Showing posts with label Digital Stamps. Show all posts

Sunday, November 28, 2021

Christmas Sled - Rachelle Anne Miller

A new card today for Rachelle Anne Miller Digital Stamps featuring one of my favourite images called Christmas Sled.


To kick this one off I first used a pale grey ink and I stamped a pretty tree image from my stash by Lesia Zgharda and available from Simon Says Stamp.  I stamped the subtle background and then used Speckled Egg Distress Oxide Ink to softly ink blend the panel creating a subtle focal point.

This panel was die cut using a deckle edge die set by Honey Bee Stamps.  The panel was backed with white craft foam and applied to an A2 card base.


I printed off the digital stamp using Copic friendly cardstock and my home printer.  I coloured the images using Copic markers, here is my colour palette:-

Skin -  E11, E21, E000
Reds - R39, R29, R24, R22, W4, W3
Greys - W7, W5, W4, W2, W1
Minty Greens - BG0000, G000, G00, W2
Bunny - T2, T1, T0

I then carefully fussy cut each component carefully and this allowed me to rearrange the elements slightly.  They were backed with foam tape and applied to the scene. 

Next, I used white acrylic paint and a stylus to dot in snow including over the characters so that it looked authentic.


Finally, I die cut the word 'noel' 5 times from white cardstock using a Hello Bluebird die.  I adhered each die cut to the next forming a nice dimensional stack which I then glued to the scene.  Underneath it I adding the season's greetings smaller sentiment using red ink to pick up the red from the characters.

A few sparkling clear sequins completed the card.

Happy crafting!


Sunday, November 21, 2021

Christmas Sled - Rachelle Anne Miller Creative Studios

 I have a new Christmas card to share with you all today.  I've used the 'Christmas Sled' digital stamp by Rachelle Anne Miller Creative Studios - please read on for all the how-to details.


For this card I first created a slimline panel 8.5 x 3.5 inches after printing the digital image on the cardstock.   I offset the cut so that I could fit in the oversized sentiment.   I then used Copic markers in E0000, E000 and E00 together with W0, W1 and W2 to create the snow-blown background..


I used the following Copic markers to colour the featured image.  Y26, YR23, YR24, YR27 and E37 together with W3, W4, W5 and W7.   Skin tones are E000, E21, E11 and E04.  Cheeks are R00, R20 and R21 and I highlighted a few points with a white gel pen.

I framed out the scene using Hello Bluebird Stamp's 'Gallery Frame #5 die, apply this die cut with foam tape behind for some nice dimension.  I also used Hello Bluebird's 'Oh What Fun' word die for the oversized sentiment.  I die cut the sentiment three times from white cardstock and once with glittering gold cardstock.  I adhered each layer together finishing with the gold on top which I ever so slightly offset to the right for a little bit of a shadow effect.  The sentiments were then glued to the scene.


Finally I used a stylus and Dr. Ph Martin's Bleed Proof White paint and dotted in the snowfall making sure that I nicked some lines so that it looks more realistic.   I used some star sequins from my stash that toned nicely but didn't compete with the background as final accents.

Hope you enjoyed the card and that you can carve out some happy crafting time soon!

Thursday, November 18, 2021

Holiday Birds - Rachelle Anne Miller Art

Rachelle Anne Miller Art has a wonderful new Christmas release and today my card features 'Holiday Birds' one of several darling new digital stamps.


I received the stamp in an email and I downloaded it to my computer and then sent it to print on my home printer which I'd loaded with a sheet of Copic friendly cardstock.   I increased the size by 10% to fit a mini slim format.  I also loaded a panel of masking paper into the printer and again printed it off.   I fussy cut that image out and layered it over the main image and then I ink blended using Chipped Sapphire and Black Soot Distress Oxide Inks.   The mask was removed.


I coloured the birds and lights with Copic markers  and a limited colour palette and highlighted points with a white gel pen.   I used acrylic paint and a stylus to dot in the snow and a white gel pen for the four point stars.


Finally I used Versamark Ink to stamp the sentiment from Hello Bluebird Stamps on to a strip of black cardstock and heat embossed in white.  This was applied with foam tape and the whole decorative panel was glued to a mini slim cardstock base.   Another Christmas card completed!

Thanks for joining me on my blog today - happy crafty time!

Nicky


Saturday, October 30, 2021

Pumpkin Patch - Rachelle Anne Miller

A new day and a new Fall themed card for Rachelle Anne Miller Digital Stamps.   This super cute digital download stamp is called Pumpkin Patch and you can make it instantly yours with a quick purchase.  The stamp image will arrive just a minute or two later in an email!


I used my home printer to print off the Pumpkin Patch image on to Copic friendly cardstock and having reduced the size by 10% and printing at 90% of original size.

I coloured the image using Copic markers.  Here is my colour palette:-

Skin - E04, E11, E21, E000
Hair, E44, E50, E51
Dress - BG72, BG75
Boots - E71, E74, E77
Pumpkins - YR21, YR38, YR14, YR09, W3, W4
Wagon - E44, E43, E42, E40
Grass - YG91, YG93, YG95, YG97
Squirrel - E000, E34, W5, W3
Blushing Cheeks - R00, R20, R21

Points were highlighted with a white gel pen.


I used a die in my stash to die cut the panel to a size just shy of A2 and that gives it the faux stitched edge.  I backed this panel with white craft foam and applied it to a panel of milk chocolate micro gingham cardstock which I was gifted by a friend.  This panel in turn was applied to a sturdy white cardstock card base.  The card is simple yet feels very substantial for having this layering.


Finally just a simple embellished finish using little wooden stars which I glued down.

Happy crafting!


Saturday, October 23, 2021

Halloween Moon - Rachelle Anne Miller Creative Studio

Hello,   I have a fun infinity shaker Halloween card for you today using the digital stamp image called Halloween Moon by Rachelle Anne Miller Creative Studio.   This is a digital stamp, so you just click and buy, it is delivered to your email address virtually immediately and you can then proceed to print the image using your home printer and immediately have some creative fun with it!


To create this card I first ink blended an A2 panel of white cardstock using Distress Oxides.  I slid this panel sideways into a stamp storage pocket for a really nice snug fit.   I popped open the end by squeezing the edges of the cardstock carefully and tipped in a variety of shaker filler contents in a blend that suited my planned colours for the entire card.  Once I was satisfied with the mix and the degree of fill, I wrapped the excess of the stamp pocket around the back of the panel and securely adhered it down using my tape runner.   I then applied that to a cardstock base.   Everything else happens on the outside of the pocket!


I printed my Halloween Moon image on Copic friendly cardstock and then trimmed down the image using some fussy cutting.  I coloured the image using my Copic markers, here's my colour palette:-

Witch Costume - W9, W7, W4, W3, V01, V12, V15
Hair - E000, E42, E43, E44, E51
Pumpkin Bag - YR82,  E93, E95
Bear - E43, E42, E41, W5, W3
Moon -  RV000, RV10, RV02
Ground - RV000, RV10, W2, W1

I then adhered the image to the top of the pocket using my tape runner again.


Finally for the giant sentiment I die cut the Boo To You Word Die from Hello Bluebird Stamps from black cardstock and applied in the same way.

Try and make an infinity shaker if you never have before.  These are by far the best and the easiest of shaker cards, the contents move about freely and don't stick to anything.

Happy crafting!


Monday, September 13, 2021

Rachelle Anne Miller Art - Halloween Cats

There's about to be a brand new release from Rachelle Anne Miller Art and I'm delighted to be giving you a sneak peek of a new digital stamp called Halloween Cats that forms part of the new release.   You can buy this and the other new stamps on September 16th.


I received the digital image in an email and sent it to print on my home printer after putting Copic friendly cardstock in the paper tray. 

I used a faux stitched rectangular die to size down the printed cardstock to just under A2.


The sweet image was coloured with Copic markers.  Here is my colour palette:-

Pumpkins - YR04, Y38, YR31, Y21, YG91, YG93
Stalks, Leaves and Ground - YG91 YG93, YG95
Large Cat - W1, W2, W3, W4, W5, W7
Small Cat - W00, W0, W1
Cheeks - R00, R20, R21
Sky - BG90, BG70, BG0000

A few points were highlighted with a white gel pen and then I popped the coloured panel in my Misti and stamped the sentiment.

I backed this panel with white craft foam to elevate it over a full sized A2 panel of charcoal coloured cardstock which nicely worked with the dark W Copic colours, making everything popped.   This panel was then attached to my sturdy cardstock card base.


To complete the card I glued down 3 wooden star embellishments from my stash and with that the card was complete.


Sunday, June 27, 2021

Rachelle Anne Miller - Kangaroo

Hi!  I have a new card today using a digital stamp illustrated by Rachelle Anne Miller called Kangaroo.  This sweet image is a joy to colour so why don't you treat yourself to the instant satisfaction of buying a digital stamp today!


When you buy a digital stamp from Rachelle Anne Miller, it is delivered to you by email within minutes.  You merely download the image and then send it to print on your home printer.   You can use whatever cardstock works for how you intend to colour the image and so for my card today I used Copic markers and therefore I placed a panel of Copic friendly cardstock into my printer.   The ink does not run when using alcohol markers in case you were wondering!


I couldn't resist colouring the Kangaroo and her sweet little Joey in her pouch first.  I used Copic markers in E0000, E40, E41 and W1 and W2 with R00 and R20 for the pink parts.

I then turned my attention to the background and I started with E41 at the bottom blending to G20, then R000, Y0000 and finally BG0000 for just a pretty wash of colour.   These colours are so pale that you can just sweep the colour on over the florals since I was going to go more vivid with those and the light colour underneath would affect nothing.

I then came back to do the florals using more colours than I could possibly list and I finished with the sweet bird delivering the flower which I coloured with B91, B41 and B12.

Points were highlighted with a white gel pen.


To finish the card I used the A2 Rectangles Frames Die-namics from MFT Stamps to die cut a simple white frame which i backed with foam tape and applied.

Finally, I formed the word 'hi' using 'Thickers' from American Crafts.   These are quite literally 'thick stickers' and there are numerous alphas and numbers to choose from and what I've used in this card is gold but behind that gold and visible from an angle it is a pale greenish blue that just went beautifully with the background.   You can buy them directly from American Crafts but also Amazon carries quite a few.

Happy crafting and hope to see you back here soon!


Thursday, June 10, 2021

Rachelle Anne Miller Digital Stamps - Hot Air Balloon

Today, the brand new Rachelle Anne Miller June release goes live and my card features one of the beautiful new digital images called  Hot Air Balloon that you might like to treat yourself to!


This is a square card with finished dimensions of 5 1/4 x 5 1/4 inches.    I created a panel of Sno-Cone cardstock by MFT Stamps to these full dimensions and adhered it to my card base.

I downloaded the digital stamp image from the email I received it in and sent it to my home printer to print on to a panel of Copic friendly cardstock.   I trimmed down this panel using my paper cutter so that it would reveal the blue border.   I am often asked if Copics make the printer ink run and my personal experience is that they don't!


I used a cloud stencil in my stash and Distress Oxide Inks in Squeezed Lemonade, Spun Sugar and Speckled Egg and created the pastel coloured sky around the hot air balloon.

I coloured the images using Copic markers and highlighted a few points with a white gel pen.


I used Versamark Ink to stamp the sentiment to a strip of cardstock and I heat embossed using Wow Embossing Powder in Metalline First Frost.   This strip was applied to the card backed with dimensional foam tape.  I loved the simplicity of this pretty scene and decided not further embellishments were required.

Love, love, LOVE this digital stamp - order yours today and receive it a minute or two later for instant satisfaction.

Happy crafting!


Sunday, May 30, 2021

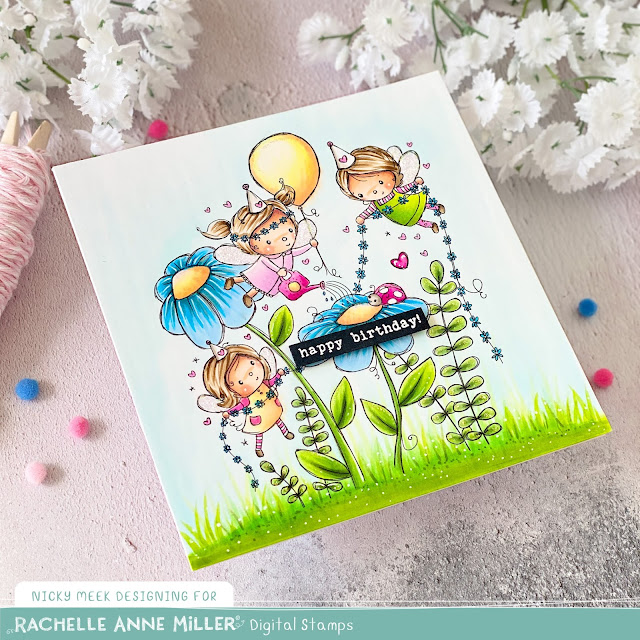
Fairy Party - Rachelle Anne Miller Digital Stamps

Hello, welcome to my blog and this new card I have today for Rachelle Anne Miller Digital Stamps.   This card features the Fairy Party digital stamp image.


Have you ever ventured into the world of digital stamps?  I know I'm pretty new to them.   Rachelle's designs are so beautiful and have the added benefit of being delivered to your email address moments after you buy the digital image.   Another plus is that you change the size of the image before sending it to print on your home printer and you can choose what type of cardstock you want to print on depending on what medium you are going to use to colour your image.

For my card today I increased the image size by 10% so it fit what was going to be a 5 x 5 inch card.  You can always do a test print first on regular printer paper before committing ... that's what I do!    I was colouring with Copics and so I inserted a panel of white Copic friendly cardstock and printed the image.    I have been asked many times if Copics make the printer ink 'run' and for me the answer is a definite no.


I coloured my image with just about every Copic colour known to mankind so I do apologise for not saving and listing them for this project.

Points were highlighted with a white gel pen and I decided for a little whimsy I'd make the ladybug's spots white instead of black.

Fairy wings were glittered up a treat using Stickles glitter and just the odd spot of glitter was added elsewhere so that this was all sparkly for a little girl's birthday.


To complete the card I trimmed the panel down to 5 x 5 inches as previously mentioned and I attached it to a card base.

I stamped the sentiment using Versamark Ink on to a little black sentiment strip and heat embossed using superfine white embossing powder.   This was applied to the card using a little foam tape, I like how the black works with the cheerful colours.

Thank you for stopping by today and I do hope you give digital stamps a try if you haven't already.

Happy crafting!


Monday, May 10, 2021

Rachelle Anne Miller Designs - Hanging Stars

Hello, welcome to my blog today where I'm sneaking a peek at one of the new stamp designs coming your way from Rachelle Anne Miller Designs.   This adorable digital image is called Hanging Stars and you will be able to buy this on May 13th which is officially release day!


To create this card I placed a full size panel of Copic friendly cardstock in my home printer.  I opened the PNG digital image and I sent it to print after I increased the image size by 10% to suit my needs.


I coloured the image with Copic markers and I glittered the two largest stars and one of the smaller stars using Stickles.   A few points were highlighted with a white gel pen.

The image was cut down to A2 size leaving space at the bottom for the sentiment which is from Mama Elephant.


To finish up the card I die cut a simple stitched frame from my stash and backed it with foam tape before applying to the decorative panel.   This was then applied to my white cardstock base!  Card complete!

 
Thank you for visiting with me today, happy crafting!


Monday, April 19, 2021

Raindrops - Rachelle Anne Miller Digital Stamps

Hello!  A new card for Rachelle Anne Miller today featuring the very adorable digital image called 'Raindrops'.


To create this card I started with the background panel which I ink blended with Distress Oxide Inks in Tumbled Glass and Peacock Feathers for a seamless fade.   I splattered this with water and blotted it up immediately to distress it.  I die cut the panel to give it the wonky stitched edge look.


On Copic friendly cardstock I used my home printer to print the digital image I received to my email.  I coloured the image with Copic markers and fussy cut the image carefully.  I flipped the image over and on a rubber mat I made circular motions with a blunt tool in the centre of the main areas, which rounds the images for a lovely 3D affect.   The image was backed with foam tape and applied.


To finish the card I stamped the sentiment which is by Hello Bluebird Stamps, I highlighted a few points with a white gel pen and I adhered the fussy cut raindrops.  The decorative panel was applied to a 110lb white cover weight cardstock base.

Happy crafting!


Tuesday, April 6, 2021

Birthday Mouse - Rachelle Anne Miller Digital Stamps

Hello friends, thank you for coming by the blog today to see more of this new card for Rachelle Anne Miller.     This card is made with the new image called Birthday Mouse.


To create this card I printed off the digital image using my home printer on to Copic friendly cardstock.   I printed the image a second time on to a sheet of masking paper.   I fussy cut the image printed on masking paper so that I could cover the cake and mouse and balloons.  I ink blended the panel softly using Distress Oxide Inks in Speckled Egg and Worn Lipstick and then the masks were removed and discarded.  This panel was die cut to give it the faux stitched edge.


I used Copic markers to colour this beautiful image ... what is not to love about that beautiful face?  Points were highlighted with a white gel pen and I also dotted in some white gel around the image.

The finished panel was backed with white craft foam which in turn was adhered to a die cut scalloped edge panel of micro gingham cardstock that was then glued to a pink panel.


To complete the card I adhered some micro gold star flat embellishments and mounted the panel to a sturdy 110lb white cover weight cardstock card base.

Happy crafting!


Friday, March 19, 2021

Lamb Cuddle - Rachelle Anne Miller

A new digital stamp card today for Rachelle Anne Miller Digital Stamps and this card uses the sweetest image called 'Lamb Cuddle' for a sweet Easter card.


I received the digital stamp image to my inbox and printed at 90% of size using my home printer and Copic friendly cardstock.


I used a wide array of Copic markers to colour this scene and it was so much fun!

I used a die from my stash by Studio Katia to size down to an A2 panel and giving it the subtle pierced edge.

I got the sentiments and sentiment strips/speech bubble from Hello Bluebird Stamps and stamped those and applied with foam tape for some subtle dimension.


The final touch was to add a few sparkling clear sequins for a subtle twinkle of interest.

Happy crafting!


Monday, March 8, 2021

Easter Bunny Girl - Rachelle Anne Miller

Today I have a new card for Rachelle Anne Miller Digital Stamps using the stamp called Easter Bunny Girl.


I received the stamp image to my email and downloaded it to my computer and then for my card I decided to reduce the stamp image down to 90% and then printed it on to Copic friendly cardstock.


I coloured my image with Copic markers and stamped my sentiment from Hello Bluebird Stamps and then trimmed down the piece of cardstock.

I adhered the feature panel to a slightly larger panel of kraft cardstock and then used the Gallery Frame #3 die by Hello Bluebird to frame out the scene, this was backed with foam tape for some nice dimension.


To finish the card I kept it simple and adhered some sparkling clear sequin accents.

Such a sweet image and an absolute pleasure to colour.  Treat yourself to a Rachelle Anne Miller digital stamp today and enjoy the instant gratification of having it instantly delivered to your inbox ready to use.

Happy crafting!


Saturday, February 13, 2021

Girl Whale - Rachelle Anne Miller Creative Studios

I'm back today with TWO very different cards for Rachelle Anne Miller Creative Studios - these cards were created with Rachelle's beautiful digital stamps and today's image is called Girl Whale.  Purchase the image, it arrives by email shortly afterwards, print it off on your home printer on the cardstock of your choice and get creating!   My first card embraces my favoured pastels.


As I said above I printed the image provided to me on Copic friendly cardstock.   I carefully selected some soft pastel Copic markers to colour the image but went with a strong pop of orange for the girl's dress so that she stood out.


To finish out the card I first die cut a white frame and then a smaller toning aqua frame which I layered on top.  The whole frame was backed with foam tape and applied to the feature panel.   The panel was glued to a sturdy cardstock card base.  I added a little glitter to the stars and stamped the sentiment and a few sparkling clear sequins completed the scene.


My second card goes deep!   I printed the image and printed it again on masking paper.  I fussy cut the masking paper image so that I could ink blend above and below the horizon, working to create a bright focal point.  I then removed the mask and Copic coloured the main image and highlighted a few points with a white gel pen.


I stamped the sentiment from Mama Elephant Wish Upon A Star stamp set with Versamark Ink and heat embossed in white.  I framed out the scene with a skinny black die cut frame popped up on foam tape and then added the 4 point stars with more of the white gel pen and a a few 4 point star holographic embellishments so that this one really glinted when it was handled .... and it does!  The decorative panel was glued to a black cardstock base for the drama and when I used darker cardstock bases I always include a nice quality white insert panel inside which I trim to be a little smaller than the A2 size.

Thank you for coming by today, I hope you treat yourself to some digis by Rachelle - happy crafting!


Tuesday, February 2, 2021

Little Fairy - Rachelle Anne Miller Creative Studio

I'm back with a new card for Rachelle Anne Miller Creative Studios which means this is a digital stamp image which also means instant gratification!!    My card today uses the sweet 'Little Fairy' image.


To create this card which required no masking, I merely sent the digital image to my printer where I'd placed a sheet of Copic friendly cardstock.  For this one I didn't need to change the scale or anything.

I used Copic markers to colour the sweet scene.  I then used a white gel pen to highlight some points and to dot in some interest throughout the design.


I die cut the panel to give it a faux stitched edge and backed it with white craft foam and adhered it to a full size A2 panel which in turn was adhered to a white cardstock card base.

The sentiments are by Hello Bluebird Stamps.


To finish the card I used some water droplet style embellishments from my stash and adhered them into position with Ranger Multi Medium Matte because it dries totally clear and is very strong.

Such a fun card to colour, I hope you consider Rachelle's beautiful designs ... no waiting time!

Happy crafting!


Saturday, January 9, 2021

Animal Parade - Rachelle Anne Miller Designs

Hello!   This month I am starting to design for Rachelle Anne Miller Digital Stamps.    Going forwards, I will be designing two cards a month for this talented illustrator.   Rachelle's sweet illustrations have captured my heart and the bonus here is that since they are digital you get immediate satisfaction from your purchase.  I'll tell you how I do it with this card using the Animal Parade digital stamp image.


Select and purchase your digital stamps from the website and print them onto the correct cardstock which for me was Copic friendly cardstock.   If you want to mask your image, print it a second time on to masking paper.   I use full sized sheets from Simon Says Stamp.   Before you print you can select to scale your image by shrinking or increasing the image you have bought.   Just make sure that you print your masking paper copy the same scale as the primary copy so that they match.


For this card didn't choose to mask so I simply printed it off once and then I trimmed down the piece of cardstock to a slimline panel.   I coloured my image using Copic markers and then used a pale pink shade and 'brushed' on a little background colour and I used a grey shade to add a little more texture to the ground.

Points were highlighted with a white gel pen including the prickles on the hedgehog that I then used a black pen to add more depth.

To finish up I stamped the sentiments which are from Hello Bluebird Stamps and I used a cloud die in my stash and die cut two clouds and these were applied with foam tape for some dimension.


A few little heart embellishments were glued in position and I framed out the scene using two die cuts from the Gallery Frame #5 die.   The first die cut was adhered directly and the second was applied with foam tape.

Thanks for stopping by - I'll be back later in the month with a new design for Rachelle Anne Miller Creative Studio.