Showing posts with label Slimline. Show all posts

Friday, November 22, 2024

Sunny Studio Stamps - Snowmen In Sweaters


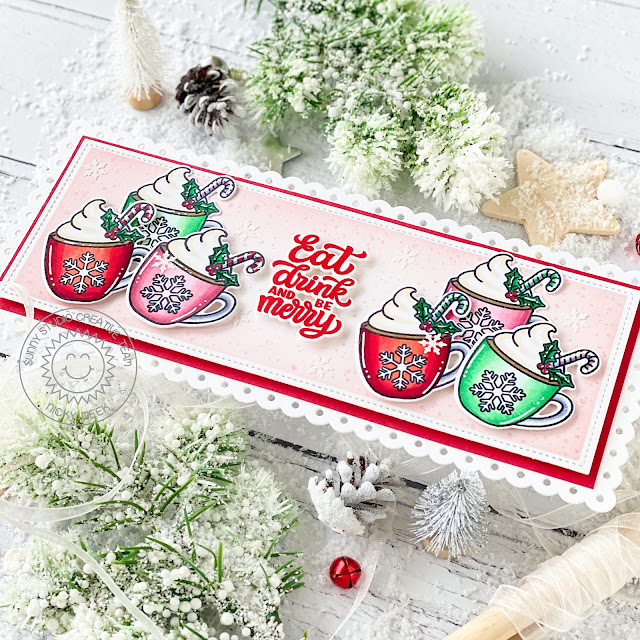
I'm going to be over on the Sunny Studio Stamps blog with all the details on this sweet slimline card featuring the adorable Snowmen In Sweaters stamp set.  Please use THIS LINK to go directly to the blog.  Thank you!


Friday, November 1, 2024

Sunny Studio Stamps - Merry Mocha


You can find me on the Sunny Studio Stamps blog today where I'm showcasing their Merry Mocha stamp set in this slimline holiday card.  Please use THIS LINK to get to the blog.  Thank you!


Friday, September 13, 2024

Sunny Studio Stamps - Halloween Card


Hey there, thanks for stopping by my blog today but I'm actually over on the Sunny Studio Blog today with everything you need to know about how I made this Halloween themed card.  Use this link to go straight to their blog and read allll about it! Thanks and have a lovely day!


Tuesday, July 30, 2024

My Favorite Things - July Release Day!!


It's time to shop the July Release by MFT Stamps which is now LIVE!!!  Perhaps you'll pick up this new stamp set illustrated by the incredible Stacey Yacula.   Here are links to what I've used to make this card:-


I prepared a slimline panel of sturdy white cardstock with finished dimensions of 8 1/4" x 3 1/4".  I ink blended using Bundled Sage and Speckled Egg Distress Oxide Inks and I stamped the sentiment in the corner using MFT's Eiffel Tower Ink.  I backed this panel with white craft foam and applied it to a full size white slimline card base with dimensions of 8 1/2" x 3 1/2".


Using the same Eiffel Tower Ink I stamped the images from Special Delivery and I coloured the images using the following Copic marker combinations.

Turtle - YG97, YG95, YG93, YG91, E44, E43, E42
Fox - E39, E17, E15, E13, C3, C1, C0
Black Bear - T9, T6, T5, T4, T3, R000, C0, E31, E41
Mouse - C3, C1, C0
Bunny Mailman - E44, E31, E41, C3, C1, C0
Birdie Mailman - E44, E43, E42
Blushes - R22, R21, R20, R00
Cap - B99, B39, B37, B97
Mailbag - E77, E74, E71
Brighter Blue - B29, B26 B24
Red - R59, R39, R29, R27, R24
Yellow - Y19, Y15, Y13
Khaki - YG97, YG95, YG93, YG91


I used the coordinating die-namics to die cut the images which were then backed with foam tape and applied to the ink blended background.  I used a white gel pen to highlight points on the images and I placed a few sparkling clear sequins around the scene for a little celebratory sparkle.

Happy shopping everyone!

Thank you for stopping by my blog today and don't forget to visit and subscribe to the MFT You Tube Channel for endless how-to videos, inspiration and product reveals.


Monday, July 29, 2024

My Favorite Things - July Release Countdown Day 1 (Card 1 of 2)


I have two cards today on my blog that feature some of the new Jenoblade illustrated stamp sets from tomorrow's release from MFT Stamps.  My second card today will be up at 12 noon Eastern.  Here's what I used to make this card:-


I created a panel measuring 3 1/4" x 8 1/4" and I stamped the sentiment in the top right corner.  I then ink blended 4 delicate pastel focal points using Mowed Lawn Kitsch Flamingo, Squeezed Lemonade and Shaded Lilac Distress Oxide Inks.  I backed this panel with white craft foam and applied it to a slimline panel with dimensions of 3 1/2" x 8 1/2" and set it to one side.


Using Memento Ink in Black Tuxedo, I stamped the images from Super Rad Skaters.  I coloured the images using Copic markers in the following combinations:-

Fox - E37, E15, E13, C3, C1, C0
Bunnies - E44, E31, E41
Blushes - R22, R21, R20, R00
Green - G16, YG45, YG41, C3, C1
Pink - RV63, RV52, C3, C1
Yellow - Y19, Y15, Y13, C3, C1
Purple - BV13, BV02, BV01, C3, C1
Brick Wall - E31, E41
Ramp - W4, W3, W1, B91


I backed each element with dimensional foam tape and applied them to the ink blended background and to finish it off simply, I highlighted a few points with a white gel pen and dotted in interested to the trees.

I hope you enjoyed my inspiration card, come back later to see my second if you can!

Thank you for stopping by my blog today and don't forget to visit and subscribe to the MFT You Tube Channel for endless how-to videos, inspiration and product reveals.


Tuesday, June 25, 2024

My Favorite Things - Jenoblade Release Day


It's always a good day when there are new Jenoblade stamps to buy from MFT!  Today is that day this month, the release is live and so shop 'til you drop!  Here's what I've used to make this sweet slimline card:-


I created a slimline card base and applied a panel of Chantilly Cream cardstock sized a quarter of an inch smaller.  I then prepared a white panel 1/4 inch smaller than the cream panel and ink blended it and then splattered with water and blotted it up.  I popped it in my Misti and stamped the sentiment and then glued it to the cream panel.


I stamped the images from Pandastic.  Those adorable bears don't need to much colouring but I used Copic markers in C3, C1, E41 and C00 to shade their white parts and R22, R21, R20, R00 to blush their cheeks. The bamboo was coloured with G16, YG13 and FYG1.  I die cut using the coordinating die-namics.


I wanted to keep this card simple and fun so I didn't embellish other than to highlight points with a white gel pen.  I decided on a layout for my die-cut images and I backed them with either a single or double layer of white craft foam and adhered in position on the background.

Thank you for stopping by my blog today and don't forget to visit and subscribe to the MFT You Tube Channel for endless how-to videos, inspiration and product reveals.


Sunday, May 26, 2024

My Favorite Things - May Release Countdown Day 2


Today I'm revealing the latest Stacey Yacula stamp set which forms part of the new release from MFT Stamps which you can buy on Tuesday May 28th at 10am Eastern.  Here's what I used to make this slimline card:-


I took a slimline panel of Poppin' Pink cardstock from MFT's cardstock line-up.  I then ink blended using Chipped Sapphire and Black Soot Distress Oxide Inks using some areas of pink to create a sky not dissimilar to some of the recent Aurora Borealis many people got to experience.  I also created some 'grass' using the Grassy Edges Die-namics in exactly the same way starting with the coloured cardstock.  I applied one piece of grass with glue to the main panel and the second section of grass I popped up on foam tape to get some dimension going.


I stamped some of the star images and the sentiment with Versamark Ink and I heat embossed in white.  I used a white gel pen to dot in more distant stars then I set this panel to one side.

I stamped the images from Twinkle Twinkle using Eiffel Tower Ink by MFT.  I coloured the bears using Copic markers in E44, E43, E42, E41, W00.  I blushed their cheeks with R22, R21, R20, R00.  I added a little BG000 to the jar of stars and C1 to the lid.  I highlighted with a white gel pen and used a black Glaze pen to define their noses.


I backed the images with dimensional foam tape and adhered them in position.

To finish, I grabbed my Ranger Stickles in 'Diamond' and I applied it to the entire surface of the large roped star and to the stars in the jar and to the inside of the open star images in the night sky.  Card done!

Thank you for stopping by my blog today and don't forget to visit and subscribe to the MFT You Tube Channel for endless how-to videos, inspiration and product reveals.


Sunday, February 25, 2024

My Favorite Things - February Release Countdown Day Two


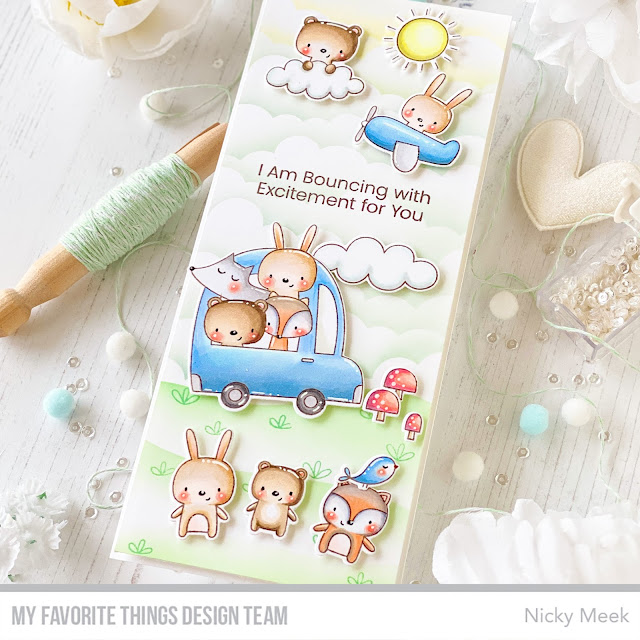
Welcome to countdown Day 2 for the February 27th new release from My Favorite Things.  I have a baby card to share with you today and here are the products that I used to make this card:-


I created a slimline panel of white cardstock and ink blended softly with Shaded Lilac and Spun Sugar Distress Oxide Inks.  I splattered the background with Perfect Pearls loosened with a drop of water and adhered this panel to my card base.

I created to white grassy edges for the bottom of the card.  I stamped blooms from the stamp set and then adhered them to the card's background, the top layer was applied with foam tape.


The images from the new stamp set were stamped with Memento Ink in Rich Cocoa and I coloured with the following Copic marker combinations:-

BABY balloons - C3, C1, C0, C00, RV000, BV00
Clouds - C3, C1, C00, RV000
Bunnies - E31, W4l, W3, W1, W00, C3, C1, C00
Blushes - R22, R21, R00
Flowers in the Grass - RV00, BV000, BV0000

Images were die cut and applied with foam tape.


I highlighted the images with a white gel pen then stamped the sentiment on a strip and applied with foam tape and lastly I added clear sequins as pretty accents.

Thank you for stopping by my blog today and don't forget to visit and subscribe to the MFT You Tube Channel for endless how-to videos, inspiration and product reveals.


Tuesday, December 19, 2023

My Favorite Things - December Release Day!


You can now start to shop the brand new release by MFT Stamps!  Perhaps you'll treat yourself to one or more of the new Jenoblade illustrated stamp sets, I can never resist playing with them.  Here's what i've used:-

Slimline Drifts & Hills Stencil

To create this slimline card I first prepared a panel of kraft cardstock measuring 8 1/2 inches x 3 1/2 inches and adhered it to a card base.  I then took a slightly smaller panel of white cardstock and I used the stencil and a rainbow of MFT's inks to create the background.


I used Memento Ink in Rich Cocoa to stamp the images from Right On Track and I coloured with the following Copic markers:-

Records - T6, T5, T4, T3, T2
Record Sleeves - C3, C1, C0, C00
Raccoon - T6, T5, T4, T3, T2, T0
Fox - E37, E17, E15, E13
Puppy - E42, E31, E41, E40
Kitten - YR24, Y26, E21, YR20, YR30
Blushes - RV55, RV02, RV10

I die cut and adhered the images either directly with glue or popped up on foam tape and highlighted a few points on the images using a white gel pen.

To finish I added the music notes and stamped the sentiment in the corner.


Thank you for stopping by my blog today and don't forget to visit and subscribe to the MFT You Tube Channel for endless how-to videos, inspiration and product reveals.


Friday, November 24, 2023

Friday, September 29, 2023

Hello Bluebird Stamps - Fall/Halloween New Release Day!


Set your alarm(s) for 7pm MST this evening to get your hands on Hello Bluebird's brand new Fall/Halloween release.  Orders are shipped strictly in the order received and with Halloween not too far off you'll want to be at the front of the line because the owners can get quickly overwhelmed with orders.  It can take a few days to clear orders just from the first night!  Don't say I didn't warn you lol!!

Here's what I've used in the making of this card:-

Sabrina
Sabrina Die

I prepped a slimline panel of white cardstock and I ink blended a 'dirty pink' sky using Spun Sugar, Victorian Velvet and Black Soot Distress Oxide Inks.  I smudged some Black Soot across the die cut moon from the Full Moon Scene Die to give the illusion of drifting clouds then adhered the moon in the middle of the lightest of the pink shade so that now we have a lovely glow affect.

Next I die cut black cardstock using the Tall Trees Die and glued this down over the moonlit background.


I stamped one of the two Sabrina's included in the stamp set and coloured her and the other elements with the following Copic marker combinations:-

Skin - E34, E33, E11, E21, E00, R21, R00
Hair - E40, E51, E44, R81
Clothing - T6, T4, T3, RV95, RV93
Cat - T6, T4
Bats - T6, T4, RV93
Pumpkins - YR09, YR07, YR04, R81, T6, T4, YG91

All images were die cut and applied to the scene with foam tape.  Points were highlighted throughout the scene with a white gel pen included dots for stars in the sky and a few more dots in the sky were added with a metallic gel pen.


I finished my card by adding 3 reflective silver cardstock stars and by stamping the sentiment with Versamark Ink and heat embossing in white on a black strip and attaching with foam tape.

Please visit the Hello Bluebird Blog today to see the new products being revealed and enjoy inspirational projects from my fellow Design Team members.  Leave a comment there before you navigate away and you'll be entered to win one of TWO $50 gift certificates to the Hello Bluebird shop.  Winners will be announced a couple of hours before the release goes live.  Good luck and happy shopping!


Saturday, August 5, 2023

Hello Bluebird Stamps - Vegetable Garden


Please use THIS LINK to join me on the Hello Bluebird Stamps blog today where I have all the details for this card featuring 'Vegetable Garden' from the July release.  Thank you!


Saturday, July 22, 2023

Hello Bluebird Stamps - Jungle King


Hi!  This is my latest card for Hello Bluebird Stamps and you can find a full blogpost for this project over on the Hello Bluebird Stamps Blog.  Please just click THIS LINK to go directly to the post!

Thank you!


Monday, May 8, 2023

My Favorite Things - May Release - Countdown Day 1


It's the last day of the May Countdown to tomorrow's new release from MFT Stamps.  You can purchase the new release at 10am Eastern.  Here's what I've used to make this new card:-

Drifts & Hills Stencil
Mini Cloud Edges Stencil

I used the two stencils to create a soft blended background that sets the stage for this darling stamp set.  In the grass area I stamped the little tufts of grass to add interest.   This panel was backed with white craft foam and applied to a slimline panel and then to the card base.


I stamped the images I'd been needing from this lovely large stamp set and I coloured with Copic markers in the following combinations:-

Blue - B32, B41, B91, B000
Toadstools - RV13, R21, R20, R00, E42
Bunnies - E31, E41, E40, E0000
Bears - E44, E43, E42, E41
Fox - E95, YR82, T3, T2, T1, C3, C1, C0, C00
Wolf - T2, T1, T0, C00
Sun - Y02, Y00, Y000, T2, T1, T0
Clouds - BG90, T1, T0

Points were highlighted with a white gel pen then I die cut the images and applied them to the scene using dimensional foam tape.  I popped the card in my Misti and stamped the sentiment twice over for a nice crisp image.


Thank you for stopping by my blog today and don't forget to visit and subscribe to the MFT You Tube Channel for endless how-to videos, inspiration and product reveals.