Showing posts with label Rachelle Anne Miller. Show all posts

Sunday, August 31, 2025

Simon Says Stamp - STAMPtember Kicks Off TODAY!!!


Thanks for joining me today as the fun kicks off at Simon Says Stamp with the first day of 'STAMPtember'.  I have several cards to share with you over the coming days but here are the details for this my first one.  To create this card I have used:-

Wild Birthday (illustrated my Rachelle Anne Miller)
Boho Flowers Embossing Folder
A2 Scalloped Rectangles 8021sd

I took a panel of pretty pink cardstock, lightly spritzed it with water and then ran it through my Big Shot using the Boho Flowers Embossing Folder.  I sized the panel down a little and adhered it to my white card base.


I die cut two scalloped edges panels from heavyweight vellum and another from white cardstock using the A2 Scalloped Rectangles die.  I ink blended a purple and pink focal point and distressed it just a little and then adhered them together then to the pink embossed background panel.

I stamped the giraffe from the new 'Wild Birthday' stamp set using Memento Ink in Rich Cocoa.  Wild Birthday is a large stamp set which includes several other illustrations, so make sure you check them all out.  I coloured the image with Copic markers and added a little glitter to the party hat and ball, I backed the image with dimensional foam tape and adhered it to the ink blended area.


To complete the card I chose one of the sentiments included in the stamp set, stamped in the same Rich Cocoa ink and then applied the strip with more foam tape.

A few twinkling sentiments completed the design.

I'll be back tomorrow with something new!  Happy shopping friends.


Saturday, August 19, 2023

MFT Stamps August Release Spotlight


It's the final day for spotlighting the August release by MFT Stamps which is available for purchase.  I have a sweet Halloween card for you today using stamps illustrated by Rachelle Anne Miller, so please read on for all the details.  Products used:-

A2 Stitched Rectangles Set 1 Stax Die-namics
Sweet Summer Color Blends Paper Pad

I selected a sheet of patterned cardstock from the Spooky Season paper pad and die cut it using the Stax die-namics and adhered it to a white A2 panel then to my card base.  I used a small die from the Stax set to create the pinky/purple panel and I stamped the sentiment in the corner, backed it with white craft foam and glued it to the patterned base.


I stamped the images using Memento Ink in Rich Cocoa and coloured with the following markers.

Skin - E33, E21, E00
Blushes - R22, R21, R20
Child (left) - V12, V01, V000, W3, W2, W0
Child (centre) - YR02, YR01, E01, W3, W2, W0, E43
Child (right) - Y21, E51, E50, G12, G20, Y0000, C1, C0

I highlighted with a white gel pen and die cut with the coordinating die-namics and then applied with dimensional foam tape.  Card complete!


Thank you for stopping by my blog today and don't forget to visit and subscribe to the MFT You Tube Channel for endless how-to videos, inspiration and product reveals.


Monday, April 10, 2023

My Favorite Things - April Countdown Day 1


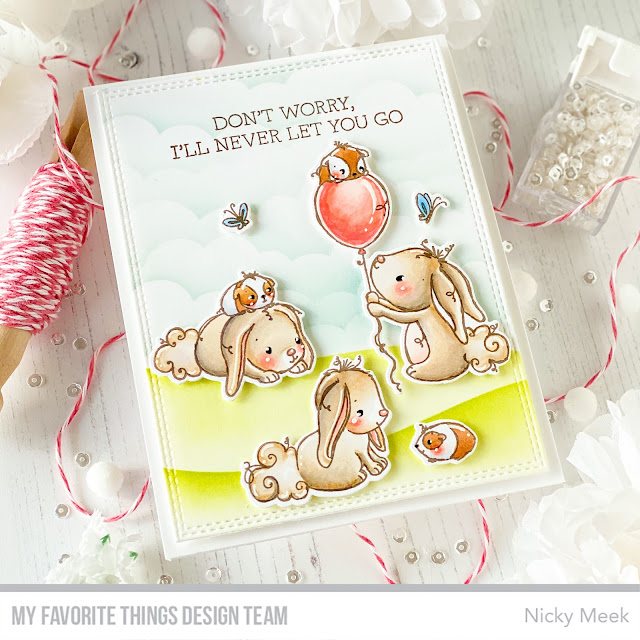
It's Countdown Day 1 to tomorrow's new release from MFT Stamps and my card today features the new Best Buds stamp set illustrated by Rachelle Anne Miller.   Here's what I've used:-

A2 Double Stitched Rectangles Die-namics
Drifts & Hills Stencil
Mini Cloud Edges Stencil

I started by using the two stencils to create sky and grass for a soft background.  I used the Rectangles Die-namics to scale down the panel which I backed with white craft foam and applied to an A2 panel.

I popped the panel in my Misti and stamped the sentiment.


I stamped and coloured the images from Best Buds, here are the Copic colours used:-

Bunnies - E31, E42, E41, E40, T2, T1, T0
Balloons & Blushes - R22, R21, R20, R00
Guinea Pigs - E35, E33, C1, C0
Butterflies - B12

Points were highlighted with a white gel pen and then I die cut with the coordinating die-namics and then applied to the scene with dimensional foam tape.


Thank you for stopping by my blog today and don't forget to visit and subscribe to the MFT You Tube Channel for endless how-to videos, inspiration and product reveals.


Monday, January 16, 2023

My Favorite Things - January Release Countdown Day 1


Just 24 hours to go until tomorrow's January release from MFT Stamps, available at 10am Eastern!   Please read on for all the details for today's card featuring the latest stamp set by Rachelle Anne Miller.

Here's what I've used:-


I stamped the '10' image and coloured it with the following Copic markers:-

Grass - YG06, YG03, YG01, YG0000
Sky - B00, BG000, BG0000
10 - RV04, RV02, RV10, C3, C1
Bees - Y19, Y13, B00, W5, W4, W2

I highlighted with a white gel pen then centred the largest die from the Wonky Stitched Set over the image and die-cut.


I stamped the sentiment on an Itty Bitty Strip and applied with foam tape - the only dimension on this card.  I then set about creating panels from prestige cardstock by MFT and the patterned paper from the pad listed above, finally glueing each layer to the next and lastly to a 5 1/2 inch square panel for the finished card.

For a subtle finishing touch I used Stickles glitter on the bee's wings and with that the card was complete!


Thank you for stopping by my blog today and don't forget to visit and subscribe to the MFT You Tube Channel for endless how-to videos, inspiration and product reveals.


Tuesday, November 8, 2022

My Favorite Things - November Release Day - MFT & Friends


The November release from My Favorite Things is now available for purchase!   Read on for all the details of my frosty card celebrating the new release.  Here are the products used in the making of this project.

From the new release:-


Previously released items:-

Oval Shadow Die-namics
Cool Christmas Greetings

To kick things off I created an A2 white panel of cardstock and an A2 vellum panel too.  I adhered the vellum to the white to form my base.  Over this and applied with white craft foam behind it was an kraft panel of cardstock that I created using the Torn Paper Edges Die-namics, stamped with the background stamp and heat embossed in white and then I came in with white pigment ink and I made it look cool and frosty by blending from the edges into the centre which I mostly left unblended for a focal point.


Beary Special is such a sweet stamp set illustrated by Rachelle Anne Miller.  I stamped the images in Memento Ink in Rich Cocoa and coloured the images with the following Copic markers:-

Bears - C5, C3, C1, C0, C00, E0000, E50
Scarf & Hat - B12, B41, T5, T3
Blushes - RV42, R11, R000

I die cut the images and adhered them to 'Oval Shadows' die cuts that I'd added a little B41 and BG70 to ice those a little, I backed with foam tape and applied.

To finish this up I created a stacked snowflake using the die-namics, using white and silver glitter cardstock and finishing with a clear jewel in the centre and applied with foam tape and I stamped the sentiment from Cool Christmas Greetings using Lazy Day ink by MFT and adhered the strip with more foam tape.


Happy shopping!


Thank you for stopping by my blog today and don't forget to visit and subscribe to the MFT You Tube Channel for endless how-to videos, inspiration and product reveals.


Thursday, October 20, 2022

My Favorite Things - October Slimline Challenge


Hello!   Are you ready for a brand new Slimline Challenge at MFT Stamps?  Christmas is such a special time for so many of us, and Christmas cards are a time-honoured tradition for recognising the season and extending heartfelt wishes for a joyous holiday to our friends and family. For this month’s Slimline Challenge, the assignment is simple. We want to see your best slimline Christmas cards!

Here are the products used in my inspiration project:-


To create my card I first created a mini slimline panel and I used pale gray ink to stamp in the subtle little trees in the distance then I ink blended using Distress Ink in Speckled Egg leaving a soft white focal point in the centre.


I stamped the images from Snow Sweet and coloured the images with the following Copic marker combinations:-

Bunny - W3, W1, W00
Girl Skin - E04, E11, E21, E00
Girl Hair - E51, E42, E44
Red - E39, E29, E27, T5, T3, T1
White - C5, C3, C1, C00
Black - T6, T5, T4, T2
Snowman's Body - C5, C3, C1, C00, R000, R0000
Blushes - RV14, RV42, R11, R000

All images were die cut and adhered with foam tape with the exception of the large tree which I 'frosted' by dabbing on some Snow-Tex by DecoArt and then added some stickles glitter on top of the snow and I glued this directly to the background.

I then carefully stamped in the bird's footprints and the seed they are feeding on.

After photographing this project I actually added a tiny amount of Stickles Glitter to the background trees so that it was even more dazzling when handled.

Finally the sentiment was stamped with Versamark Ink and heat embossed in white.  This too was applied with foam tape.

Best of luck with your submissions!


Thank you for stopping by my blog today and don't forget to visit and subscribe to the MFT You Tube Channel for endless how-to videos, inspiration and product reveals.


Tuesday, October 11, 2022

My Favorite Things - October Release Day/MFT & Friends


The MFT Stamps October release is now available for purchase!   Perhaps you'll be buying this Rachelle Anne Miller illustrated stamp set?

Products used:-


I used the two largest circles from the Stax Die-namics set to create an opening in each of two square panels.   The one with the smaller opening I ink blended around the circle with Speckled Egg Distress Oxide Ink.   I backed the white panel with foam tape and stuck it to the blended panel which in turn was glued to another panel that had a Speckled Egg ombré affect blended on it.   Everything was then applied to a panel of patterned cardstock and glued to the card base.


I stamped the Cute & Cuddly Christmas image and coloured it with the following Copic markers:-

Koala - W5, W4, W3, W2, W1
Red - R89, R39, R29
White - C3, C1, C00
Tree - E87, E44, E43
Blushes - RV14, RV42, R11

The image was die cut and applied with foam tape and I highlighted with a white gel pen.

To complete the card I used Snow-Tex to dab on some snow and a little white stickles glitter on top of that and I applied 3 sparkling clear sequins.   The sentiment was stamped and directly applied and with that the card was complete.


Enjoy your online shopping!  Thank you for stopping by my blog today and don't forget to visit and subscribe to the MFT You Tube Channel for endless how-to videos, inspiration and product reveals.


Saturday, September 24, 2022

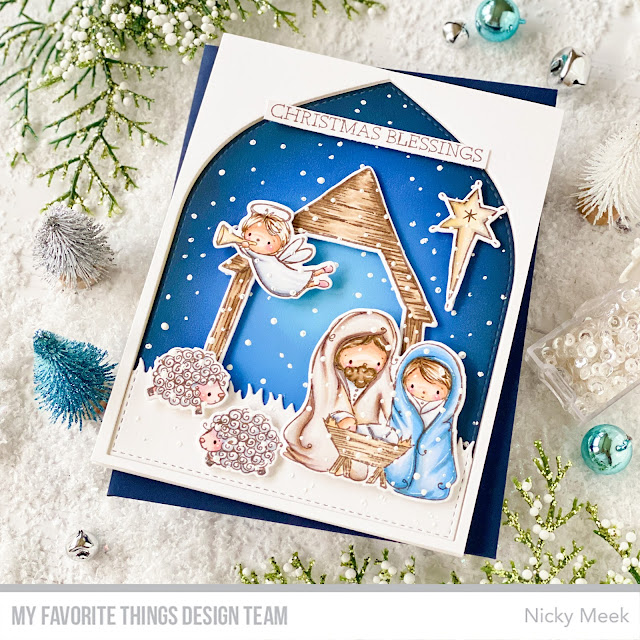
My Favorite Things - Christmas Blessings


Welcome to my blog where I'm sharing this new card for MFT Stamps that features the new Christmas Blessings stamp set illustrated by Rachelle Anne Miller.  Here are the products used:-


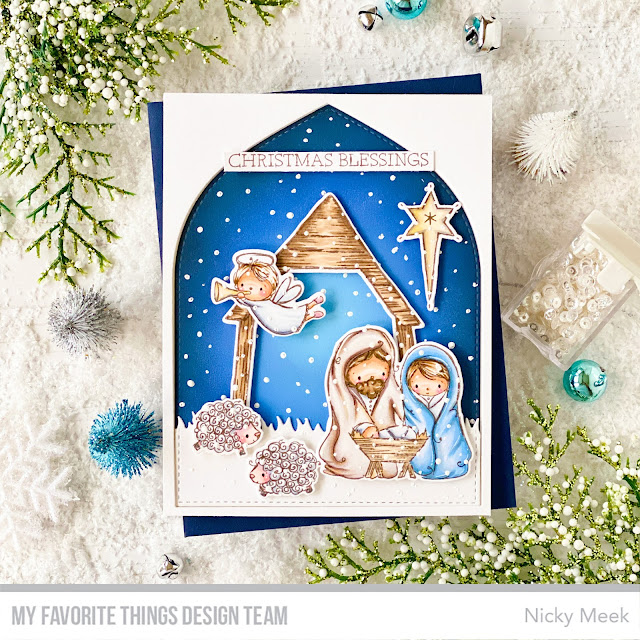
I created a white A2 panel of cardstock and used the Elegant die-namics in the largest size to die cut the opening.  I ink blended the negative cut and used acrylic ink and a stylus to dot in some falling snow.  I backed the outer cut with dimensional tape and adhered it to a panel and then glued the blended focal point panel through the opening so that it is recessed.   I again used the same size of the Elegant die together with the Grassy Terrain Die-namics to create the snowy grass strip which I applied with foam tape and also dotted with snow.


I stamped and coloured the images from Christmas blessings - here are the Copic colours used:-

Mary - B24, B32, B41, B91, W3, W1
Joseph - E77, E74, E71, E70, E40
Baby Jesus - C3, C1, C00
Manger - E43, E42, E41
Skin - E55, E11, E21, E00
Stable - E44, E43 E42
Star - Y21, YR20, E000, W2, W0
Angel - C3, C1, C00,  BG70
Blushes - RV42, R30, R000

Points were highlighted with a white gel pen and then all images die cut and applied with foam tape.

I stamped and applied the sentiment with foam tape and finished up by adding additional snow over the images to make it look realistic.  Make sure when you apply snow over images that you nick the lines of the images because that will give you the most realistic appearance.


Thank you for stopping by my blog today and don't forget to visit and subscribe to the MFT You Tube Channel for endless how-to videos, inspiration and product reveals.


Sunday, July 24, 2022

My Favorite Things - Number Fun 4


Welcome to my blog and a new card for MFT Stamps.   I'm continuing to enjoy working with the Rachelle Anne Miller illustrated series of birthday number stamps being issued one each release and now we've reached Number Fun 4.

Products Used:-


I die cut a white panel of Copic friendly cardstock using Wonky Stitched Square Stax Die-namics.  I stamped the main image and the sentiment I chose on this panel and then adhered it to a slightly larger square of pink patterned paper chosen from the paper pad.


I coloured the image using the following Copic marker combinations:-

The number 4 - RV21, RV10, RV00, W2, W1
Ducks - E02, Y02, W2, W1, YR07, YR04, Y38
Puddle - BG13, BG34, BG11, BG000

I also used BG0000 and BG70 to make a little 'haze' around the scene to better define it.

I highlighted with a white gel pen and then backed this panel with white craft foam and applied it to a larger white square panel which in turn was adhered to my card base for a card with a finished size of 5 1/4 inch square.   The focal image may be small but by adding various mats you can really make a substantial card which is fun.


Thank you for stopping by my blog today and don't forget to visit and subscribe to the MFT You Tube Channel for endless how-to videos, inspiration and product reveals.


Saturday, June 25, 2022

My Favorite Things - Oceans of Love

I'm back with a new project for MFT Stamps and this time I'm featuring the new Oceans Of Love stamp set illustrated by Rachelle Anne Miller from the most recent release.   Read on for all the details.


Here's what I've used in the making of this card:-


I created an A2 panel of Caribbean Sea card stock and adhered it my card base.    Two smaller panels were created from white card stock using the Rectangles Die-namics listed above.   The larger one was adhered to the coloured panel with white craft foam sandwiched in between and then I set to work on the smallest feature panel.  I used Something Blue Ink and ink blended the panel fading it to a lighter hue as I worked up the panel.  I spritzed on some water and left it to dry.  Once dry I stamped the sentiment in the top corner and adhered the panel to the others.


I stamped my images and coloured them with the following Copic colours:-

Skin - E04, E11, E21, E00
Blush - R22, R21, R20, R00
Hair - E000, G00, B63
Green - G16, BG13, BG32, G00, B63
Turtles E44, E42

I highlighted with a white gel pen and then applied the 3 elements to the background with dimensional foam tape.

To complete the card I used Stickles glitter in 'Crystal' to glitter the mermaid both her body and a little in her hair and also points on the two sea turtles.

Finally I glued some bubble type embellishments in place.


Thank you for stopping by my blog today and don't forget to visit and subscribe to the MFT You Tube Channel for endless how-to videos, inspiration and product reveals.


Tuesday, June 7, 2022

My Favorite Things - June Release Day with MFT & Friends

The MFT Stamps June release is now available for purchase!   Perhaps you'll keep adding to your Rachelle Anne Miller illustrated collection by putting Number Fun 3 in your shopping cart.


Products used in this project:-


I created a red panel slightly smaller than A2 and adhered it to an A2 white panel.   I used the stencil and Blue Yonder Ink to create the cloud background then this panel was adhered to the red one.


I stamped the main image plus some additional clouds from the Number Fun 3 stamp set.  I coloured the image with the following Copic markers.

Number 3 - R39, R29, R27, R24
Giraffes - E44, E43, E42, E41, E40
Blushes - R21, R20, R00
Bluebird - B04, B02, B01, B00

I fussy cut the image and adhered everything to the background.

I popped the panel in my Misti and stamped the sentiment twice so that it was a nice crisp image and a few sparkling clear sequins completed the project.


Thank you for stopping by my blog today and don't forget to visit and subscribe to the MFT You Tube Channel for endless how-to videos, inspiration and product reveals.


Sunday, May 8, 2022

My Favorite Things - May Release Countdown Day 2

It is Countdown Day 2 to the May release by MFT Stamps which you can buy from on May 10th at 10am EST.   Perhaps you'd like to treat yourself to this new stamp set illustrated by Rachelle Anne Miller called Number Fun 2.


Products used in this card:-


I stamped the image on to some Copic friendly cardstock.  I then stamped the image a second time on masking paper and I carefully fussy cut the image.  I peeled off the masking paper backing and adhered it accurately over the main stamped image.  I masked a line with masking tape and used Speckled Egg for the blend above and then moved the masking tape so that could used Mowed Lawn below the line for grass.  The image mask was then carefully removed.


I coloured the image with the following Copic markers:-

The number 2 - YR30, YR20, Y21, Y23, W2, W1, W0
Animals - E44, E43, E42, E40, R000
Pinks -  R21, R20, R00, R000, W2, W1, W0
Greens - YG45, YG13, YG03, YG01

I stamped the sentiment and this panel was backed with craft foam and applied to an A2 panel and applied to the card base.

Final touches were all done with a white gel pen, dotting in interest to the sky around them and highlighting points in the images.


Thank you for stopping by my blog today and don't forget to visit and subscribe to the MFT You Tube Channel for endless how-to videos, inspiration and product reveals.