Showing posts with label MFT. Show all posts

Tuesday, August 13, 2024

My Favorite Things - August Vault Release Day!


It's release day for the August Vault at MFT Stamps and all of the re-released Laina Lamb products are now available for purchase.  Here's what I've used to make this card:-


I took a panel of white cardstock and used a light grey ink to stamp the stacks of books image from Books & Buddies illustrated by Jenoblade.  I die cut the panel using the Stax Die-namics, backed the panel with white craft foam and adhered to a grey panel then to my card base.


The Precious Polaroids Die-namics are such a useful set to have in your stash and I'm personally very happy to see them make a comeback.   I chose two sizes of the set of four and I die cut MFT's cardstock 3 times each for each colour and I glued them in stacks.


The next task was to stamp the images from Books & Buddies with Memento Ink in Tuxedo Black and colour them in soft Copic colour combinations:-

Bunny (top) - E31, W3, W1, W0
Bear - E44, E43, E42, E41, W00
Bunny (bottom) E55, E31, E41, C3, C1, C00
Blue - B01, BG10, BG000
Pink - V01, V000
Green - G20, G40, YG11

I used a black glaze pen to emphasise the eyes and foot pads.  Once dry I used a white gel pen to highlight certain points and then I glued the images behind each Polaroid frame opening.


I glued the pink frame directly to the background and the blue frame was attached with a single layer of foam tape and lastly the green frame has a double layer behind it, making for a casual stack.

To complete the card I stamped the sentiment on a sentiment strip and applied it with foam tape and three Nuvo Crystal Drops in 'Malted Milk' completed the scene.

Thank you for stopping by my blog today and don't forget to visit and subscribe to the MFT You Tube Channel for endless how-to videos, inspiration and product reveals.


Monday, August 12, 2024

My Favorite Things - August Vault Release of Laina Lamb


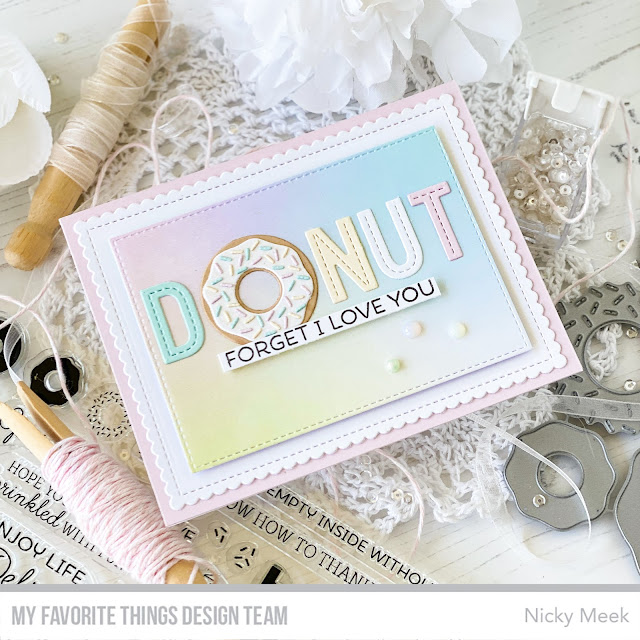
The door to the My Favorite Things vault is being swung open at 10am EDT tomorrow August 13th and in it you'll find a lot of long lost Laina Lamb products many have been clamouring for.   I decided to create with the Donuts Die-namics to kick things off.  Here's what I've used to make this card:-

Sweet Summer Color Blend 6 x 6 Paper Pad
Blueprints 27
A2 Stitched Rectangles Stax Set 1 Die-namics
In Stitches Alphabet Die-namics

I created an A2 card base and over that I layered an A2 panel of pink cardstock.  I then used Blueprints 27 to create the scalloped panel in white which was glued in place.  Next I used the Stax Die-namics to create a panel from the Sweet Summer Color Blend 6 x 6 Paper Pad. This panel was backed with a panel of white craft foam and glued down.


Using the In Stitches Die-namics I created the letters I'd be needing from scraps of MFT cardstock and for the 'O' I used the smaller of the two Donut dies from the Donuts Die-namics.   I iced the donut in white and used the same cardstock scraps to create the sprinkles.


I used a glitter pen to add subtle sparkle to the white icing and then one by one I glued on the sprinkles so that they were nicely distributed.  I masked a straight line across my card and glued the letters along it, removed the mask and glued the donut down.


To finish the card I stamped the sentiment from Donuts & Sprinkles which is a coordinating sentiment set and I backed it with dimensional foam tape, found centre and then stuck it down.

For a simple finishing flourish I used Nuvo Dream Drops in 3 toning shades to embellish the lower right hand corner.  Card done!

Thank you for stopping by my blog today and don't forget to visit and subscribe to the MFT You Tube Channel for endless how-to videos, inspiration and product reveals.


Tuesday, August 6, 2024

My Favorite Things - Food Truck Fun Card Kit - Release!


The MFT Stamps Food Truck Fun August Card Kit is now available for purchase!  Shop early because it is likely to sell out fast.  For my second card showcasing this kit I have used the following products:-


As with yesterday's card, I again kept this one clean and simple (CAS).  I made a white panel of cardstock trimmed to 4 inches x 5 1/4 inches and I ink blended with Spun Sugar Distress Oxide Ink to create a very soft focal point.


Using MFT's beautiful coloured cardstock I die cut all the different components of the flower stall and the Flower Market Die-namics.  I then glued all the different components together and highlighted with a white gel pen before applying it all to the blended background panel.


I popped the panel in my Misti and stamped the 'Flowers' sign in Poppin' Pink Ink by MFT and then I used Memento Ink in Rich Cocoa to stamp the sentiment at the bottom.

To complete the card, I backed the decorative panel with white craft foam and applied it to an A2 card base.  Card done!

Thank you for stopping by my blog today and don't forget to visit and subscribe to the MFT You Tube Channel for endless how-to videos, inspiration and product reveals.


Monday, August 5, 2024

My Favorite Things - Food Truck Fun Card Kit


Hello, thanks for coming by my blog today to learn about the new My Favorite Things August card kit called 'Food Truck Fun'.  Here's what I've used to created my card:-


I decided to keep my card clean and simple (CAS) and prepared a 4 inch x 5 1/4 inch panel of white cardstock.  I masked a line and ink blended below it very softly with light grey ink to ground the truck.


Using MFT's cardstock colours I die cut all the different components of the food truck and several of the elements from Donut Shop Die-namics.  I simply glued all the parts together and highlighted with a white gel pen then adhered to the background.


To finish the card I stamped the sign on top of the truck and the sentiment below using the Coffee & Donuts stamp set.  I backed the decorative panel with white craft foam and applied it to an A2 card base.  Card done!

Thank you for stopping by my blog today and don't forget to visit and subscribe to the MFT You Tube Channel for endless how-to videos, inspiration and product reveals.


Tuesday, July 30, 2024

My Favorite Things - July Release Day!!


It's time to shop the July Release by MFT Stamps which is now LIVE!!!  Perhaps you'll pick up this new stamp set illustrated by the incredible Stacey Yacula.   Here are links to what I've used to make this card:-


I prepared a slimline panel of sturdy white cardstock with finished dimensions of 8 1/4" x 3 1/4".  I ink blended using Bundled Sage and Speckled Egg Distress Oxide Inks and I stamped the sentiment in the corner using MFT's Eiffel Tower Ink.  I backed this panel with white craft foam and applied it to a full size white slimline card base with dimensions of 8 1/2" x 3 1/2".


Using the same Eiffel Tower Ink I stamped the images from Special Delivery and I coloured the images using the following Copic marker combinations.

Turtle - YG97, YG95, YG93, YG91, E44, E43, E42
Fox - E39, E17, E15, E13, C3, C1, C0
Black Bear - T9, T6, T5, T4, T3, R000, C0, E31, E41
Mouse - C3, C1, C0
Bunny Mailman - E44, E31, E41, C3, C1, C0
Birdie Mailman - E44, E43, E42
Blushes - R22, R21, R20, R00
Cap - B99, B39, B37, B97
Mailbag - E77, E74, E71
Brighter Blue - B29, B26 B24
Red - R59, R39, R29, R27, R24
Yellow - Y19, Y15, Y13
Khaki - YG97, YG95, YG93, YG91


I used the coordinating die-namics to die cut the images which were then backed with foam tape and applied to the ink blended background.  I used a white gel pen to highlight points on the images and I placed a few sparkling clear sequins around the scene for a little celebratory sparkle.

Happy shopping everyone!

Thank you for stopping by my blog today and don't forget to visit and subscribe to the MFT You Tube Channel for endless how-to videos, inspiration and product reveals.




Monday, July 29, 2024

My Favorite Things - July Release Countdown Day (Card 2 of 2)


It is my pleasure to bring you my second card today featuring a Jenoblade illustrated stamp set (keep scrolling after this post if you missed my card from earlier today).  These stamps are just some of several sets being released tomorrow by MFT Stamps at 10am Eastern.  Here's what I've used:-


I took a white A2 panel of cardstock and ink blended using Salvaged Patina Distress Oxide Ink.  I stamped the sentiment in the corner and I die cut the panel using the Stax die-namics and backed it with white craft foam and applied it to an white A2 card base.  I set this to one side.


I stamped the three images I'd be using from the stamp set and the coloured with the following Copic marker combinations:-

Mice - E31, W3, W1, W0, W00
Blushes - R22, R21, R20, R00
Orange - YR09, YR07, YR04, Y38
Pineapple - E44, Y26, YR21, G07, YG45, YG11
Black Grapes - BV29, BV25, BV23
Green Grapes - YG13, YG11
Apple - R37, R08, R05
Banana - Y19, Y15, Y13, Y06, E44, E43
Raspberry - R59, RV17, RV55, G07, YG41
Fruit Bowl - G00, G11, BG0000

I die cut the images using the coordinating die-namics and applied to the ink blended background with either a single or double layer of dimensional foam tape.


To finish the project I highlighted points with a white gel pen and I used some Nuvo Jewel Drops in 'Aqua Plains' to add subtle accents.  Card done!

Keep scrolling to see my first card today!

Thank you for stopping by my blog today and don't forget to visit and subscribe to the MFT You Tube Channel for endless how-to videos, inspiration and product reveals.


My Favorite Things - July Release Countdown Day 1 (Card 1 of 2)


I have two cards today on my blog that feature some of the new Jenoblade illustrated stamp sets from tomorrow's release from MFT Stamps.  My second card today will be up at 12 noon Eastern.  Here's what I used to make this card:-


I created a panel measuring 3 1/4" x 8 1/4" and I stamped the sentiment in the top right corner.  I then ink blended 4 delicate pastel focal points using Mowed Lawn Kitsch Flamingo, Squeezed Lemonade and Shaded Lilac Distress Oxide Inks.  I backed this panel with white craft foam and applied it to a slimline panel with dimensions of 3 1/2" x 8 1/2" and set it to one side.


Using Memento Ink in Black Tuxedo, I stamped the images from Super Rad Skaters.  I coloured the images using Copic markers in the following combinations:-

Fox - E37, E15, E13, C3, C1, C0
Bunnies - E44, E31, E41
Blushes - R22, R21, R20, R00
Green - G16, YG45, YG41, C3, C1
Pink - RV63, RV52, C3, C1
Yellow - Y19, Y15, Y13, C3, C1
Purple - BV13, BV02, BV01, C3, C1
Brick Wall - E31, E41
Ramp - W4, W3, W1, B91


I backed each element with dimensional foam tape and applied them to the ink blended background and to finish it off simply, I highlighted a few points with a white gel pen and dotted in interested to the trees.

I hope you enjoyed my inspiration card, come back later to see my second if you can!

Thank you for stopping by my blog today and don't forget to visit and subscribe to the MFT You Tube Channel for endless how-to videos, inspiration and product reveals.


Sunday, July 28, 2024

My Favorite Things - July Release Countdown Day 2


Welcome to my blog and Day 2 of the Countdown to MFT's July release which you can purchase Tuesday July 30th at 10am Eastern.  Today, my card features one of two Yuzu illustrated stamp sets.  Here's what I've used:-


I wanted to create a warm dessert sunset backdrop and so to do this I took a panel of white cardstock (A2) and ink blended using Rusty Hinge and Wild Honey Distress Oxide Inks.  I slightly distress that background with a fine spray of water which I immediately blotted dry and then I dotted in some white fleck with a white gel pen.  Over this I layered two sand dunes that were created using Stitched Snow Drifts, although I didn't want the stitched edge so I turned the die upside down so the dune edges were smooth.  I used the same two inks to ink blend the dune although with a lighter touch so they just looked they were 'kissed' by the deep sunset and I used Copic markers and a white gel pen to add texture to the sane.  I applied both dunes with dimensional foam tape.


I used MFT's Eiffel Tower Ink to stamp the images from Llama Love and I coloured the different elements with the following Copic marker combinations:-

Llamas - E41, C3, C1, C0,  E77
Llama Faces - E01, C3, C1, C0
Blushes - R22, R21, R20, R00
Pink - RV09, RV06 (plus RV23 for the balloon)
Green - G05, YG13
Yellow - Y19
Blue - B04, B12, B41

The images were die cut using the coordinating die-namics and applied to the scene with either a single or double layer of dimensional foam tape.


I stamped the sentiment multiple times in my Misti for a nice crisp and bold image and then to finish the card I highlighted some points with my white gel pen and then applied the decorative panel to a slightly larger panel of MFT's fabulous Poppin' Pink cardstock and this was all glued to a slightly larger white card base.

Make these adorable Llama's yours on Tuesday!

Thank you for stopping by my blog today and don't forget to visit and subscribe to the MFT You Tube Channel for endless how-to videos, inspiration and product reveals.


Saturday, July 27, 2024

My Favorite Things - July Release Countdown Day 3


Hello everyone!  I'm sure you've all been impatiently waiting for MFT's next big release, well, here it is as we kick off the countdown to release day which is July 30th at 10am Eastern.  My first of five cards for this release features a brand new Stacey Yacula illustrated stamp set.  Here's what I've used:-


I took an A2 panel of white cardstock and I did a delicate ink blend of Saltwater Taffy and Mowed Lawn Distress Oxide Inks.  I stamped the sentiment and then backed this panel with white craft foam and adhered it to a slightly larger white card base.


I stamped all of the images from Pick of the Patch using MFT's Eiffel Tower Ink.  I then set about colouring the images and here are the Copic colours that I used:-

Strawberries - R39, R37, R05, R21, G20, G14, YG03, Y15
Bunnies - E44, E31, E41
Mice - W4, W3, W1
Blushes - R22, R21, R20, R00
Terracotta Pot - E35, E33, E11
Bucket - C3, C1, C0
Ladder - E43
Ladybugs - E37


I then die cut these pretty images using the coordinating die-namics and arranged then as I had had them in my mind before I started.  Once I was happy with the layout I took a photograph of my phone so that I wouldn't forget, then I started to add dimensional foam tape to the back of each element and build the scene again from the back and working forwards.

Last but not least, I grabbed my white gel pen and began highlighting certain points which makes the whole thing pop!

Thank you for stopping by my blog today and don't forget to visit and subscribe to the MFT You Tube Channel for endless how-to videos, inspiration and product reveals.


Saturday, July 20, 2024

My Favorite Things - Precious Pals


I didn't get to play with 'Precious Pals' when MFT Stamps released it recently and so as soon as life presented an opportunity I coloured it up and created this card.   Here are links to what I've used:-


This is a slimline card with finished dimensions  3 1/2 inches x 8 1/2 inches and I created a card base and adhered another white panel to it.

I prepared a slightly smaller panel and masked a line and then softly ink blended a 'rainbow' of colours to make a little diffused warmth behind each position where a critter would be placed.  I stamped the sentiment boldly, backed the panel with white craft foam and applied it to the card base.


Using Memento Ink in Tuxedo Black I stamped the adorable pals from Precious Pals.  I then coloured the images with the following Copic marker combinations:-

Pup with Garnet - T7, T6, T4, T2, C3, C1, C00, R89, R39, RV29
Kitten with Diamond - E37, Y28, YR24, YR20, E50, C3, C1, C00, BG000, BG90
Bunny with Emerald - E44, E43, E42, E41, E40, G19, G02, G00
Squirrel with Amethyst - T6, T5, W5, W3, W1, V17, V04, V01
Fox with Blue Topaz - E37, E15, E13, E11, C3, C1, C0, B02, B00, B0000
Blushes - R22, R21, R20, R00


The images were die cut using the coordinating die-namics and then I backed each image with dimensional foam tape and applied them to their matching background ink blend.

Eyes were emphasised with a black glaze pen and then I used a white gel pen to highlight certain points and added 'sparkles' to the gemstones.

Last but not least I glued some clear gemstones into the background and then the card was complete.

Thanks for joining me, I'll be back soon with something new!