Showing posts with label Distress Ink. Show all posts

Wednesday, January 9, 2019

Puddle Play - Hello Bluebird

Hi!  I have a slimline card featuring all the cuties from Puddle Play by Hello Bluebird Stamps


A slimline card gives you so much more 'real estate' to work with to build your scenes and get all those characters and elements in that you love!   Finished size is 8 1/2 x 3 1/2 inches.  Panel cut at 8.2 x 3.2 inches.  Envelopes for this size are easily sourced and are called slimline, invitation, #9 and size 9.


I used a Clarity Stencil Brush to ink blend my gray background using Distress Ink in Weathered wood.  I die cut the clouds without stamping them from the stamp set and ink blended them too.  I stamped some of the water splashes upside down to become raindrops using Memento Ink in Fog.  I backed my panel with craft foam and applied it to the card base.  The craft foam backing means that your card makes it through the postal system in much better shape especially when you have embellishments such as I have on this card.


I stamped my images using Ranger Archival Ink in Potting Soil on to Bristol Smooth cardstock.  I watercolour painted the images using the following colours.  Kuretake Zigs in Gray Brown 094, Bright Yellow 052 and Light Pink 026.  Also Tombow ABT in 020.  I die cut all the elements and highlighted some points with a Uni-ball Signo white gel pen.  I decided on a layout then adhered everything using dimensional foam tape - making sure all my characters were interacting with one another to tell a story.


To finish out the card I stamped the sentiment with the same Fog ink onto a sentiment strip and backed it with foam mounting tape and adhered.  Embellishments needed to be water droplets and so I used 4 different sizes to add some fun dimension to the card.

I hope you like this encouragement card and feel inspired.

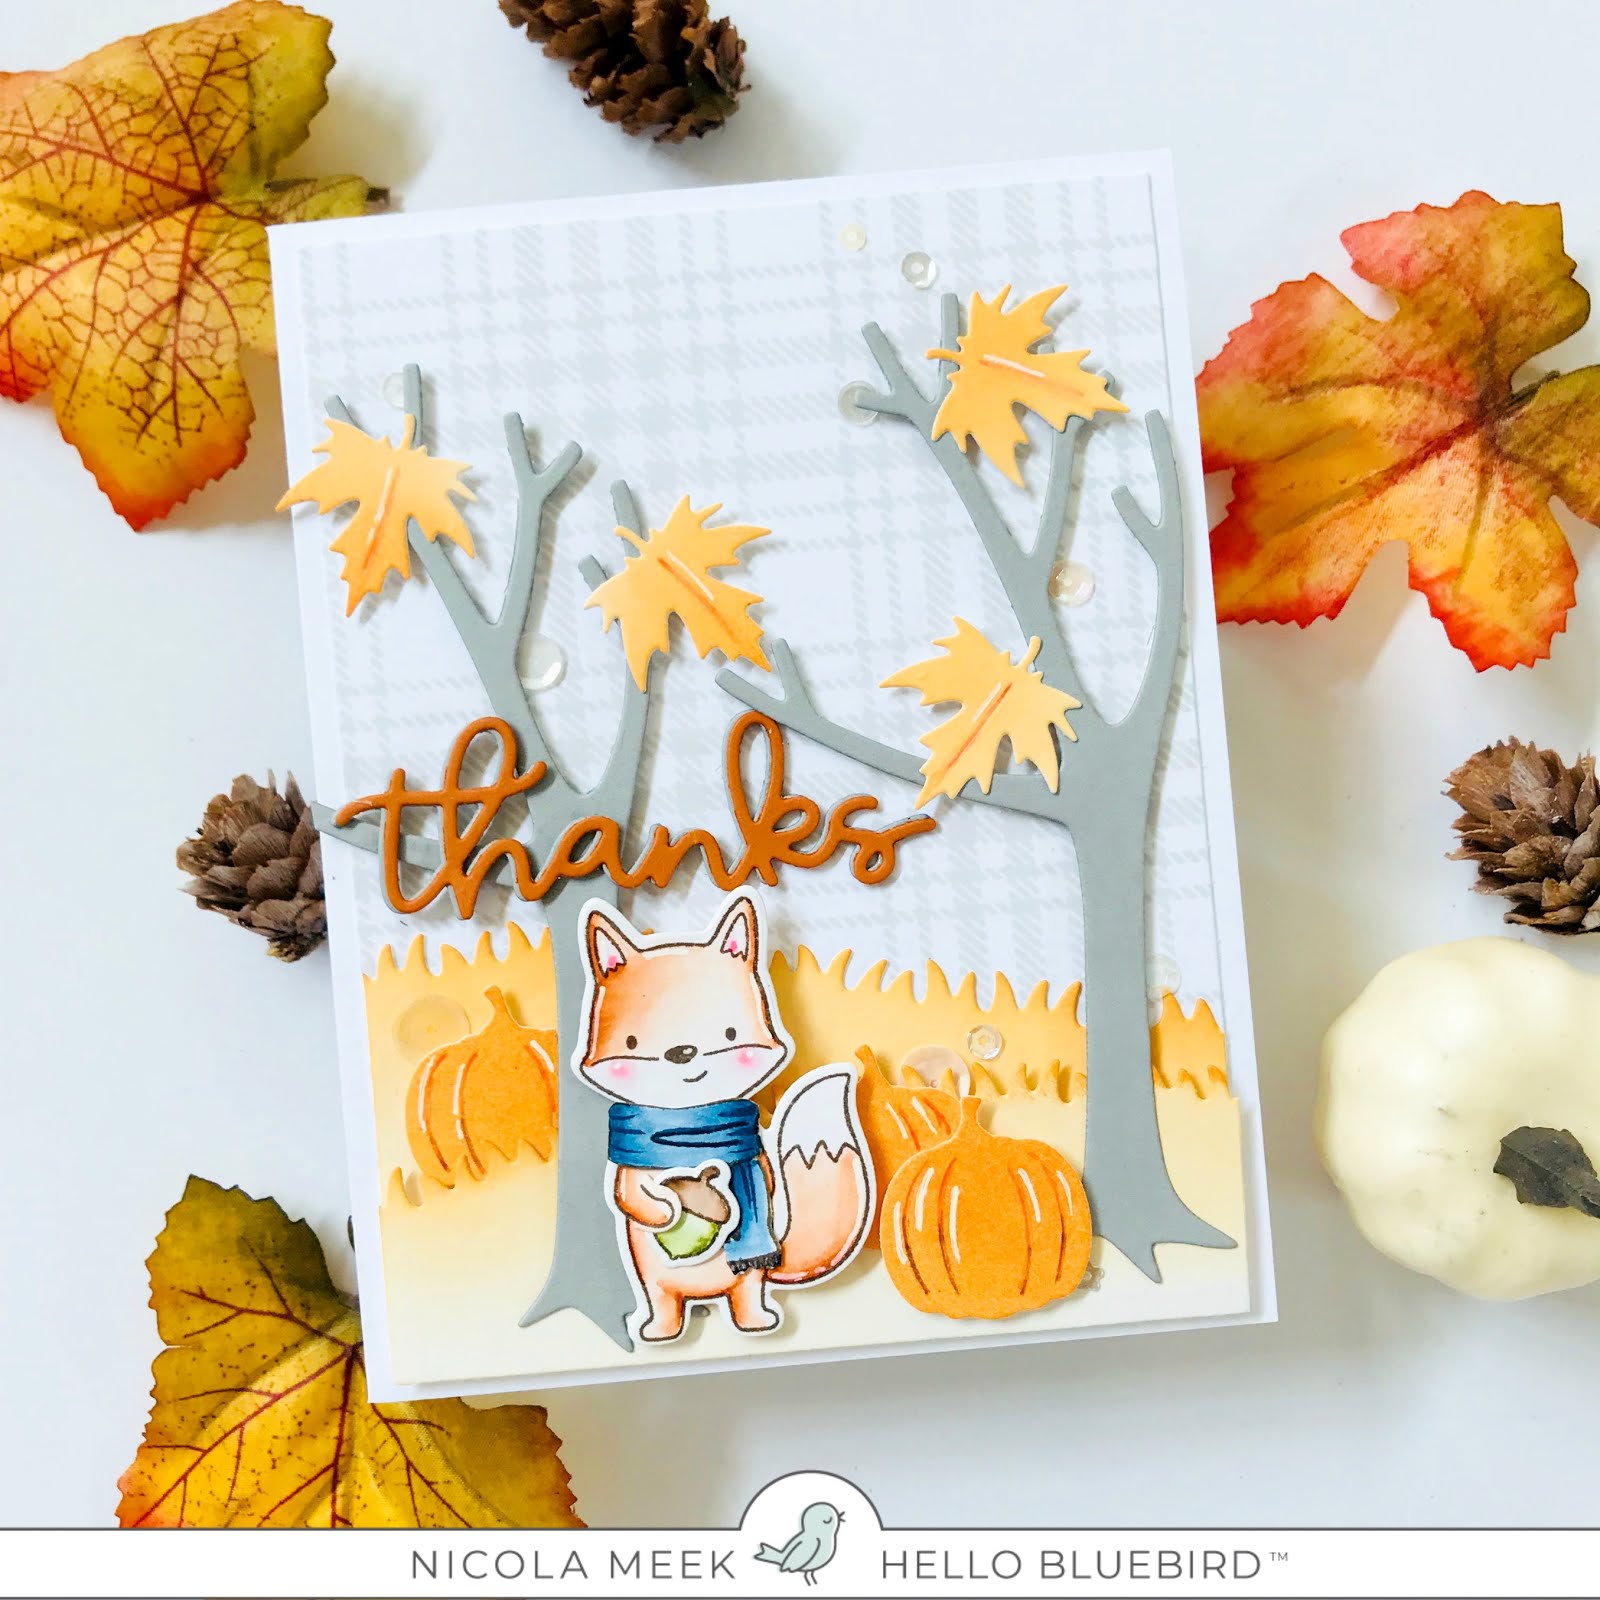
Thanks for stopping by - happy crafting!

Nicky x

Sunday, November 11, 2018

Rooftop Reindeer - Hello Bluebird Stamps

Hey there, I'm back with another card for Hello Bluebird Stamps and once again I'm using Rooftop Reindeer .... without the roof this time!


A pretty simple card by any measure - I grabbed an A2 panel of Bristol Smooth cardstock and ink blended it using Distress Ink in Tattered Rose.  I splashed the panel with water and blotted it up a few seconds later.  I then placed the panel in my Misti and stamped the Tis The Season sentiment with Versamark Ink and heat embossed in Copper.  I repeated this process twice more to make the sentiment super bold and raised.   I die cut the panel to provide the simple faux stitched edge.   I then grabbed one of the dies from Hill and Dale and die cut a snowy hill then die cut that hill with a matching faux stitched edge.  I adhered this to the card base with foam tape.


Next I then stamped the second part of the sentiment 'TO BE JOLLY' on a strip of cardstock with more Versamark Ink and again heat embossed in Copper.  I love everything in the rose gold to copper variety - so pretty and warm and luxurious looking.  I applied the little sentiment with foam tape.

On Bristol Smooth I stamped my reindeer duo with Ranger Archival Ink in Potting Soil.  I watercolour painted them using Kuretake Zigs and highlighted some points with a Uni-Ball Signo white gel pen.  I die cut the the images using the coordinating dies then adhered them with more foam tape.


Look at that metallic copper sentiment!  I just love that colour!

The card was finished out by adding 'snow' by way of white Nuvo drops in random sized droplets and then I set it aside to fully dry for a couple of hours before applying the card panel to the 110lb Neenah white cardstock base.

Card complete!  Thanks for stopping by for the details - use the comments section if you wish to ask any questions I will always be happy to help you!

Nicky x

Monday, November 5, 2018

Penguin Pals - Pretty Pink Posh

Hello!

I'm back with a new card for Pretty Pink Posh featuring the brand new Penguin Pals stamp set available from November 5th .... yes today!!!!!!


The card features an A2 Bristol Smooth cardstock panel that I ink blended with Distress Ink in Chipped Sapphire, I then die cut it to give it the faux stitched edge and then splashed it up with some water which I blotted away and then I slightly watered down some white acrylic paint and splashed that too.  I set it aside to dry.

Another A2 panel of white cardstock was die cut with the same edge and then I used one of the dies from Stacked Edges 1 die and cut the curved strip leaving me with three parts, but I only needed two for this card so I set aside the 3rd portion for another project and I then adhered together the two I needed, added foam tape to the reverse and adhered it to the now dry background panel.


Pretty Pink Posh has a new die set for this release called Pine Sprigs and it is very adaptable.  Here I've used it by die cutting white cardstock and creating the idea there is a tree just off to the left and another off to the right and all you see are the over-hanging tree limbs.

On yet more Bristol Smooth cardstock I stamped my penguin images and their hats.  I watercolour painted them using Kuretake Zigs and highlighted with a Uni-Ball Signo white gel pen then die cut and applied to the scene with more dimensional tape.


My card was finished by glueing a generous amount of 'snow' in the form of Marshmallow Confetti Mix sequins throughout the scene and I popped the card into my Misti and stamped the sentiment with Versamark Ink and heat embossed in silver and then to make it more pronounced I stamped once more and heat embossed again - I love this look and could barely prevent myself for going back and doing it a third time!

Thanks for stopping by my blog today - I'm off to make another card .............!

Nicky x


Saturday, October 27, 2018

North Pole Littles - Hello Bluebird

Hey everyone, I have a new card for Hello Bluebird Stamps to share with you today featuring the super cute North Pole Littles stamps and dies.  They are set in a scene created by using the 'essential' (in my humble opinion) Spooky Scene die!


First things first .... I softly ink blended an A2 panel of Bristol Smooth cardstock using Distress Oxide Ink in Spun Sugar.  I dotted in some falling snow by hand, using a Uniball Signo White Gel Pen and adhered the panel to my card base and set it to one side.


Next, I took the Spooky Scene die and die cut a white cardstock A2 size panel.  I ink blended the trees using Distress Ink in Pumice Stone.   Now, when you die cut the Spooky Scene you get some negative cuts that you'd perhaps ordinarily throw away or use as scrap.   The centre negative cut is really quite large and I decided to grab a hill die from Hill and Dale and cut a second hill which of course will perfectly match the line of the ground from the Spooky Scene cut.  I then took a Versamark Ink Pad and inked up certain areas of the trees and ground and then sprinkled on some Wow! White Puff Twinkle Embossing Glitter and heat embossed .... this stuff is wonderful, can't say enough good about it! I then adhered all the parts of my Spooky Scene back together on the reverse to hold them in place then applied foam tape and added it to the card base.


Now to add some fun colour!  I stamped my North Pole Littles using Ranger Archival Ink in 'Coffee'.  I watercolour painted them using Kuretake Zigs in Light Beige 074, Flesh Colour 071 and Pale Pink 028 to shade their faces with Light Pink 026 for their cheeks and some of the parcels and ornaments.  The deeper red is Carmine Red 022.  Points of creamy yellow are done with a Tombow Dual Brush marker 020.  Hair is done with either Tombow in shade 912 and the other in 969.  The green colour used is an Arteza Real Brush Pen in Mint Green A177.


Cheeks and other points were highlighted with the Uniball Signo gel pen and then die cut and added to the scene with more foam tape.  The sentiment was stamped on a strip of cardstock and similarly applied.  Pretty adorable right?

Thanks for stopping by to read, I hope to see you next time and if you don't want to miss anything do sign up for emails from this blog.

Nicky x


Wednesday, October 24, 2018

Fall Buddies - Hello Bluebird

Hi!  Thanks for swinging by my blog today to read about my latest card for Hello Bluebird Stamps.  This card features the delightful Fall Buddies stamp set from the latest release.


My card started with a panel of Bristol Smooth that I ink blended with Distress Ink in Tumbled Glass, I blended to a white fade at the bottom so that it would slightly highlight the horizon for a small point of interest.  I then squished a little of the ink onto an acrylic stamping block and added a tiny amount of water and splattered with a paintbrush to distress.


I then used the Spooky Scene Die and I die cut an A2 panel of more Bristol Smooth cardstock.  The die cut comes apart like a jigsaw puzzle.  I kept the outer frame white and set it to one side.  I ink blended the tree and then the grass using Distress Inks.  I put the pieces back together again upside down and taped them together then added dimensional foam tape to all areas and adhered it to the panel and at this point I also adhered the empty scene to the card base.

On yet more Bristol Smooth I stamped all of my images with Ranger Archival Ink in Potting Soil.  I watercolour painted them using Kuretake Zigs, highlighted some areas with a Uni-Ball Signo white gel pen and then fussy cut the images and used more foam tape to adhere them.  I decided to add a little humour with the 'happy fall' sentiment by having my squirrels throwing themselves from the tree onto big piles of autumn leaves beneath them.  I love the feeling of pure joy and that they are relishing the change of season.


With everything in place I considered any final touches and decided on a few wood butterflies and flowers which just seemed to add that perfect finishing accent and the bunny and squirrel each hold up a little wooden heart.

Thank you for stopping by my blog today, I really appreciate it and see you next time!

Nicky x

Tuesday, October 16, 2018

Pumpkin Patch - Hello Bluebird

Hello!

I'm back with my second card today and for the second time in a week I'm using Pumpkin Patch by Hello Bluebird Stamps which forms part of their incredible new release!


Since the last time that I played with this stamp set I went more traditional in my choice of colours, this time I decided to go with sweet pastels and switch it up a little.  To that end I took a panel of Bristol Smooth cardstock.  Using Distress Inks in Spun Sugar and Fossilized Amber I delicately and randomly ink blended the panel.  I then used my embossing buddy to prepare the surface for heat embossing.  

In my Misti I took some of the smaller images from the stamp set like a squirrel and pumpkin and acorn and some leaves and I arranged them in a design where I could repeat it twice across the width of the card by stamping once with Versamark Ink then moving the panel over in my Misti and stamping again.  I kept moving my panel and re-inking and stamping until all areas had the pattern and then I heat embossed using white embossing powder.  Once cooled I die cut the panel to give it a faux stitched edge.


I adhered the panel to my card base then from another panel of white cardstock I die cut the Gallery Frame #2 Die  and then layered this over the decorative panel popped up on dimensional foam tape.  I had a leftover die cut from Grassy Knoll which I ink blended softly, again using the Fossilized Amber Distress Ink and then I stamped the grassy tufts using a tiny stamp included in Deer Friend.  I measured it to size and adhered it, inserting it into the gap for a snug fit.

On Bristol Smooth cardstock (I like and always use Strathmore) I stamped my feature image using Ranger Archival Ink in 'Potting Soil'.  It stamped quite dark since I'd just re-inked my pad but it should calm down soon lol.  I watercolour painted the image using Kuretake Zigs and highlighted their cheeks with a Uniball Signo White Gel Pen.  I die cut and adhered the image with more foam tape.


Finally, I stamped the sentiment from Autumn Script.  It actually says Pumpkin Spice but I trimmed off the second word.  I then die cut using the coordinating dies for the stamp set and then die cut 3 more times from white cardstock to build a stack which I adhered together - each time trimming off in the same place since I'd chosen not to use the 'spice' word.  Finally I glued it in place and stamped 'season' on a little strip of cardstock and popped that onto some foam tape so it aligned nicely.


So there it is .... my non-traditional take on the season and I hope that YOU have an enjoyable Pumpkin Season and enjoy the change in temperatures and colours!

I'll see you next time, thanks for stopping by and feel free to ask any questions you may have, I'll be happy to try and answer them for you.

Nicky x

Thursday, October 11, 2018

'Tis The Season and Christmas Is Coming - Hello Bluebird

Hello!  I'm delighted to be finally sharing with you a couple of projects today to preview the big new and very wonderful Hello Bluebird release which you can buy October 12th!

My first card today combines the 'Tis The Season sentiment stamp set with the wonderful Christmas Is Coming stamp set.


For this card I richly ink blended my background using Distress Inks in Wilted Violet, Seedless Preserves and Chipped Sapphire, I blended away to nothing at the bottom to give the appearance of snow and then took a little Distress Ink in Picket Fence to further soften where the colour finishes  and to give the appearance that the wind is whipping up the snow from the surface.


I splashed and blotted the background with water.  Then I mixed a little white acrylic paint with a tiny spritz of water and using a small paint brush I splattered on the snow.  I sometimes went for big blobs and other times for small to build depth ... I wanted a real blizzard!  I then put my dried panel in my Misti and using Versamark Ink, I stamped the sentiment and then heat embossed in white.  I repeated this process in order to really make the sentiment stand out on the busy background and it looks even more raised and brighter white for doing that.

Finally, on Bristol Smooth cardstock I stamped my images with Ranger Archival Ink in Potting Soil and watercolour painted them all with my Kuretake Zigs.  I didn't have the dies yet and so I fussy cut the images and adhered them with dimensional foam tape.  Using a Uni-Ball Signo White Gel Pen I hand dotted in the snow all over my characters.  The finishing touch was the application of a little subtle Stickles glitter here and there.


My second card today will be revealed this afternoon on Instagram and here on my blog so stay tuned for that!

Thanks for stopping by,

Nicky x

Saturday, September 22, 2018

Away In A Manger - Hello Bluebird

Hello Papercrafters!

Today I'm in Christmas mode and using Away In A Manger by Hello Bluebird Stamps.


My card started with a an A2 panel of Bristol Smooth cardstock which I ink blended with Distress Inks in Peacock Feathers and Squeezed Lemon.  Prior to ink blending I had figured out my basic layout for the scene so I knew I'd want the glow of the star coming down on the gathered group below.


On yet more Bristol Smooth I stamped up all my images using Range Archival Ink in Potting Soil.  I then watercolour painted everything with my Kuretake Zigs and die cut each image.  I arranged each piece into the scene that I had previously decided on and adhered them using varying amounts of dimensional foam tape.


I placed the panel into my Misti.  I positioned the sentiment stamp and stamped it twice in the same Archival Ink.   I then used Gold Stickles to add tiny dots of 'glimmer' emanating from the star and falling around the characters beneath.  Finally,  I used the negative off-cut from using the Gallery Frame 3 Die on a previous card and applied it raised up on more foam tape that I trimmed into very thin lengths.  The panel was attached to the card base and .... project complete!

I hope you enjoyed the card and found inspiration for your own projects.  Thanks for stopping by, I'll be back soon with more!

Nicky x

Friday, September 14, 2018

Autumn Gatherings - Hello Bluebird Stamps

Hi everybody, I'm back with another card for Hello Bluebird Stamps.   For this card I've called on several of their stamp and die sets.  The thing with Hello Bluebird is how seamlessly everything works together from past and present releases and this will go forward so you can build a collection and draw from everything constantly.


This card started with the creation of the plaid background using the Plaid Background Stamp.  I stamped it in pale grey and then applied the panel (slightly trimmed up) to the card base.  Next I die cut the Halloween Tree Die from grey cardstock.  The pretty leaves for the trees are from the Gallery Frame 3 Die and were ink blended, as were the pumpkins.  The grassy banks are from the Grassy Knoll Die Set and these were also ink blended.  Finally the 'thanks'  sentiment was die cut three times in grey and deep orange cardstock from the Gallery Frame 2 Die Set and adhered together slightly offset so the grey shows as a shadow behind the orange.


I decided on an arrangement for all my die cuts and ink blended components and then adhered them into the scene layered up on varying amounts of dimensional foam tape to build depth.  

On some Bristol Smooth cardstock I  stamped my fox from the Autumn Gatherings stamp set together with the scarf (which is among various items of clothing you can dress the critters up in) and the acorn to give him something to hold.  I watercolour painted these using my Kuretake Zigs and then I die cut the images, assembled them and applied them into the scene using more foam tape.


The final touch was to highlight some areas with a Uniball Signo white gel pen and then I sourced a few toning mixed sequins and tucked them here and there just to add a sweet little twinkling accent.

I do appreciate you stopping by to read about this card.  Feel free to ask any questions in the comments section - I'm very happy to try and help you!

Until the next time, happy crafting

Nicky x

Wednesday, September 5, 2018

So Many Snowmen - Mama Elephant

Hello everyone!


I'm so excited that in a few days I'll be participating in the huge Mama Elephant new release Blog Hop Stampede.  It got me feeling in the mood to create more cards by going back 1 year and playing with the much loved 'So Many Snowmen' stamp set.


I stamped the large image onto Bristol Smooth cardstock and then afterwards to some masking paper which I fussy cut out and layered over the original image to protect it.  I ink blended the cheerful sky with Distress Ink in Peacock Feathers to a subtle ombré affect.  Once dry and with the mask still in place I layered on Nuvo Glitter Paste and allowed it to dry before removing the mask.


Working with the colour of the sky I'd created I used colours that I felt went well together and watercolour painted the sweet snowmen using my Kuretake Zigs and then I highlighted  their pink blushing cheeks with a Uniball Signo White Gel pen.

The finishing touch was to stamp and heat emboss the sentiment onto a strip of black cardstock and then I die cut several snowflakes from 'Stitched Flakes' by Simon Says Stamp and applied them.

I hope you enjoyed the card tutorial and are feeling inspired.  Thanks for stopping by!

Nicky x

Monday, July 30, 2018

Fishin' Hole + Pond Builder - Hello Bluebird Stamps

Hi!  I'm excited to share this card today featuring primarily the all new 'Pond Builder' die from the latest release from Hello Bluebird Stamps together with 3 Mallard ducks from the new Fishin' Hole stamp set.


The Pond Builder die is so useful and a great investment if you like creating water scenes because it makes it so easy!   I have lots of ideas for it going forwards, so stay tuned!

To make this card I took an A2 panel of Bristol Smooth cardstock.  I die cut it first with the water's edge die and the remaining top section was die cut with the wave 'bushy' die from the set.  I ink blended the 'pond' with Distress Ink in Peacock Feathers and the bushes behind the pond with Twisted Citron and Mowed Lawn.  Finally the sky was  blended in Tumbled Glass and the sentiment was stamped with Memento, Tuxedo Black.

Using more Bristol Smooth I cut two grassy edges from the Pond Builder set for the bottom of the card which were ink blended in the same two green shades previously mentioned.  I also die cut the Bulrushes and rocks from Pond Builder and for these I directly coloured them with Kuretake Zigs and then blended them out with a fine detailer waterbrush pen.  Finally I stamped the Mallard from Fishin' Hole 3 times, watercolour painted them then die cut.


Time to assemble!

I adhered the pond to my card base leaving a little unglued section along the top.  I then layered on the grass strips at the bottom.  Next I adhered the bushes behind the pond and the sky .... they all fit together like pieces of a jigsaw puzzle.  I applied glue and tucked some of the Bulrushes behind the back waterline (this is why I left an unglued margin at the top) and a couple more were inserted behind the grass in the foreground.

I glued the rocks in and around the water and with the ducks I glued the base of them but their heads are popped up on a little foam tape for dimension.  I used a Uniball Signo White gel pen to draw in by hand the ripples of water around the ducks and rocks and the final touch was the additional of a few sparkling clear sequins.

Card complete!

I encourage you to imagine the possibilities with this Pond Builder die.  Thanks for stopping by the blog today, see you next time!

Nicky x

Monday, July 23, 2018

Blooming - Avery Elle

Hello everybody, I have a pretty floral card for you today.  'Blooming' is part of the new summer release by Avery Elle and it is so useful as it is, or to pair with your other sentiments or little characters you might own.  It would work great as the basis of a shaker card too!  It comes with coordinating dies.


My card started with a panel of smooth watercolour cardstock that I ink blended with distress inks in Worn Lipstick and Squeezed Lemonade and then splattered on a little pink paint.  I adhered this panel to the card base.  Next I stamped and die cut the floral hexagon.


I watercolour painted it then die cut and adhered it to the card using dimensional foam tape.  The sentiments were stamped in the centre and a few assorted toning sequins were glued into place to add a little twinkle for the finish.


I thank you for stopping by the blog today.  I do hope you like the card and feel inspired.

Nicky x


Tuesday, July 17, 2018

Moose and Friends - Hello Bluebird

Hello, this is my second post of the day using the exciting new release stamps from Hello Bluebird.  Introducing Moose and Friends!


This card features a panel of Bristol Smooth cardstock that was ink blended ever so subtly with Distress Inks in Spun Sugar and Tumbled Glass.  The panel was then die cut to provide the faux stitched edge.  More Bristol Smooth was die cut twice with the Grassy Knoll grass edge dies from Hello Bluebird and these were softly ink blended with Cracked Pistachio and layered into the scene with foam tape.


On yet more Bristol Smooth (I do love this stuff!!!) I hand stamped all the images from Moose and Friends using Ranger Archival Ink in Potting Soil.  I selected a number of toning Kuretake Zig watercolour pens and watercolour painted everything and then fussy cut and applied them into the scene layered up on varying amounts of foam tape to build dimension.  Points were highlighted with a Signo Uniball White gel pen.


The Hooray balloon group was created the same way the animals were.  I then flipped it over and attached single strands of solid cream baker's twine and made sure that the twine lined up with the bottom of each tied balloon.  I cinched them together and adhered them behind the cake to anchor it.  The final touch was the addition of several tiny wooden butterfly embellishments.  The panel was adhered to an A2 110lb Neenah solar white cardstock base.

I hope you enjoyed my card - I just LOVED making this one and can't wait to work with this stamp set again, these characters are just so beautifully illustrated.

Thanks for stopping by!

Nicky x

Bee Happy - Hello Bluebird Stamps

Hello!  I am excited to share two new cards today featuring new release stamp sets by Hello Bluebird.  This post features Bee Happy!


This card features an A2 panel of Bristol Smooth cardstock that I softly ink blended using Distress Inks in Spun Sugar and Cracked Pistachio.  I splashed on a little water and quickly blotted it up with a kitchen towel to distress the background.  I die cut the panel to provide the simple faux stitched edge.


On more Bristol Smooth I hand stamped my images using Ranger Archival Ink in Jet Black.  I watercolour painted the images using Kuretake Zigs and highlighted some points with a Uniball Signo White gel pen.  I die cut the images and applied them into the scene using foam tape to build dimension.


I stamped the sentiment onto a strip of cardstock that I ink blended in Spun Sugar to match the colour of the background and attached that with foam tape also.  I decided the grass/ground needed more definition so I used simple dots to build definition.  To achieve this I used a combination of a Distress Ink pen in Mowed Lawn and my Uniball Signo White gel pen.  I stamped the trails of the bees and added a few Nuvo drops for a finishing embellishment.

I just love this stamp set and hope that you do too.

On to the next card!

Nicky x

Friday, July 13, 2018

Fishin' Hole by Hello Bluebird

Hello everybody, I'm back today with a brand new card using Fishin' Hole by Hello Bluebird Stamps.  This and some other stamp sets are set for release July 15th and I will have several more cards to share with you this month.


An A2 card panel was ink blended with Distress Inks in Tumbled Glass for the sky and Salty Ocean for the pond.  The panel was distressed with water splashes and then blotted dry with a kitchen towel.  I used one of the bullrush stamps from the stamp set and did some casual first and and second generation stamping using Shabby Shutters  to form an edge for the pond at the back of the scene.  I watercolour painted the pokers using a Kuretake Zig in Beige.  Using Distress Ink pens I dotted in a more defined water's edge top and bottom of the panel and then attached a white frame I already had in my stash with dimensional foam tape.


On Bristol Smooth cardstock I stamped my images using Ranger Archival Ink in Jet Black.  I watercolour painted everything using Kuretake Zigs and highlighted some points with a Uniball Signo White Gel Pen.  The images were fussy cut and applied with more foam tape.  The sentiment was stamped on a strip of cardstock and also applied with foam tape.


I had some fun finishing this peaceful scene.  I applied several 'bubbles' above the fish in the form of the blue jewels from Pretty Pink Posh that you see in my photography.  I then used the Stickles glitter in Crystal that you also see in the photo to glitter up the dragonfly's wings and then I dotted tiny spots of the product through the bullrushes and water and tiny touches of it on the frame which gives the whole scene the prettiest twinkle when the card is handled.  Once dried the panel was attached to a 110lb Neenah cardstock base.

Thank you for stopping by to read about this card, hope to see you back here again soon!

Nicky x


Monday, July 9, 2018

Peek A Boo Pals - Avery Elle

Hi!  Are you ready for a dose of cuteness?  Look no further than these Peek A Boo Pals by Avery Elle and their coordinating dies.


For this card I started out by die cutting a panel of smooth watercolour cardstock.  I die cut it twice using two of the dies from Dotted Border Elle-ments and ink blended with distress inks and distressed each of the 3 portions created with water and paint splashes.  I adhered the sky piece directly to the card base, the middle section with one layer of foam tape and for the lower portion I doubled up the foam tape.  I stamped the sentiment in archival ink.


I took more watercolour cardstock, stamped my images and using an archival pen, I drew in some glasses for the bear and dressed him and the monkey up.  Next I watercolour painted them and die cut them out.  Everything was adhered into position with foam tape for lots of dimension.  I highlighted a few areas in white and I gave each of their cute noses and the eye glasses a dimensional glossy accent for the finishing touch!


Thank you for stopping by the blog today and I hope you enjoyed the card and are feeling inspired.

Nicky x