Showing posts with label Frosty Flakes. Show all posts

Friday, November 17, 2023

Hello Bluebird Stamps - Christmas Release Day!


It's release day!!!  Hello Bluebird's brand new Christmas release will be live at 7pm MST TONIGHT November 17th.  Their Black Friday Sale will also go live at the same time and I strongly advise you to shop as soon as it all goes live to avoid disappointment.

My card today previews the following new products and some older ones too:-

NEW
Cup Of Cheer
Cup Of Cheer Die

OLDER
Snowy Countryside Square Scene Die
Gallery Frame #7 Die
Frosty Flakes Die

To create this card I started with the background, die-cutting it from white cardstock and ink blending using Shaded Lilac for the sky and a little Cracked Pistachio and Speckled Egg for the snowy ground.  I splashed these pieces with watered down white acrylic paint and assembled them and glued them down and then added the frame on top (Gallery #7) with foam tape.  I popped the card in my Misti and double stamped the sentiment.


After stamping the images from Cup Of Cheer using Memento Ink in Rich Cocoa, I coloured with the following Copic markers:-

Squirrel - E35, E33, E31, E41, V09, V25, BV01
Bunny - C3, C1, C0, C00, YG97, G94, YG93, E33, E31, E41
Bear - E44, E43, E42, YG97, G94, YG93, BV01, BV20, BV000, BV0000
Otter - W5, W3, W2, E35, E33, E31
Blushes - R21, R20, R00

I die cut all elements and applied to the background with foam tape.


To complete the scene I used a metallic gold gel pen and dotted the scarf on the squirrel and otter.  You can't see this in the photo but it is a lovely surprise when the card is handled and it catches the light - they've got their festive gear on!!  I also used a stylus and white acrylic paint to dip and dot the snow in throughout the scene and over the critters.  Much better to dip and dot than to have no control over the splattering and hide their beautiful faces.   Three snowflake die cuts completed the scene and this whole panel was mounted to a kraft panel and then to a slightly larger white cardstock base bringing it to a meaty 5 3/4 inches square!

Happy shopping everyone and I'll be back soon with something new featuring items from the release.


Sunday, October 30, 2022

Hello Bluebird Stamps - Merry Makers


Well hello there and thank you for joining me today to read more about my latest card for Hello Bluebird Stamps.   This slimline Christmas card uses the following Hello Bluebird products:-


First of all I used the Scene Die to die cut a slimline panel of 110lb cover weight cardstock.   I ink blended the parts using Distress Oxide Inks and then reassembled the parts by first glueing down the frame to another slimline panel and then starting at the bottom and working up, I glued the other parts in place.


I stamped the sweet animal images from Merry Makers and coloured them with the following Copic marker combinations:-

Brown Bear - E87, E44, E43, E42, E41, E40
Fox - E18, E09, E07, E17, E15, E13, E11
Reindeer - E44, E23, E55, E43, E42
Black Bear - T6, T5, T4, T3, T2, T1
Bunny - E31, E41, E0000, W3, W2
Yellow - Y19, Y15, Y06, T3, T1, T0
Pink - RV14, RV42, R11
Purple - V25, BV00, V12

A white gel pen was used to make a few highlights and then I used the coordinating dies to die cut the images which I applied to the background with dimensional foam tape.

To finish up I added a few die cut 'Frosty Flakes' and stamped one of the sentiments from the stamp set which fit nicely in the gap.   Card complete!


Saturday, October 22, 2022

Hello Bluebird Stamps - Holiday Release - Snowman Competition


It is Day 2 of Previews for the Holiday Release from Hello Bluebird Stamps.  The release goes live at 7pm MST on October 23rd.

My card today reveals the adorable Snowman Competition stamp set which I have paired with the formerly released Snowy Sky Scene Die.   Snowman Competition is a large 6 x 8 inch stamp set and packed with cute images to create endless snowman building scenes.


I die cut the background and ink blended with Spun Sugar and Victorian Velvet Distress Oxide Inks, creating a soft but bright focal point.  I adhered these sections to a white card base with the lower layer of snow popped up on foam tape.

I stamped and coloured the images using the following Copic markers:-

Snowman & Snowball - C5, C3, C1, C0, C00, R000
Bunny - E55, E31, E41
Squirrel - T5, T4, T3, T2, T1, C0, E0000
White Goose - C5, C3, C0, E000
Green - G19, G05, YG13
Snowman Scarf - RV14, RV42, T5, T2

Images were die cut and applied with foam tape and a few highlights were added with a white gel pen plus to the bunny's scarf and polka dots and stripes on the scarves.

I added some snowflakes made using the essential Frosty Flakes Die and of course the sentiment which is one of several included in the stamp set.

Visit the Hello Bluebird Blog to see more reveals and card inspiration and leave a comment for a chance to win one of THREE $50 gift certificates.


Tuesday, September 27, 2022

Hello Bluebird Stamp - First Snow


Join me on the Hello Bluebird Blog today where I have all the details for this card featuring several Hello Bluebird products.   Use THIS LINK to reach the blogpost directly.   Thank you!


Tuesday, December 24, 2019

Winter Woods Overlay Die - Hello Bluebird Stamps

Hello and thank you for joining me on my blog today for this new card featuring the Winter Woods Overlay Die from Hello Bluebird Stamps.  Also used in this project is the Snowy Sky Scene Die and the sentiment is from the Tis The Season sentiment set and the beautiful Frosty Flakes die too.


To create this card I first die cut a panel of white cardstock using the Snowy Sky Scene Die.   I ink blended using Distress Ink in Ice Spruce and adhered these die cuts to a 110lb white cardstock base.  I took another panel of white cardstock and die cut the Winter Woods Overlay Die and glued this to the background.


A few weeks ago I made a half dozen of the snowmen from the Winter Woods Overlay die so that I could apply the snowman to several cards this holiday season.  No stamping required you just die cut the snowman, colour the pieces in any way you wish then glue them all back together.  I used Copic markers for mine.   He was adhered to the scene.

To finish up this simple card I die cut several of the Frosty Flakes - I always have many on hand when I'm creating my seasonal cards so that they are ready to go.  These were adhered with a tiny bit of glue just in the centre so that the tips of the snowflakes could be teased upwards to look more dimensional.


Finally and to pick up the red used on snowman I stamped the sentiment using red ink on to a strip of cardstock and adhered that in place too.  Since the card was intended for my father in law I wanted to keep it simple and slightly masculine and therefore it is glitter and sequin free but of course you could adorn yours as much as you like!

Appreciate you stopping by to read about this card.  Hope to see you next time.  Happy crafting!

Nicky x

Tuesday, December 10, 2019

Snowball Fight - Pop Up Box Card - Hello Bluebird Stamps

Hello!  I decided to switch things up a bit and get dimensional and I created this Pop Up Box Card using Snowball Fight from Hello Bluebird Stamps.


The actual die used to form the box is from Lawn Fawn and you can source others elsewhere.  I die cut all the parts from 110lb white cardstock.  I used Distress Oxide Ink in Tumbled Glass to ink blend the panels, fading away the blending to nothing.   I then used a white gel pen and hand drew in the falling snow.  Each panel was adhered in place on all sides of the box.  I wrote the message to my intended recipient on the panel that is on the reverse of the box before adhering it just for ease.


I stamped the kittens from Snowball Fight on to Copic friendly cardstock using Memento Ink in Rich Cocoa and I coloured them with Copic markers and highlighted points with a white gel pen then die cut the images and set them to one side for a while.


Using a Memento Ink in a pale blue shade I stamped the the pile of snowballs image 3 times from Snowball Fight.  I also stamped the two little trees from that stamp set and then I grabbed the Yeti Or Not stamp set which has more of the same style of trees but in 2 slightly larger sizes, so this provided me with a nice mix once I'd stamped them.  Using B000 I added a little colour to both the snowballs and the trees then die cut the images. 


Time to start assembling!  There's no hard and fast rule for how to do this but you just want to layer away and keep checking all your angles so that there is interest no matter from which angle the card is viewed.  Slowly but surely I adhered the elements to the scene.  A couple of the snowballs whizzing through the air are elevated and floating above the scene by adhering them to a narrow strip of acetate.  As you build your scene keep checking that the box card can be folded for mailing purposes and unless you want to size it up into a much larger envelope, be sure to keep all elements within the A2 frame (i.e. nothing should be poking out the sides when you fold it flat)!


Time now just for the finishing touches which come in the form of several Frosty Flakes being adhered into the scene and the sentiment was stamped with red ink and is from the Christmas Is Coming stamp set.

I appreciate you stopping by the blog today and I hope to see you next time.  Happy crafting!

Nicky x

Monday, December 2, 2019

Cocoa Party - Hello Bluebird Stamps

Hello friends, I'm sharing a new card featuring the sweet Cocoa Party stamp set from the October release.  For this card I wanted to bring in minty greens and peppermint pinks as befits the theme of the featured stamp set.


To make this card I grabbed a panel of white cardstock and ink blended it with Distress Oxide Ink in Cracked Pistachio.  I splashed on some water and blotted it up for a little distressing and then splattered on some metallic pearl white watercolour paint and set the panel aside to dry for a few minutes.  Meanwhile, I ink blended a second panel with Distress Oxide in Spun Sugar and used the Grassy Knoll Die to create the curved grassy edge.  The sentiments were stamped then the die cut was backed with foam tape and applied to the first panel which in turn was applied to a 110lb cover, white cardstock base - nice and sturdy!


On Copic friendly cardstock I stamped my images with Memento Ink in Rich Cocoa (how could I not)?   I used Copic markers to colour the images and then highlighted some points with a white gel pen.  They were die cut using the companion dies backed with more foam tape and applied to the scene, tucking them behind the grassy hill.


To finish the card I used the Frosty Flakes Die and cut some flakes from both white and glittered white cardstock.  I carefully added a little glue just to the centre of each flake and adhered them down.  Once dry I teased up the edges of the flakes to make them more dimensional and exciting to the eye.

How sweet of you to stop by to read about this card today.  Happy crafting!

Nicky x

Thursday, October 17, 2019

Frosty Littles - Hello Bluebird Stamps.

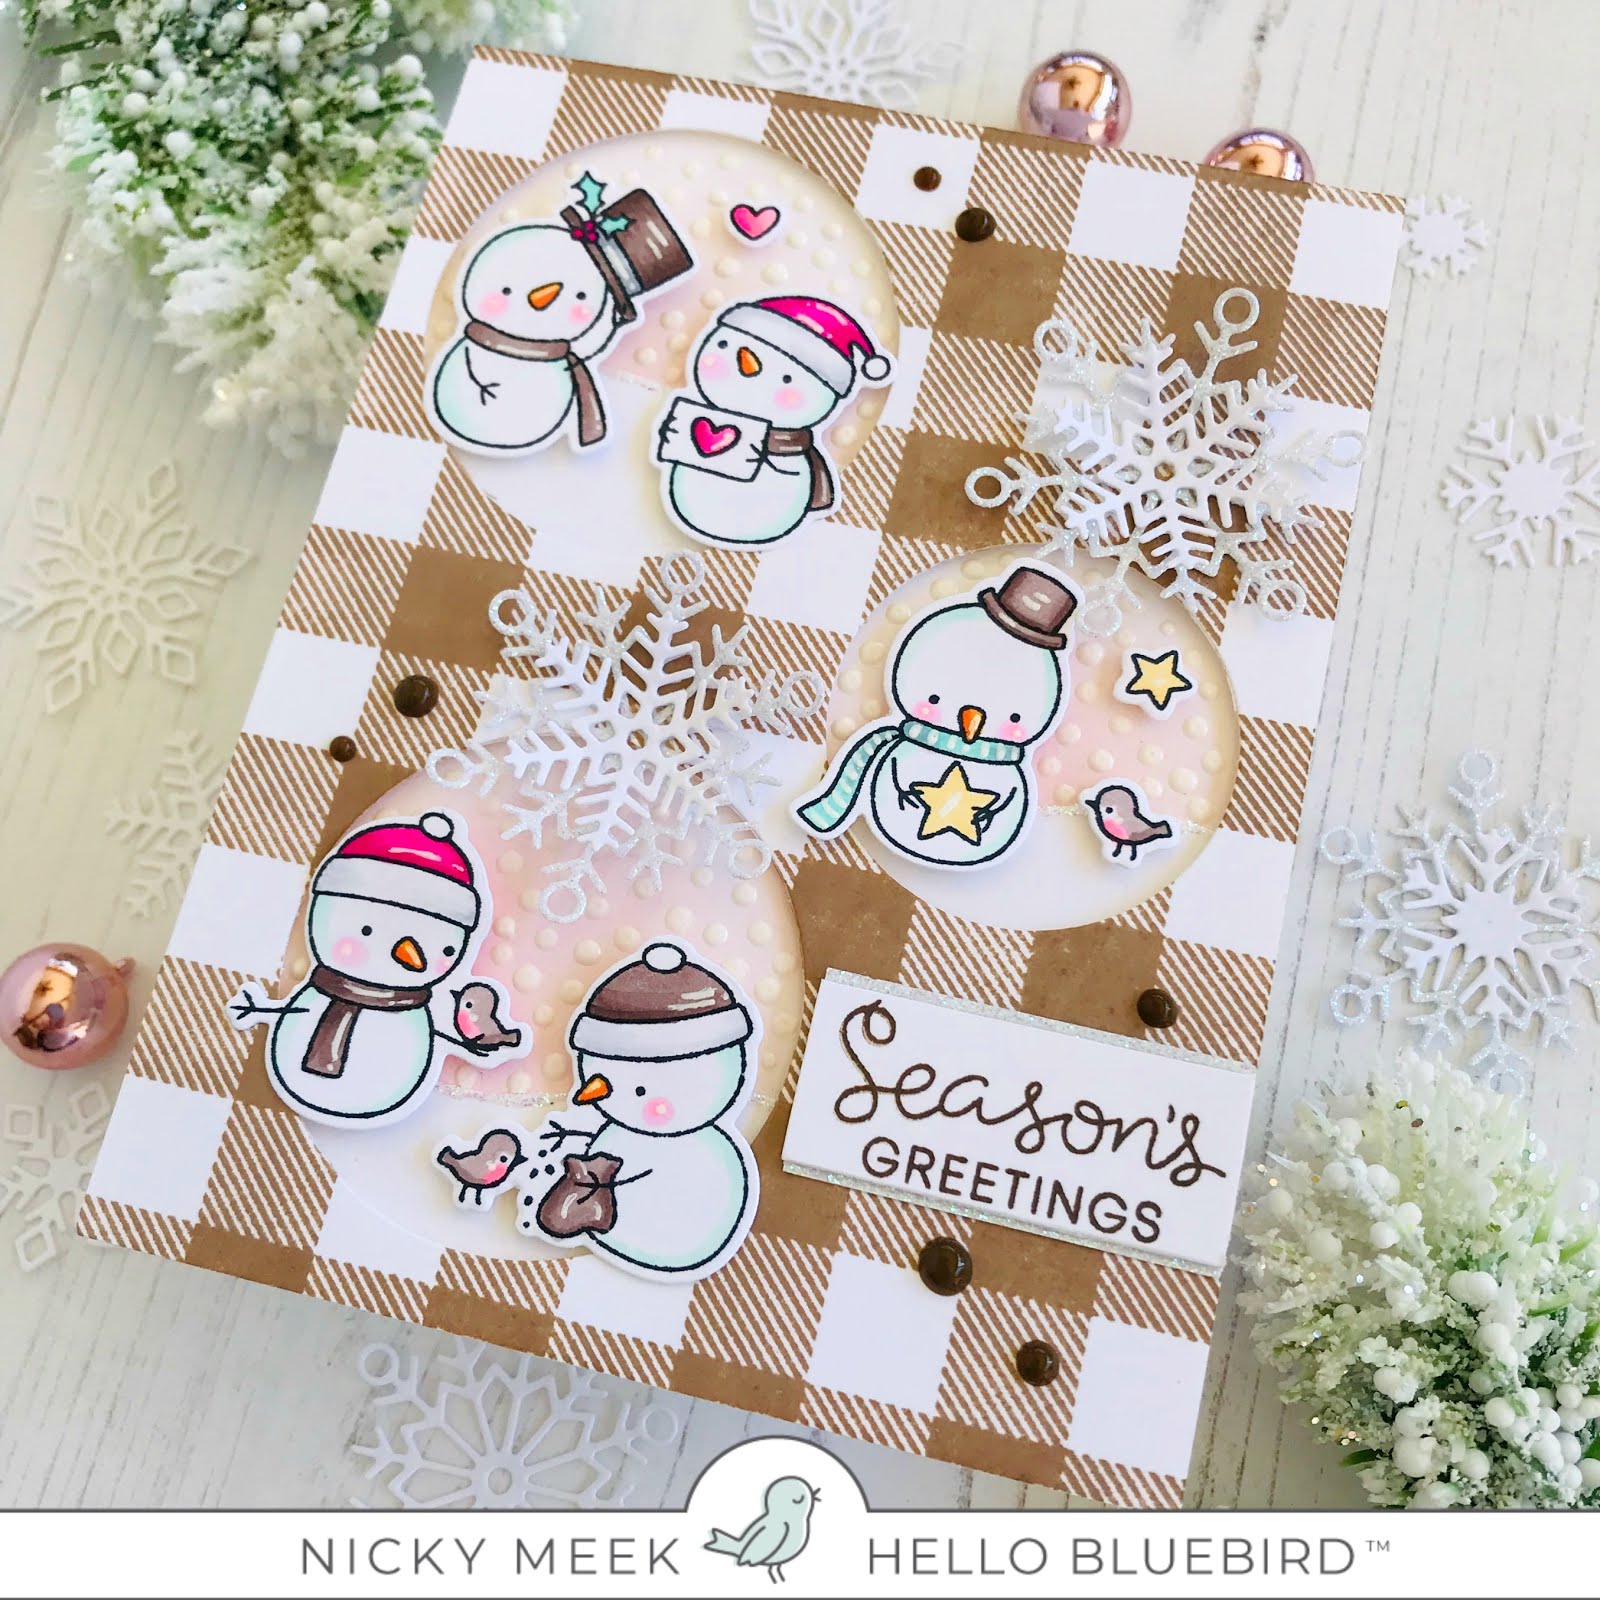
Feels so good to be back making Christmas cards again, it has to be my favourite card making 'season'.  Today, for Hello Bluebird Stamps I have a card using a favourite set from last year called Frosty Littles and the coordinating dies can be found here.  Since we just got a good cold front through my area thoughts turned to hot chocolate, pink peppermints and sparkle and this is what inspired my card.


To make this card I used the Buffalo Check background stamp.  I inked it up with Nuvo Hybrid Ink in Soft Suede and stamped it to a panel of white cardstock, repeating for a better stamped image.  I used 2 different sizes of some standard circular dies from my stash to die cut the three openings.  I did a little Distress Oxide ink blending with Spun Sugar where each opening would be on another panel of white cardstock.   I die cut 3 mini sections of 'snowy hills' using the Hill and Dale Die and edged each with some Stickles glitter in Crystal.


I backed the checked panel with foam tape and applied it to the ink blended panel and in turn this was applied to a sturdy 110lb white cardstock base.

I used Nuvo Crystal Drops in Simply White and dotted in some dimensional snowfall into each circular opening.

On Bristol Smooth cardstock I stamped my Frosty Littles images and coloured them with Copic markers.  They were die cut, backed with foam tape and applied to create 3 little scenes in each opening.  Points were highlighted with a white gel pen.


The card was finished with layered snowflakes die cut using Frosty Flakes.  The larger flake was die cut with white sparkly paper and the smaller one layered on top from white lightweight cardstock.  These were glued together and to the card.

Finally the sentiment was stamped from Snow Play and I used Nuvo Crystal Drops in Dark Walnut for a few chocolatey embellishments.

I'm so happy you navigated to my blog today to read about this card.

Happy crafting!

Nicky x

Friday, December 21, 2018

Moose and Friends - Hello Bluebird Stamps

Hello!  Have you got all your Christmas cards made yet?   Maybe you are running out of inspiration in which case perhaps I can tempt you with this card made using Moose and Friends  by Hello Bluebird Stamps.


For this card I used a Clarity Stencil Brush to ink blend Distress Ink in Spun Sugar to form a focal point which I then splashed with water and blotted it up.  The panel was die cut to provide the faux stitched edge.  Next, I die cut a panel of Neenah 110lb white cardstock using the same stitched edge die and from each end I die cut a 'hill' using Hill and Dale Die.    I applied some Ranger Multi Medium Matte glue to the hills and then sprinkled on some Distress Glitter.  These two die cuts were layered over one another at the base of the card and adhered down.  The larger hill is glued directly and the smaller hill is on foam tape.


I stamped up the moose and bunny from Moose and Friends onto Bristol Smooth cardstock and watercolour painted them with my Kuretake Zigs.    The knitted hat, gifts and pinecones were stamped from Little Holiday Extras, where necessary they were watercolour painted and adhered with foam tape along with the moose and bunny.

Next, I grabbed the new Frosty Flakes Die and die cut the flakes several times so that I had a good supply of them.  I choose a few for this card, arranged and adhered them, slightly teasing up the outer edges for dimension.


The final touch was the sentiments.  These sentiments come from the Typed Christmas sentiment set which I ADORE!  They were stamped with the same Ranger Archival Ink in Potting Soil that I used for my characters etc.  Each sentiment was aligned on the right hand side and adhered with foam tape.

I thank you so much for stopping by the blog today, I hope you enjoyed this card and found some inspiration.  Happy Holidays!

Nicky x