Showing posts with label Valentine. Show all posts

Wednesday, February 26, 2025

Alex Syberia Designs February Release Blog Hop & Giveaway


I thank you for joining me today on my blog where I'm sharing my first card for Alex Syberia Design's February release.  Love cards shouldn't only be reserved for Valentine's Day and there's some wonderful love and friendship themed products to choose from in the new selection being offered.  Did you hear that there is a UK online site for Alex Syberia products now and you can find it HERE?  This shop serves the UK and EU but also ships across the world as does the US online site which is found HERE.  Last but not least THIS LINK will take you to the Alex Syberia Designs blog hop post which I encourage you to visit.  Be sure to read all the way to the end of my post for GIVEAWAY information and to find a link the next designer on the blog hop.  Thank you.

My first card for the release uses the following products:-


I ink blended a white panel using Blush ink by The Stamp Market.  I faded the ink so it was darkest at one end and lightest at the other.  Over this I glued a white die cut created using the Heart Collage Die.  I then framed this out with a pale peach frame created using the Good Day Quilted Rectangles Die Set and some cardstock from my stash.  The frame was applied popped up on foam tape.


I then took the new Love & XOXO Die Set and die cut 4 times.  Twice in white cardstock, once in pale blue and finally in red.  I glued the letters in stacks with the white slightly offset and you also get a glimpse of the pale blue when viewed from an angle and this will eventually tie in to some of the colouring on the penguins.

I determined a straight line and adhered the big XOXO to the card background.

The images from Penguin Love were stamped with black ink and coloured with the following Copic markers:-

Penguins - T6, T5, T4, T3, G00, G0000, C3, C1, C00, Y19, YR07
Blush - R22, R21, R20, R00
Red - R29, R24, R05
Pot - G00, G0000, C3, C1

All images were die cut using the coordinating dies.


I backed the images with foam tape and applied them to the scene and set them standing on the Roses Are Red sentiment from the same stamp set.

To complete the card I took out my white gel pen and I highlighted the coloured images and the XOXO and then I did some highlights in the actual background collage to create further interest.

Last but not least a few sparkling clear sequins created a subtle sparkle.

Thanks for stopping by!

Giveaway info:


Alex Syberia Designs is giving away a $50 gift certificate to 1 winner and a $15 gift card to 3 lucky winners. 


Open internationally. All 4 winners will be drawn from the entrants that have played along with this Blog hop by midnight GMT March 8th, 2025. Winners will be announced on the Alex Syberia Designs blog 'Giveaway Winners' page on March 9th, 2025.


Blog Hop Order:


Alex Syberia Designs

Emelie
Erin
Colleen

Sylvie

Carly

Amanda

Bobbi

Brenda

Nicky (you are here)

Nicoletta

Sandi


Tuesday, February 11, 2025

Waffle Flower - Post Collage Valentine


A warm welcome to you and thank you for joining me on my blog today where I'm sharing a Valentine's card made just for the love of it that showcases the  Postage Collage products from Waffle Flower

To make this card I used the following products:-


I took an A2 panel of sturdy white cardstock and I used the Postage Collage Die to die cut it.


The Postage Collage Rose Stencil has three parts to it and starting with the first one I ink blended until all of the designs were complete.  I used the following Distress Inks for the blending:-

Spun Sugar
Victoria Velvet
Picked Raspberry
Festive Berries
Cracked Pistachio
Mowed Lawn

I then used the Postage Collage Love Stamp Set and Eiffel Tower Ink by MFT to stamp the postage themed images in various positions.

I backed this decorative panel with dimensional foam tape and then adhered that to a white panel that was hidden behind the main one.


I took some toning patterned cardstock from my stash, this one is Strawberry Frosting by Lawn Fawn and I trimmed it just a little shy of A2 and I adhered the decorative panel to it and then this was all glued to an A2 card base.

I'm always itching to embellish and add more but with this one I kept it beautifully simple and classic and added nothing more.  Card done!

Thanks for coming by to read today, it is very much appreciated and I'll be back very soon with something new.  Have a great day!


Monday, January 6, 2025

Pink & Main - Love Letters


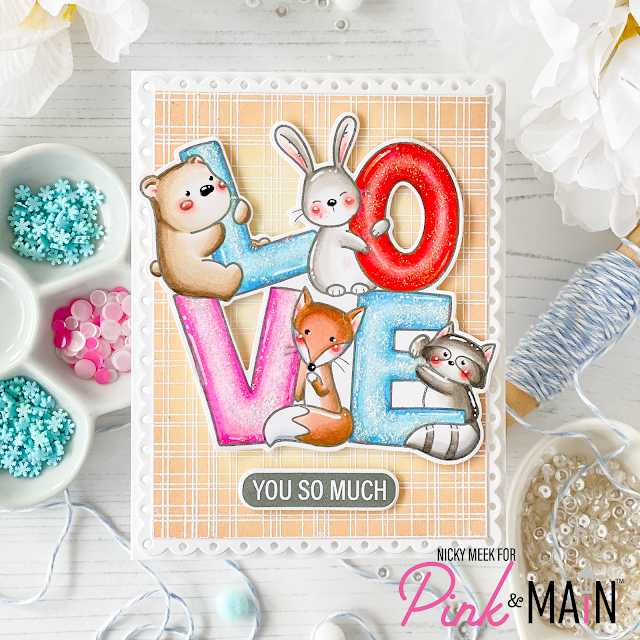
Hello friends!  I hope 2025 has got off to a good start for you all personally.  Today I'm sharing a card made as a guest designer for Pink & Main and which frankly has you covered year round but of course with Valentine's Day right around the corner there is special focus.

This card features their new 'Love Letters' stamp set, together with the coordinating die.  The scalloped panel in the back was made using Fancy Scalloped Rectangle Stackables Die by Lawn Fawn and the patterned background created using the now discontinued 'Woven' background stamp from Hello Bluebird.

Ok, lets get started!  As with just about every card I create I started with the background and I kept it neutral so that the colourful letters popped.  I took a panel of cardstock and ink blended using Tea Dye Distress Oxide Ink, inking a little more around the edges and fading towards the centre focal point.  I hit this with my heat gun to dry it then stamped the panel using Versamark Ink and the Woven background stamp then I heat embossed in white.


I die cut a white panel of cardstock using the scalloped die and then glued the blended panel to that.  I backed the panels with white craft foam and applied it to a white card base.

I used Eiffel Tower ink by MFT to stamp the image and I coloured with the following Copic markers:-

Bear - E44, E43, E42, E41, E40
Bunny - W3, W2, W1, W0, W00
Fox - E35, E34, E33, E11, C3, C1, C0
Raccoon - W6, W5, W4, W2, W0, C3, C1, C0
Blushes - R22, R21, R20, R00

I used a black glaze pen to emphasise their noses and eyes and a white gel pen to highlight a few spots.


I used the coordinating die to die the image and also the stamp sentiment.  I backed it all with dimensional foam tape and applied to the background.

The final act was to grab my Stickles Glitter in 'Diamond' and glitter up those letters in all their glory and with that done this card was complete.

Shop this delightful stamp set by clicking the Pink & Main link at the top of this blogpost.  Thanks for stopping by!


Friday, January 3, 2025

Sunny Studio Stamps - Window Trio Hearts Portrait Die


Please join me today on the Sunny Studio Stamps blog where I'm sharing this card using the Window Trio Hearts Portrait Die (although I only used the cupcake image included with the die).  This link will take you to the blog.  Thank you!


Friday, March 1, 2024

Sunny Studio Stamps - Tree Branch Dies


Hello!  You can find me over on the Sunny Studio Stamps blog today with everything you need to know about this new card.  Please use THIS LINK to be taken directly to the blog.  Thanks and have a great day!


Friday, January 19, 2024

Sunny Studio Stamps - Gift Card Envelope


Hi!  Come and find me and all the details for this new Valentine's themed card for Sunny Studio Stamps on their BLOG today.  Thanks and have a wonderful day!


Friday, January 12, 2024

Sunny Studio Stamps - Love Birds


Hello!  Today I'm happy to announce that I have joined Sunny Studio Stamps and it is my absolute pleasure to be designing for owner Mendi and alongside the rest of her talented team.  Most Fridays you'll be able to find me on their BLOG with a new project and this Love Birds card is my first, so please use the blog link to join me there for all details.  Thanks and have a great day!


Wednesday, January 10, 2024

My Favorite Things - January Release Spotlight Day


Greetings Earthlings!  Today we are spotlighting the January release from MFT Stamps which is already available for purchase so go and grab your favourites before they go out of stock.  Here's what I've used to make this card:-

Wonky Stitched Rectangles Stax Die-namics

I ink blended a white panel using Peacock Feathers Distress Oxide Ink and dotted in some interest with a white gel pen and Copic.  The panel was die cut using the Stax Die-namics and I popped it in my Misti and stamped the sentiment.  The panel was backed with craft foam and applied to another white A2 panel then to the card base.


I stamped the images from Monster Love using Memento Ink in Rich Cocoa.  I coloured with the following Copic marker combinations:-

Landscape - G19, YG45, YG13, YG01
Spaceship - C5, C3, C1, C00, BG000
Monster (left) - BG13, BG32, BG11, W3, W1, YR09, YR04, RV02, RV63
Monster (middle) - RV02, RV10, RV000, YR09, YR04, Y38, BG32, BG11
Monster (right) - RV63, RV02, RV000, BG32, BG11, R29


Images were highlighted with a white gel pen and die cut then the landscape was glued directly to the background and all other elements applied with foam tape.  Card complete!

Thank you for stopping by my blog today and don't forget to visit and subscribe to the MFT You Tube Channel for endless how-to videos, inspiration and product reveals.


Monday, January 8, 2024

My Favorite Things - January Release - 1 More Day To Go!


I'm very happy you have stopped by my blog today where I'm sharing this easel card that was created using the latest stamp set illustrated by Stacey Yacula.  Here's what I've used:-

Blueprints 27

The photo at the top of this blogpost shows the card opened into an easel in one of two positions.  Below is the card in it's second easel position.   A recipient can choose which position to sit the card open depending on the height it will be at but also the sender can choose to write above the inside sentiment or around it or just write on the back of the whole card.


Here's a link to an easel card tutorial by Jennifer McGuire.  Start out with a basic design and as you grow in confidence you can do endless more complicated, charming designs.  They're really not tricky!

So for this design I used Blueprints 27 to cut the same scallop edged panel twice.  I ink blended both panels after masking off the edges and stamped the larger sentiment.  I was then able to attach the easel to the back of the panels with glue.


I stamped the images from Micest Thing using Memento Ink in Rich Cocoa and I coloured with the following Copic markers:-

Mice - E31, E41, E40, C3, C1, C0, W3, W1
Blushes - R22, R21, R00
Ears - R21, R00
Hearts - R08, R22, R20

I then die cut with the coordinating die-namics.


Images were backed with foam tape and I also stamped the smaller sentiment and backed it with foam tape too.   I applied the sentiment for one position to sit the easel and then with the second position I made sure to align the top of the mouse with the top of the thought bubble so that the easily would sit straight if placed in that position.  I then stuck the elements to the main front of the card.

Points were highlighted with a white gel pen.


Thank you for stopping by my blog today and don't forget to visit and subscribe to the MFT You Tube Channel for endless how-to videos, inspiration and product reveals.


Sunday, January 7, 2024

My Favorite Things - January Release - Two Days To Go


Hello and welcome to my blog where I continue to preview the January 9th release from MFT Stamps.  That's right - just TWO days to go!  Here's what I've used to make today's card:-

A2 Stitched Rectangles Stax (Set 2) Die-namics

To create the card I first ink blended a white panel using Distress Oxide Inks whereby I mixed a little Dried Marigold and Spun Sugar for a perfect peachy blend.  I then die cut using the Stax Die-namics and stamped the sentiment in my Misti.  The panel was backed with craft foam and applied to another A2 panel then to the card base.


I used Memento Ink in Rich Cocoa to stamp all of of the images from Paper Planes and I coloured using the following Copic marker combinations:-

Paper Planes - C3, C1, C0, C00, E40
Dogs - E74, E71, E70, E31, E41, E40, C3, C1, C0, C00
Blushes - R22, R21, R00
Pale Blue - BG000, BG70
Birds - E31, E41


All elements were die cut and applied with foam tape no matter how small they were and to embellish simply I added 3 dots under each cloud using a metallic gelly roll pen and three sparkling clear sequins were tucked in, one behind each dog in a paper plane.

Thank you for stopping by my blog today and don't forget to visit and subscribe to the MFT You Tube Channel for endless how-to videos, inspiration and product reveals.


Saturday, January 6, 2024

My Favorite Things - January Release - 3 Days To Go!


Just THREE days to go now until the January 9th release by MFT and this is what I've used to make this card:-

Grassy Edges Die-namics

This is a mini-slimline Valentine's card where I started by ink blending a background using Poppin' Pink Ink by MFT.  I splattered this with white acrylic paint loosened with water and dotted in some pink Copic marker for more interest.  This panel was applied to a card base.  I die cut two grassy borders and ink blended with whatever ink was left on my blending brush and applied these to the background, the large directly with glue the smaller with foam tape.


I used Memento Ink in Rich Cocoa to stamp all of the images from Lovely lions and I coloured with the following Copic markers:-

Deep Pink - RV17, RV09, RV25, RV13
Lion's Mane - E44, E57, E43
Lion's Bodies - Y26, E31, E41, E40
Blushes - RV25, RV13, R000

I highlighted with a white gel pen and die cut with the coordinating die-namics and applied with foam tape.


To complete the card I stamped the smaller sentiment on a sentiment strip and also applied with foam tape.

Thank you for stopping by my blog today and don't forget to visit and subscribe to the MFT You Tube Channel for endless how-to videos, inspiration and product reveals.


Friday, January 5, 2024

My Favorite Things - January Release - 4 Days To Go!


The new MFT release is crazy adorable and will be available for purchase January 9th at 10am Eastern.  My card today features the following products:-

Blueprints 25 Die-namics

Please note that from this point forwards, coordinating die-namics for stamp sets will no longer be available separately.  This means that you must either commit to buying the stamps and dies together immediately or only buy the stamp set on it's own.  Buying both together is at a discounted rate.


I stamped a white panel using the main cloud image and Memento Ink in Rich Cocoa  to create a background and die cut using Blueprints 25.

I stamped the piglets I'd be needing from Cupigs with the same ink and everything was coloured with following Copic colour combinations:-

Pigs - R11, R01, R00, R0000, W3, W2, W1, W00
Clouds and 'Diapers' - C3, C1, C0, C00, BG000
Brown - E77, E74, E71, E70
Blushes, R22, R21, R00

Points were highlighted with a white gel pen and applied with foam tape for dimension.

I glittered some of the hearts on the clouds and the 'cupigs' angel wings ... because glitter makes everything more fun - tell me I'm wrong!


To finish up I simply stamped the sentiments on two sentiment strips and added a little colour like the background and added the strips at playful angles with foam tape.

Thank you for stopping by my blog today and don't forget to visit and subscribe to the MFT You Tube Channel for endless how-to videos, inspiration and product reveals.


Tuesday, January 2, 2024

My Favorite Things - Vault Release


Well a great big HAPPY NEW YEAR to you all and thank you for joining me today on my blog for the first day of two, featuring MFT's brand new Vault Release which is available to purchase NOW!  Here's what I've used to make this shaker card:-

Essential Sentiments
Skinny Strips Die-namics
Sweet Summer Color Blends 6 x 6 Paper Pad

I started by creating 3 x A2 panels.  The first was taken from the paper pad, the second was created from acetate (to create the shaker window) and the third was white cardstock.


I die cut the white panel using the Full of Heart Die-namics then backed the panel with the acetate using secure Scor-Pal tape on the reverse.  I then flipped this over and added foam tape around the edges and dusted the inner edge with anti static powder so that the shaker filler didn't stick to the sides.  I removed the backing paper of the foam tape and dropped a mix of shaker filler contents until I was happy with the quantity and colour mix.  I then closed the shaker unit by adding the patterned paper panel from the pad.  I was then able to glue this to the card base.

When creating the patterned paper panel there were some leftovers which nicely show the pretty blend of colours.  I took a die from the Heart Stax Die-namics and die cut in each colour portion so that the hearts on top of card echoed the blend inside the card.  Each one was adhered to a white cardstock die of the same size just to make them sturdy and a tad more dimensional and I glued them in place.


To finish the card, all I needed was the perfect sentiment and for this I went back to the Essential Sentiments stamp set which I stamped in the perfect toning pink ink namely Cotton Candy Premium Dye Ink from MFT.  I backed the sentiment strip with some foam tape just in the centre and applied it to the centre heart and with that the card was complete!

Thank you for stopping by my blog today and don't forget to visit and subscribe to the MFT You Tube Channel for endless how-to videos, inspiration and product reveals.