Showing posts with label Birdie Brown. Show all posts

Wednesday, November 8, 2023

My Favorite Things - Vault Release Spotlight


Welcome to my blog!  Today I have a second card featuring products that were just released from MFT's Vault and which are once again available for purchase.  Here's what I've used to make this Christmas card:-

Stitched Snow Drift Die-namics
A2 Stitched Rectangles Stax Set 2 Die-namics
Small Brick Wall Stencil

I started with a panel of Kraft cardstock and overlaid this with the stencil and then I ink blended through it with white pigment ink to create the brick wall design.  I then created a white panel of cardstock.  From one end I die cut with the Icicle Edge Die-namics and from the other I used Stitched Snow Drift Die-namics.   I ink blended a little icy blue on to each using Distress Oxide Ink in Tumbled Glass and then I used the largest die from the Stax set to die cut both the kraft and white pieces so that they were all sized the same.


I stamped the sentiment to the icicle portion and then added both the icicle and snowy ground portions to the brick background using dimensional foam tape.  This panel was then adhered to a red card base inside of which I added a white insert for writing on.  I set this to one side.

I stamped the images I was needing from Santa's Elves using Memento Ink in Rich Cocoa.  I coloured using the following Copic marker combinations:-

Skin - E34, E11, E21, E00
Blushes - R22, R21, R00
Red - E59, E39, RV29, R24
Green - G29, G28, YG67, YG05
White - C5, C3, C1, C0
Tree - BG10, BG0000, C1, C0, YG31

I highlighted with a white gel pen then die cut with the coordinating die-namics and I applied the Elves and all other elements using either a single or double layer of dimensional tape.


For the finishing embellishments I used Stickles glitter to add twinkle to the icicle edge and then more subtly to other elements in the scene and then I used white Nuvo drops to add in some dimensional snow.

Thank you for stopping by my blog today and don't forget to visit and subscribe to the MFT You Tube Channel for endless how-to videos, inspiration and product reveals.


Friday, August 18, 2023

MFT Stamps August Release Spotlight


Continuing to spotlight products from the MFT Stamps August release with this new card featuring a Birdie Brown illustrated stamp set.  Here's what I've used:-

Notebook Paper Pad
A2 Stitched Rectangles Set 2 Stax Die-namics

I created a panel of white cardstock and stamped it with the Denim BG stamp then die cut using the largest die from the Stax die-namics.  I also used the same die to die cut a corner of the Notebook paper pad and I glued this to the denim panel, backed the whole thing with white craft foam and then glued to an A2 white panel then to the base.


I stamped the images from Class Act using Memento Ink in Rich Cocoa.  I coloured with the following Copic markers:-

Bus - Y19, Y38, W3, W2, W0, T2, T0, T7, BG10, BG0000
Girl Skin - E33, E21, E00, E000
Girl Hair - E40, E51, E42
Girl Clothing - C3, C1, YR09, YR07, YR04, E77, E44, E43, E42
Boots - E44, E43, E42, E41
Apples - R39, R37, R08, YG45, YG13
Pencils - Y38, Y19, T1, R83, R81, E41, E40

I die cut and applied the images with foam tape.  Points were highlighted with a white gel pen and I stamped the sentiment on a sentiment strip and also applied with foam tape.


Thank you for stopping by my blog today and don't forget to visit and subscribe to the MFT You Tube Channel for endless how-to videos, inspiration and product reveals.


Sunday, April 16, 2023

My Favorite Things - Fresh Foliage with The Whole Herd


A warm welcome to my blog today where I'm sharing a new card for MFT Stamps using the brand new Fresh Foliage stamp set from the latest release which I've combined with the ever popular Birdie Brown illustrated The Whole Herd stamp set.   Here's what I've used to make this birthday card:-


I took an A2 panel of white cardstock and using MFT's lovely inks I stamped using 3 green colours and just two images from the Fresh Foliage stamp set.  I started from the top and worked down and then ink blended through the lower third of the foliage to fill in the ground a little more.  I stamped the sentiment then die cut using the A2 Die-namics.  I backed this with a piece of white craft foam and glued it to a green panel and then in turn to my card base.


I then stamped the images I was wanting to use from The Whole Herd using Memento Ink in Rich Cocoa (my go to for stamping most of the time) and then coloured with Copic markers.  Here are the colours used:-

Cow - T4, T3, T2, T1, C3, C1, C0, C00, R21, R20, R00, R000, E44
Chicks - Y19, Y15, Y06, Y00
Piglet - R21, R20, R00, R000
Chicken - R22, E43, E42, E41, C3, C1, C0, C00

Cheeks were blushed and points highlighted with a white gel pen and then I die cut using the coordinating die-namics and baked the larger animals with regular foam tape and to make them pop a little more, for the chicks I used a thicker foam tape.

I finished the card by adding some white gel pen dots throughout the foliage and added three sparkling clear sequin accents which just add a little interest as they catch the light while the card is handled by the recipient.


Thank you for stopping by my blog today and don't forget to visit and subscribe to the MFT You Tube Channel for endless how-to videos, inspiration and product reveals.


Thursday, April 13, 2023

My Favorite Things - CC209


Well hello there and welcome to a new Color Challenge CC209 for MFT Stamps.  This is my inspiration card and this is what I've used in the making of it:-


I masked a line on an A2 panel and above it I softly ink blended using Cotton Candy Ink by MFT.   I spattered and blotted up water, then added some white acrylic paint to water and spattered that and finally I spattered some Poppin' Pink ink loosened with a drop of water too.

I popped the panel in my Misti to stamp the sentiment and applied this panel to my card base.


I stamped and coloured the images from Sittin' Pretty using the following Copic markers:-

Door - RV19, RV17, RV09, RV06, T1, T0, C00, BG0000
Girl Skin - E34, E33, E11, E21, E00
Girl Blush - RV06, RV02
Girl Hair - E43, E42, E0000
Girl Clothes - RV00, C1, C00
Plant Greenery - YG99, YG97, YG95, YG93, YG91
Medium Pink Pot and Tulips - V05, V01, RV02, RV00

All images were die cut and either glued directly or added with foam tape for dimension and I finished by simply highlighting points using a white gel pen.


Thank you for stopping by my blog today and don't forget to visit and subscribe to the MFT You Tube Channel for endless how-to videos, inspiration and product reveals.


Wednesday, March 1, 2023

My Favorite Things - Wednesday Sketch Challenge - WSC635


Hello and welcome to a brand new Wednesday Sketch Challenge for MFT Stamps.  This is WSC635 and i hope you are going to be able to carve out some time to join in.  Full details for entering any of MFT's challenges can be found on their site.

My inspiration card uses the following MFT products:-

Happy Patterns 6 x 6 Paper Pad

I prepared a panel using the Rectangles Die-namics and ink blended it with Sour Apple ink by MFT.  I die cut another panel using the same die but using a gingham sheet of patterned paper from the pad, I stamped the sentiment on the angle, backed it with craft foam and mounted it on the ink blended panel which in turn was glued to a full A2 white panel and then to the card base.


I stamped the images I needed from Ewe Are The Best and coloured them with the following Copic markers:-

Sheep - C3, C1, C00, R0000, E01, E00, R000, T5
Party Hat - B24, B32, B21
Balloon - R39, R29, R27
Flowers - G46, G24, YG13, Y19, Y04, C1, YG0000

I highlighted a few points with a white gel pen and then die cut and applied with foam tape.  

To finish this simple design I added a little grey shadow under each sheep with Copic markers to ground them.

Now let's see what YOU do with the sketch - have fun and happy crafting!


Thank you for stopping by my blog today and don't forget to visit and subscribe to the MFT You Tube Channel for endless how-to videos, inspiration and product reveals.


Wednesday, February 15, 2023

My Favorite Things - Wednesday Sketch Challenge WSC633


Thank you for joining me today to take a look at my inspiration card for MFT's newest Wednesday Sketch Challenge WSC633.

Here are the products used:-

A2 Stitched Rectangles Stax Set 2 Die-namics
Blueprints 25
Essential Stitched Sentiment Die-namics

My card started by creating an A2 panel using Princess Pink cardstock.  Over this I glued in place a panel of patterned cardstock that had been die cut using the Stax Die-namics.  I used a smaller die from the same set to create the alternative 'ruled' panel and this was backed with white craft foam and I used a star die from the Blueprints to die cut a line of stars along the top edge and then used the same die to create coloured stars from MFT cardstock and adhered them through the gaps.  I applied this panel to the grey panel (trimmed to size and following the sketch).


I ink blended a little focal point on the white panel then stamped my images and coloured them with the following Copic markers:-

Mouse - E41, E40, W1
Cupcake - E87, E44, E43, E42, E41, YR0000, E50, E30, RV63, RV52, R20
Blush, Ear and Party Hat - RV63, RV52, RV000, R20, R00

I used a white gel pen to highlight 2 or 3 points then die cut and applied with foam tape.

To finish my card I stamped and applied the sentiment with foam tape and glued some teeny tiny gold stars for twinkling accents.

Have fun entering the challenge - full details can be found on the MFT site.


Thank you for stopping by my blog today and don't forget to visit and subscribe to the MFT You Tube Channel for endless how-to videos, inspiration and product reveals.


Saturday, December 3, 2022

My Favorite Things - Warmest Wishes


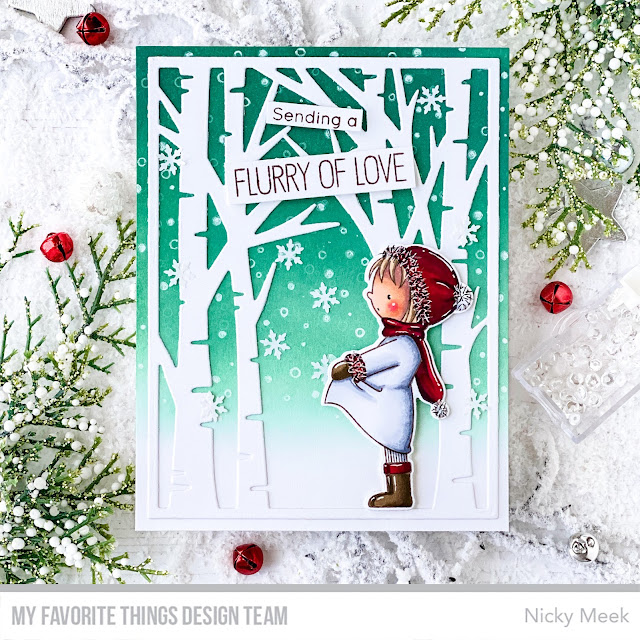
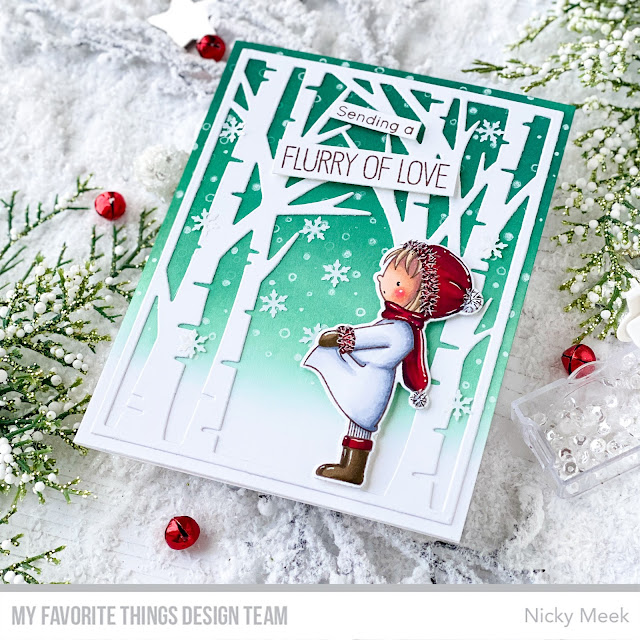
I recently treated myself to a few Birdie Brown illustrated stamp sets for MFT Stamps that I hadn't previously owned and this Warmest Wishes mini stamp set was one of them.

Products Used:-


I ink blended a white panel using Pine Needles Distress Oxide Ink, then used white ink to stamp in some of the snowfall images from the stamp set and overlaid that with a white die cut of the Birch Tree Forest Cover-Up Die-namics which I glued in place.   I used a white pen to fill in some of the open circle snow images but left others as circles for a slightly different look from the norm.


I stamped the girl from Warmest Wishes with Memento Ink in Rich Cocoa and coloured her with the following Copic markers:-

Skin - E04, E11, E21, E00
Blush - RV13, R21, R00
White Dress - C5, C3, C1, C0, C00
Red - R89, R39, R29
Boots & Gloves - E89, E44, E43

I used a white gel pen to highlight some areas and to add white fluff to the fringe of her hat, cuff and bobbles.  I then came in with a fine tipped black archival ink pen and added some depth to the fluffy affect using that and then I used a pale gold gel pen to add metallic fluff -  you can only see this when the card is handled and it catches the light.

I die cut the image using the coordinating die-namics and applied her with foam tape.

I stamped and applied the sentiments at jaunty angles to keep it playful and then added a few white snowflake embellishments to finish up the scene.


Thank you for stopping by my blog today and don't forget to visit and subscribe to the MFT You Tube Channel for endless how-to videos, inspiration and product reveals.


Wednesday, August 24, 2022

My Favorite Things - Wednesday Sketch Challenge - WSC608


Welcome to my blog and a brand new Wednesday Sketch Challenge at MFT Stamps!  This is WSC608 and I'm sharing my inspiration card.  I love this sketch, I think it is very cool for a whole variety of card designs so I hope you will enter the challenge.

Products used:-


I used the Stax Die-namics to die cut 3 identical panels of white cardstock.   I used the Snow Drifts Die-namics to create the 'hills'  from two of the panels.

I ink blended the back panel to create a focal point and adhered it to my A2 white card base.   I also ink blended the edges of the the two 'hills' and then I applied both of these layers to the background panel with dimensional foam tape behind each for some super dimension.   I stamped the sentiment with red ink.


I stamped and coloured the images from Ready, Set, Snow.   I used the following Copic colours:-

Bunny - E31, E41, E0000, W2, W2, W0, W000
Penguin - W6, W5, W4, W3, W2, W1, W0
Red - R39, R29, R24, R22
Blue - B97, B95, B91

Highlights were added with a white gel pen and then the images were die cut and added the scene either with a single or double layer of foam tape to give the appearance that they are flying down that mountain side.

To complete the project I stamped the fir trees and adhered them either directly or with foam tape and I added 4 points stars and light falling snow to the sky with a white gel pen for the final touch.


Thank you for stopping by my blog today and don't forget to visit and subscribe to the MFT You Tube Channel for endless how-to videos, inspiration and product reveals.


Wednesday, July 20, 2022

My Favorite Things - WSC603

Friends!   There is a brand new Wednesday Sketch Challenge WSC603 - are you going to play along?  Here's my inspiration card and the sketch for this week - read on! 


Products Used:-

Ewe Are The Best Stamps
Ewe Are The Best Die-namics
A2 Double Stitched Rectangle Stax Die-namics

Kind of a fun one this week right?   So I masked an A2 white panel of cardstock and used Spun Sugar Distress Oxide Ink to create the 3 sections with ink blending.   The tape was carefully removed.

I stamped and coloured the elements from Ewe Are The Best one of my very favourite Birdie Brown stamp sets and I coloured everything with Copic markers:-

Ewes - C3, C1, R30, R000 R0000, RV63, RV52, RV10
Greens - G07, YG45, G12, G40
Browns - E55, E31, E41


I used the coordinating die-namics to die cut all the elements.   I die cut the panel with the A2 Double Stitched Die-namics and applied it to an A2 white panel which in turn was glued to my card base.

I popped the card in my Misti and stamped the sentiment.

Lastly I played around with different little vignettes for each of the three defined sections and once I'd found what I liked I snapped a quick photo so that I could move everything to one side whilst I started glueing it all down and with key elements added with foam tape.     The photo is there for if I couldn't remember my layout.   Generally I do remember but the day I don't take a photo is the day I forget lol!

Finally, I used a white gel pen to highlight a few points and with that the card was complete.


Thank you for stopping by my blog today and don't forget to visit and subscribe to the MFT You Tube Channel for endless how-to videos, inspiration and product reveals.



Thursday, June 23, 2022

My Favorite Things - Color Challenge #CC192

There's a new Color Challenge CC192 at My Favorite Things which I hope you will play along with for a chance to win a gift voucher.  Here is my inspiration card and the Paint Book for this new challenge.


Products Used:-


Copic colours used:-

Bear - E87, E44, E43, E42, E41, E0000, W7, W5
Blues - B04, BG02, B01
Greens - YG03, YG01, YG0000

I die cut panel was masked.   Above the line the clouds were ink blended using the stencil and then the mask was moved and ink blended beneath it for grass.

The sentiment was stamped, the panel backed with white craft foam and mounted to an A2 panel.

The bear, party hat and balloon were stamped and coloured with the Copic colours listed above, the images were die cut, backed with dimensional foam tape and applied to the scene.

A few sparkling clear sequins act as finishing accents.


Thank you for stopping by my blog today and don't forget to visit and subscribe to the MFT You Tube Channel for endless how-to videos, inspiration and product reveals.