Showing posts with label Wednesday Sketch Challenge. Show all posts

Wednesday, April 26, 2023

My Favorite Things - Wednesday Sketch Challenge - WSC643


Hello and welcome to a new Wednesday Sketch Challenge for MFT Stamps!  This is WSC643 and that's the sketch (above) that you are working with this week to inspire your own creation to enter the challenge for a chance to win a gift voucher.  Full details for challenge entries can be found on the MFT site.

Here's what I've used in the making of my inspiration card:-

Watercolor Wash Free Form Stencil
Watercolor Wash Rectangle Stencil

To kick things off I was inspired by the sketch to use the two stencils to form the 3 'water ripples'.  I used Summer Splash Ink to blend.  I then used the Stax Die-namics to scale down the A2 panel which I backed with white craft foam and adhered to an A2 pattern panel from the pad, then to my card base.


I stamped the images I was going to need from Island Shell-ebration and coloured them with the following Copic markers:-

Sand - E95, E42, YR61, YR00, E0000
Palm Tree - E87, E44, E55, E42, G28, YG67, YG13, YG01
Coconut Cocktail - E87, E44, E42, E41, E40
Blue Crab - FB2, B93, B91, RV06, FRV1, RV21

Points were highlighted with a white gel pen and then I die cut using the coordinating die-namics and applied to the scene using dimensional foam tape.

To finish the card I stamped the sentiment on a Skinny Strip and applied that with foam tape and last but not least I applied some water droplet style embellishments  to complete this simple but fun card.


Thank you for stopping by my blog today and don't forget to visit and subscribe to the MFT You Tube Channel for endless how-to videos, inspiration and product reveals.


Wednesday, April 19, 2023

My Favorite Things - Wednesday Sketch Challenge - WSC642


Perhaps you can carve out some time in the next few days to join in with MFT Stamp's latest Wednesday Sketch Challenge.  This is WSC642 and maybe your entry to the challenge will be the lucky winner of a gift voucher - full details on the MFT site.

Here's what I've used in the making of this simple CAS card.


First of all I prepared 2 stitched edges panels of white cardstock using the Stax Die-namics in the largest and 3rd from largest sizes included in the set.   I applied the larger die cut to an A2 white panel of cardstock then backed the smaller with white craft foam and adhered it to the other.  This was all glued to a card base and set to one side.


I stamped the bees using a very pale grey ink for a no-line effect when colouring with Copic markers.  

Here are the colours used:-

Blue Bee - G00, G000, BG0000, R00, E00, E0000
Pink Bee - RV21, RV10, RV000, R00, E00, E0000
Green Bee - YG11, G40, G20, R00, E00, E0000
Blushes - R21, R00
Wings - BG70, T2, T1, T0
Shadow/Shading - T2, T1, T0

I highlighted with a white gel pen and used a very fine detail black archival ink pen to bring out the features on their faces and legs/antennae etc.

I then die cut using the coordinating die-namics.

Finally, I stamped and heat embossed the sentiment in silver on a Skinny Strip die cut.  I backed it with dimensional foam tape and applied it to the background panel and then I also backed the bees with more foam tape and playfully lined them up to match the sketch.


Thank you for stopping by my blog today and don't forget to visit and subscribe to the MFT You Tube Channel for endless how-to videos, inspiration and product reveals.


Wednesday, March 29, 2023

My Favorite Things - WSC639


Welcome to a new Wednesday Sketch Challenge for MFT Stamps.  This is WSC639 and here is what I've used in the making of this inspiration card:-


Guided by the sketch, I prepared a panel of patterned cardstock using the Rectangles Die-namics and I created a second panel using the same size from white cardstock which I trimmed down to follow the diagonal panel across the top left. I glued these parts together then backed the patterned panel with white craft foam and applied it to a full size A2 panel and then to my card base.

I then used the Circle Stax Die-namics to create a circle of cardstock which ink blended with Ripe Raspberry Ink by MFT and distressed with water and white acrylic paint.  I backed this with more foam and applied to the background.


I stamped the three images I was needing from Freezin' Season and coloured them with the following Copic markers:-

Bunny - E33, E53, E41, E40
Dog - T4, T2, C3, C1, C0, C00
Pup - W3, W1, W0
Blushes - RV04, RV02, RV10
Green - G19, G09, G02
White - C3, C1, C0, C00

I highlighted with a white gel pen and also dotted in snow falling across them then die cut and applied with a single layer of foam tape for the critters at the back and for the pup at the front I backed him with 2 layers to make him pop forwards.

Last but not least, I stamped the sentiment in my Misti and applied some little wooden stars for the embellishments and then it was complete!


Thank you for stopping by my blog today and don't forget to visit and subscribe to the MFT You Tube Channel for endless how-to videos, inspiration and product reveals.


Wednesday, March 8, 2023

My Favorite Things - Wednesday Sketch Challenge WSC636


Time for the newest Wednesday Sketch Challenge by MFT Stamps - this is WSC636 and here are the products used to make my inspiration card:-


I used the A2 Stax Die-namics to create a white panel which I glued to a full A2 white panel and then to the card base.  Over this panel I layered a pink panel created using a smaller size from the Stax set and then for the 'tiled' panel I used cardstock from Finishes and Textiles 6 x 6 Paper Pad and a die from the Slimline Die-namics.   This tiled panel was backed with white craft foam and applied.


I then set about die cutting the little elements from Serenity Now and Bubble Bath to basically make a 'slice of bathroom' that feels serene!   Once all the elements were die cut I glued them together and then to the tiled panel.

I finished the card by stamping a sentiment from Time To Unwind on a sentiment strip and applied with dimensional foam tape.

A simple CAS card!


Thank you for stopping by my blog today and don't forget to visit and subscribe to the MFT You Tube Channel for endless how-to videos, inspiration and product reveals.


Wednesday, March 1, 2023

My Favorite Things - Wednesday Sketch Challenge - WSC635


Hello and welcome to a brand new Wednesday Sketch Challenge for MFT Stamps.  This is WSC635 and i hope you are going to be able to carve out some time to join in.  Full details for entering any of MFT's challenges can be found on their site.

My inspiration card uses the following MFT products:-

Happy Patterns 6 x 6 Paper Pad

I prepared a panel using the Rectangles Die-namics and ink blended it with Sour Apple ink by MFT.  I die cut another panel using the same die but using a gingham sheet of patterned paper from the pad, I stamped the sentiment on the angle, backed it with craft foam and mounted it on the ink blended panel which in turn was glued to a full A2 white panel and then to the card base.


I stamped the images I needed from Ewe Are The Best and coloured them with the following Copic markers:-

Sheep - C3, C1, C00, R0000, E01, E00, R000, T5
Party Hat - B24, B32, B21
Balloon - R39, R29, R27
Flowers - G46, G24, YG13, Y19, Y04, C1, YG0000

I highlighted a few points with a white gel pen and then die cut and applied with foam tape.  

To finish this simple design I added a little grey shadow under each sheep with Copic markers to ground them.

Now let's see what YOU do with the sketch - have fun and happy crafting!


Thank you for stopping by my blog today and don't forget to visit and subscribe to the MFT You Tube Channel for endless how-to videos, inspiration and product reveals.


Wednesday, February 22, 2023

My Favorite Things - Wednesday Sketch Challenge - WSC634


Welcome to a new Wednesday Sketch Challenge for My Favorite Things.   You can find out out how to enter one MFT's challenges by visiting their site, read on for how I made my card to fit the sketch.

Products Used:-


To follow the sketch I first created an A2 panel with a stitched edge using Blueprints 25 and patterned paper.  I adhered this to a white panel to reinforce it then glued the whole thing to a card base.  Next task was die cut the large tag from Blueprints 9.  I did this twice, once so that I could ink blend a background and the the second so that I could die cut the scalloped top and bottom borders which are so pretty.  After ink blending the main tag I backed the scalloped pieces with foam tape and applied.  The tag was backed with white craft foam and applied to the patterned base.  Let's get that dimension going!


I stamped the images using Memento Ink in Rich Cocoa and coloured with the following Copic markers:-

Girl Skin - E33, E11, E21, E00
Girl Hair - E44, E42, E0000
Girl Clothes - B00, B000, B0000, T4, T3, T2, T0 and C3, C1, C00
Balloon - RV63, RV02, RV10
Box - E44, E43, E42, E41, E0000, B00, B000, B0000
Kitten - C3, C1, C0, C00
Blushes - R21, R20, R00, R000

I used my white gel pen to dot in interest to the background, polka dots to the blue ribbon and highlights on cheeks etc, then I die cut and applied with dimensional foam tape.

I popped the panel in my Misti and stamped the sentiment and then fed pink baker's twine through the top of the tag and pulled to a little knot finishing by snipping the ends.


Thank you for stopping by my blog today and don't forget to visit and subscribe to the MFT You Tube Channel for endless how-to videos, inspiration and product reveals.


Wednesday, February 15, 2023

My Favorite Things - Wednesday Sketch Challenge WSC633


Thank you for joining me today to take a look at my inspiration card for MFT's newest Wednesday Sketch Challenge WSC633.

Here are the products used:-

A2 Stitched Rectangles Stax Set 2 Die-namics
Blueprints 25
Essential Stitched Sentiment Die-namics

My card started by creating an A2 panel using Princess Pink cardstock.  Over this I glued in place a panel of patterned cardstock that had been die cut using the Stax Die-namics.  I used a smaller die from the same set to create the alternative 'ruled' panel and this was backed with white craft foam and I used a star die from the Blueprints to die cut a line of stars along the top edge and then used the same die to create coloured stars from MFT cardstock and adhered them through the gaps.  I applied this panel to the grey panel (trimmed to size and following the sketch).


I ink blended a little focal point on the white panel then stamped my images and coloured them with the following Copic markers:-

Mouse - E41, E40, W1
Cupcake - E87, E44, E43, E42, E41, YR0000, E50, E30, RV63, RV52, R20
Blush, Ear and Party Hat - RV63, RV52, RV000, R20, R00

I used a white gel pen to highlight 2 or 3 points then die cut and applied with foam tape.

To finish my card I stamped and applied the sentiment with foam tape and glued some teeny tiny gold stars for twinkling accents.

Have fun entering the challenge - full details can be found on the MFT site.


Thank you for stopping by my blog today and don't forget to visit and subscribe to the MFT You Tube Channel for endless how-to videos, inspiration and product reveals.


Wednesday, January 25, 2023

My Favorite Things - Wednesday Sketch Challenge WSC630


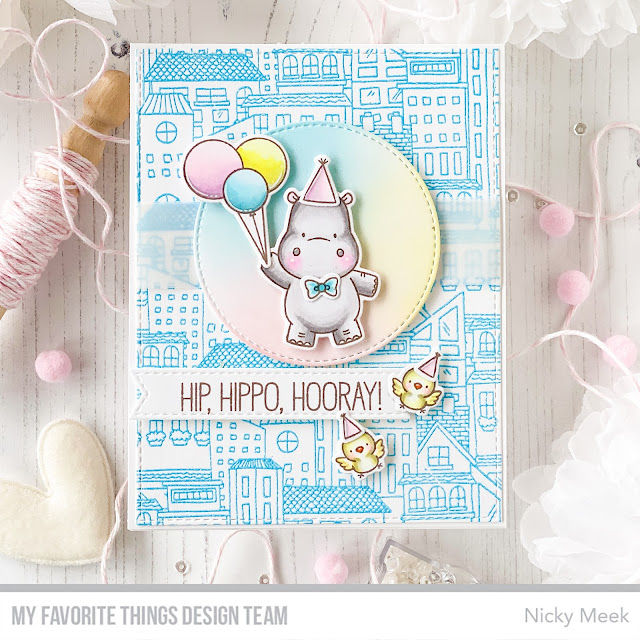
Hello and welcome to my blog and an inspiration card for My Favorite Thing's latest Wednesday Sketch Challenge WSC630 - please see the sketch you are working with (above).

Item's used in this project:-

A2 Stitched Rectangles Stax Die-namics (Set 1)
I & O Stitched Circle Stax Die-namics
Essential Stitched Sentiment Die-namics

To kick things off I first stamped the background panel using the background stamp and heat embossed using Wow! Opaque Pastel Blue embossing powder.  I used the stax die-namics to make the panel slightly smaller than A2 and then wrapped 2 layers of vellum around the panel, securing on the reverse and to follow the sketch.  This panel was then attached an A2 white panel which in turn was glued to the card base.


I used the Circle stax die-namics to create the circle focal point and I ink blended softly in 3 shades of Distress Ink, I backed this with foam tape and applied over the vellum 'stripe'.

I stamped the Happy Hippos images I'd be needing and coloured them with the following Copic markers:-

Hippo - T3, T2, T0, C00
Birds - Y13, Y06, Y00, Y0000, T2, T0, YR07
Pink -  RV02, RV52, RV00, RV0000
Blue - BG53, B00, B0000
Yellow - Y13, Y06, Y00, Y0000

Points were highlighted with a white gel pen, hats were glued to heads etc and then they were backed with foam tape and applied to the scene.

To finish I stamped the sentiment from the stamp set on a sentiment strip and this too was applied with foam tape.

I hope you're inspired to join in the challenge, full details on the MFT blog.


Thank you for stopping by my blog today and don't forget to visit and subscribe to the MFT You Tube Channel for endless how-to videos, inspiration and product reveals.


Wednesday, January 18, 2023

My Favorite Things - Wednesday Sketch Challenge - WSC629


Ready for a new Wednesday Sketch Challenge?  This is WSC629 and I hope you play along for a chance to win the challenge - full details on MFT's site.

My inspiration card works off the following sketch:-


Here are the products used:-

Mini Cloud Edges Stencil
Tree Builder Die-namics (large cloud top right)
Skinny Strips Die-namics
Blueprint 27 Die-namics

I die cut a panel using Blueprints 27 and used the stencil and Princess Pink ink to create the clouds. I then used my paper trimmer to remove a 1 1/4 inch strip from the panel and replaced it with a 1 1/4 inch strip of princess pink cardstock to follow the sketch.   I backed the new panel with white craft foam and then glued this to an A2 white panel and in turn to my card base.


I stamped the images I needed from Parachute Pals  and coloured them with the following Copic markers:-

Bunnies - E44, E43, E42, E41, E40
Blushes - R21, R00, R000
Purple - V12, V01, RV00
Goggles - BG000

Everything was die cut and positioned per the sketch.  I finished by stamping and applying the sentiment strips and adding a few wood stars for a cute and dreamy little scene.


Thank you for stopping by my blog today and don't forget to visit and subscribe to the MFT You Tube Channel for endless how-to videos, inspiration and product reveals.