Showing posts with label Lawn Fawn. Show all posts

Monday, February 24, 2025

Lawn Fawn - Ruff You!


Welcome to my blog and a card made for fun using Lawn Fawn products.  Here's a list of links to the products I've used:-

Magic Iris Beehive Add-On (for the flowers)

To create the card I took a panel of pale blue cardstock.  Over this I glued a white panel that I had die cut using the Itsy Bitsy Die and which I had ink blended with a little Speckled Egg Distress Oxide Ink.

Next, I die cut a sturdy white panel of cardstock using the Meadow Backdrop Die and I ink blended using Twisted Citron and Mowed Lawn Distress Oxide Inks.  I also spattered with water and blotted that up and then splattered some Mowed Lawn loosened with a couple of drops of water.  I backed this panel with dimensional foam tape and applied it to the other panels.
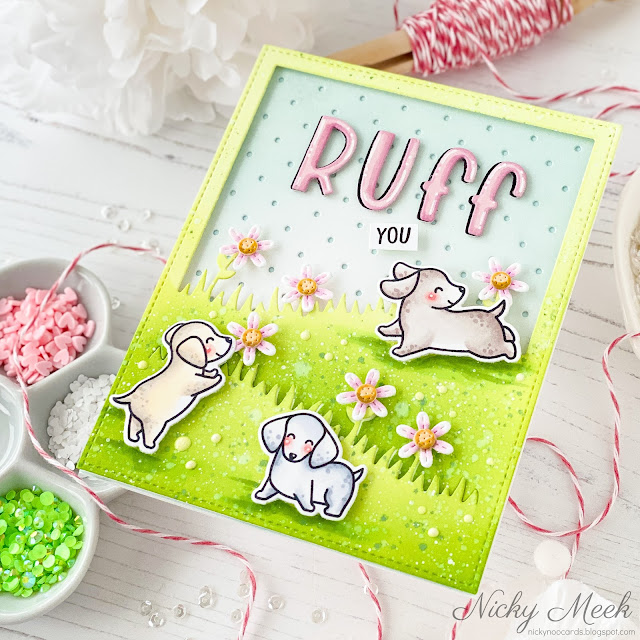


I die cut 6 flowers using the Magic Iris Beehive die and coloured them with Copic markers and then adhered them with glue to the meadow background.  I also added a little piece of foam tape behind each bloom to support it and make sure it stays nice dimensional.

I stamped 3 puppies from Furry and Bright and coloured with the following Copic markers (clockwise from the top):-

Puppy 1 - E70, E71, W2, W1, W0
Puppy 2 - C3, C1, C0, C00
Puppy 3 - E51, E40, E0000

I blushed and highlighted their cheeks and then die cut and applied with more foam tape.


For the punny sentiment I die cut RUFF using the Henry's ABCs die.  I offset the black behind the pink for a shadow when glueing them together and I used Copic markers to shade the pink for the look of more dimension.  I then came in with a white gel pen and highlighted the letters and glued to the sky and lastly I stamped the word YOU on a strip and added it underneath.

I used Copic markers under each pup to add a shadow and a few Nuvo drops completed the scene.

Appreciate you visiting my blog today,  I'll be back soon with something new to share.


Saturday, June 22, 2024

Lawn Fawn - Magic Iris Beehive


I continue to create using my Lawn Fawn products just for the pure love of creating cards with their lovely products and today my card uses their Magic Iris Beehive Add-On Die along with their Stitched Scalloped Rectangle Frames Die and More Magic Messages stamp set.

To create this card I first used the Scalloped Rectangle Die mentioned above and die cut once from white cardstock and again from some of Lawn Fawn's patterned cardstock.  I used the largest die in the set of four to do this.   I used the patterned section from the centre and recessed it within the white frame which I adhered to a slightly smaller than A2 card base.


I used green, pink, yellow, black and kraft cardstock scraps and die cut the branch, leaves, blooms and bees from the Beehive Die.  I used a little ink on a mini sponge dauber to add a little colour to the leaves and then I adhered all the parts together and assembled the blooms and greenery on the branch.

I die cut the beehive, stamped the sentiment of my choice in the centre and then ink blended with Scattered Straw, Fossilized Amber and Vintage Photo Distress Oxide Inks.

I backed all of these die cuts with dimensional foam tape and then started by sticking down the beehive then the branch overhanging at the top and finally the bees with their little vellum wings.


To finish the card I used a white gel pen to highlight some points and then used white Nuvo drops for finishing accents.

This card needs to go out to someone amazing!!

Thanks for joining me on my blog, I'll be back tomorrow with something new.  Happy crafting!


Thursday, June 20, 2024

Lawn Fawn - Berry Special


Hello!  Here's my third card of the week featuring Lawn Fawn products as I took some time to create purely for the love of cardmaking.  The card uses 'Berry Special' a beautiful stamp set with coordinating dies and their 'Foursquare Backdrop Die'.

I started by creating a panel of patterned cardstock from Lawn Fawn and adhered it to my card base.  I then took a heavyweight white cardstock and die cut the Foursquare Backdrop die.  I used Twisted Citron and Mowed Lawn to ink blend the squares and I backed the rest of the frame with foam tape and applied it to the patterned panel.  I then glued the ink blended squares through the openings.


I stamped the images from Berry Special and coloured with the following Copic marker combinations:-

Red - RV29, RV25, RV13, RV10
Green - G07, YG13, YG01
Yellow - YR21, Y21
Mice - E55, E31, E41

I die cut the images and applied with foam tape.


I highlighted a few little points with a white gel pen and then I popped the card in my Misti and I stamped the sentiment at the bottom.

Thank you for joining me for the details on this card.  I'll be back tomorrow with something brand new to share with you.  Happy crafting!


Tuesday, June 18, 2024

Lawn Fawn - Meadow Backdrop Die


I continue to play with my Lawn Fawn products just for 'funsies' and today I've turned to their Meadow Backdrop Die which is more than just a backdrop, you also get other images as you see in my sample.

I took a panel of white cardstock in a nice heavy weight and I die cut using the Meadow Backdrop Die.  I also die cut some of the images including the bee image which I repeated to create three.


I ink blended the background using Distress Oxide Inks in Worn Lipstick, Scattered Straw, Antique Linen, Twisted Citron and Mowed Lawn Distress Oxide Ink.  I dotted in some interest with a green felt tip pen and adhered it to my card base.

I ink blended the yellow parts of the bee which I'd initially die cut in white cardstock and then I assembled those little cuties and highlighted with a white gel pen.

Clouds and bees were applied with foam tape and I stamped the sentiment on the wave style sentiment strip and also applied with foam tape to keep up with the dimension.

I'll be back in a couple of days with another summery card.  Thanks for stopping by!


Sunday, June 16, 2024

Lawn Fawn - Veggie Happy


I recently carved out some time to play with my Lawn Fawn products and have some cards to share with you over the coming days starting with this one which features their 'Veggie Happy' stamp set and 'Fancy Scalloped Rectangle Stackables Die'.

I die cut an A2 panel of white cardstock using the Stackables Die, I masked off the edges and uses a stencil from my stash along with 'Minty' ink by The Stamp Market to create the grass background.  I used a felt tip pen with a fine tip to add tufts of grass and used a white gel pen to dot the tufts to add subtle flowers.  I removed the mask, backed the panel with white craft foam and applied it to a pattern panel which I then glued to an A6 card base .


I stamped the images from Veggie Happy and coloured with Copic markers.  Here are the combinations I used:-

Red - R05, R22, R21, R20
Green - G07, G02, G12
White - C3, C1
Soil and Bag of Soil - E44, E43, E31, E41
Mice - E55, E31, E41
Blue Dungarees - E95, E93

I die cut using the coordinating dies and applied to the background with foam tape.


I stamped the sentiments on three sentiment strips and applied them with foam tape at playful angles.

Card done!  I'll be back in a couple of days with something new.


Wednesday, April 3, 2024

Lawn Fawn Wedding Card


Just wanted to leave this card image here but I'm sorry I'm unable to blog the details for you due to time constraints.  This card was made for my niece's recent wedding.  It is A6, very layered and dimensional and I even stamped a sentiment on the writing insert inside.  The card was made entirely of Lawn Fawn products.  If you have any questions, please comment below and I'll get back to you.  Thank you!

Saturday, October 7, 2023

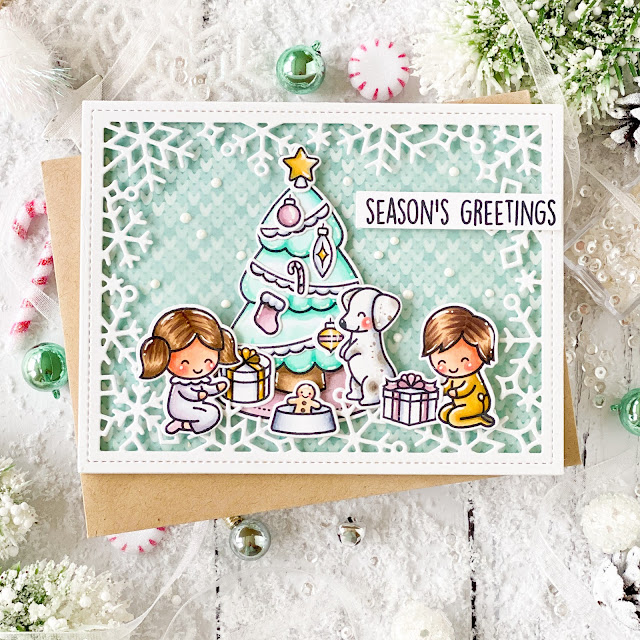
Lawn Fawn - Joy To All


Since it is raining cats and dogs today it seemed like the perfect excuse to spend some time in my craft room and get another Christmas card made.  This card features all Lawn Fawn products.  Here's what I've used:-


I started by prepping a patterned paper background using a sheet from the paper pack and trimmed it to A2.  I adhered this to a white A2 panel.  Over the top I layered an A2 panel of vellum.

I die cut a second A2 panel of white cardstock using the Snow Flurries Backdrop Die which is so pretty.  I adhered this with dimensional foam tape.


I stamped the images from Joy To All with black ink and coloured the images with the following Copic markers:-

Christmas Tree - BG13, BG32, BG11, BG000, BG0000, E44, E43, E31, RV95, RV93, RV91
Hair - E77, E44, E43, E31
Skin - E33, E11, E21, E00, R22, R20
Nightdress - RV93, C1, C0, C00
Onesie - Y26, YR31, Y21, W3, W2
Pup - W4, W3 W1, C3, C1, C0
Dog Bowl & Gingerbread Man - C5, C3, C1, C0, C00, E31, E41

I die cut using the coordinating set of dies and then applied to the scene with either a single or double layer of foam tape as I built forwards.


I highlighted points on the images with a white gel pen and adhered the ornaments to the tree.

To finish, I stamped the sentiment on a strip and applied with foam tape and I used Nuvo Crystal Drops in Simply White to make some dimensional snowfall around them.

Thanks for stopping by my blog today, I hope you enjoyed the card.


Friday, October 6, 2023

Lawn Fawn - Furry and Bright Christmas Card


Thanks for joining me today on my blog.   I was happy to have found some time earlier this week to make a card using all Lawn Fawn products and just for the fun of it.  Here is a list of linked products that I have used in the making of this card:-


I used the Stackable die in combination with the Favorite Flannel Paper and die cut a decorative background panel.  I backed the panel with white craft foam and glued it to a white A2 panel which I then glued to my card base.

Over this I layered the window scene which I stamped and coloured and then used the coordinating dies to die cut (Copic colours follow in this blogpost).  I glued the scene to the scalloped background and adhered to the 'flannel' background.


I stamped the images from Furry and Bright with black ink and coloured all images with the following Copic marker combinations:-

Background - BG11, BG000, BG0000, W2
Sofa - R59, R39, R29
Dog (left) - E44, C5, C3, C1, C0
Dog (couch) - E51, E50, W2, W1
Dog (floor) - W5, W4, W3, W2, W1
Blushes - R22, R20, R00
Antler Hats - E44, E43, E42, E31
Gift Bones - E42, E41, E40, G05

Points were highlighted with a white gel pen and then I die cut with the coordinating dies and applied the images to the scene using dimensional foam tape.


I used a stylus and white acrylic paint and dipped and dotted the slightly dimensional snow into the background 'window'.  I glued in 3 die cut snowflakes using the Mini Snowflakes die and stamped the sentiment from Furry and Bright on a sentiment strip and applied with more foam tape and with that the card was complete!

Thanks for coming by my blog today, if you have a question or comment please leave it in the comments section and I'll happily respond.


Friday, September 15, 2023

Lawn Fawn - Winter Birds


I'm back with a new card featuring new and old products from Lawn Fawn ... I've been spoiling myself rotten lately!  Here's what I've used to make this tweet Christmas card.


First of all I prepped a patterned panel and adhered it to a white A2 panel of cardstock.  Next, I die cut the scalloped oval focal point and ink blended softly with Distress Oxide Ink in Spun Sugar.  I splashed this with white acrylic paint, backed it with foam tape and applied to the patterned panel and set it to one side to dry.


 I stamped all the images I'd be needing from the two stamp sets to work the design I had in my head.  I used Memento Ink in Rich Cocoa to stamp and the following is a list of the Copic markers used (fir was stamped in green):-

Cardinals - R39, R37, R24, T4, T3, Y19
Blue - BG72, B97, B95
Gold Bauble - Y19, C3, C1
Pinecones - E77, E44, E42
Branches & Bird's Nest - E44, E43, E42

I used a white gel pen to highlight points and to polka dot their scarves then I die cut with the coordinating Lawn Cuts and applied to the scene using either glue or dimensional foam tape where I needed it.


To finish up I stamped the sentiment and applied with foam tape, I glittered the fir and pinecones and I added some white star clay embellishments for the final touch.

I loved making this card.  I'm a little obsessed with Cardinals, we see them where we live and they never fail to make me smile with their incredible red colours.


Wednesday, September 13, 2023

Lawn Fawn - Build-a-Birdhouse Christmas Card


Hi everyone!  Feels so good to be starting to make Christmas and Winter themed cards again which are my absolute favourite of all the seasons and holidays.   I recently treated myself to some new Lawn Fawn products and will be producing several cards using my new goodies over the coming weeks.  Here is a list of links to the products that I used in the making of this project:-


To kick things off I first created a patterned paper panel which I adhered to a slightly larger white cardstock panel.  Over this I layered a die cut square frame that was made using the largest size die from the Stitched Square Frames.  I applied this popped up on foam tape.  Creating this frame produced a negative cut from the centre which I used to create two snow hills that were of course the perfect width.  I applied the lower hill with foam tape, ensuring to leave a gap in the centre at the back for the post of birdhouse to eventually go in between.  The second (upper) snow hill was glued directly to the patterned background panel.


I die cut the Build-a-Birdhouse and the Add-On die sets using white cardstock.  With the greenery and pinecones I die cut those bits a few more times as I needed multiples for my design.  I ink blended the birdhouse using Distress Oxide Inks in Tea Dye and Ground Espresso and adhered the parts together with glue.  I then coloured the Add-On pieces with the following Copic marker combinations:-

Cardinal - R24, RV14, RV13
Greenery - YG41
Pinecones - E44, E42, E40
Christmas Lights - RV14, RV10, Y21

I used artistic license and kept the Cardinal's face white but I softened the edge of the red as it came around the face using the Copic '0' Colorless Blender.  I emphasised the eye with a fine tipped black marker pen.

Points were subtly highlighted with a white gel pen and then adhered to the birdhouse either directly or with foam tape.  I die cut the bow from the Add-On set from glittering silver cardstock for a nice festive feel.


To finish, I adhered the greenery in the corners of the frame and added snow covered greenery between the snow hills.   I glittered the greenery and snow covered roof of the birdhouse and then added star die cuts (for snow) around the scene.

Last but not least the sentiment was stamped with pink ink (sentiment is from the Joy To All stamp set) and this sentiment strip was then applied with foam tape.   Card complete.

Thanks for coming by, I'll be back before you know it with something new!


Thursday, August 3, 2023

Lawn Fawn - You're A Keeper


Well hello there, thank you for visiting my blog today where I'm sharing a new card made purely for the love of the craft and featuring 100% Lawn Fawn products.  Please be aware that the bee keeper was from a free with purchase stamp set called 'You're A Keeper' and now sold out and the patterned background paper was one of three pieces of patterned paper included free with my order from Lawn Fawn a couple of months ago.  The list below therefore doesn't include these two items:-


First of all I prepped an A2 panel using the patterned paper.  I die cut the frame and added with foam tape then I layered two grassy borders created using the Grassy Border Die and which I ink blended with Scattered Straw Distress Oxide Ink and splattered with white acrylic paint loosened with a drop or two of water.   First grassy border at the back was adhered directly but no glue near the top so that I could lift it a little and tuck images behind and the smaller layer was popped up on dimensional tape but again the strip of tape was right at the bottom to allow tucking.


I stamped the images I'd be needing from You're A Keeper and Hive Five and coloured with the following Copic markers:-

Bear - T5, T5, T4, T3, T2, T1, E31, R22, R20, R00,
Hive - E44, E43, E42, Y28, Y26, YR31, Y21
Flowers - B12, B41, Y28, Y26, YR31, Y21, YG45, G12
Honeypot - B12, B41, Y28, Y26, YR31, Y21, C3, C1, C00
Bees - E00 Y26, Y21, BG000

Points were highlighted with a white gel pen and Hive Five images die cut using the Lawn Cuts and the You're A Keeper images were fussy cut.  I applied the images to the scene using dimensional foam tape.

Sentiment came last (but not least).   I used Henry's ABC's to die cut the letters for HONEY twice over and glued them together then aligned and glued them to the background.   I used Copic markers to make a honey coloured fade on the lettering and then used Nuvo Crystal Glaze to gloss it up.   Lastly, I stamped 'You're A Keeper' on a sentiment strip and adhered with foam tape.

Had so much fun with this card and Lawn Fawn's lovely products and can't wait to play again!


Wednesday, June 21, 2023

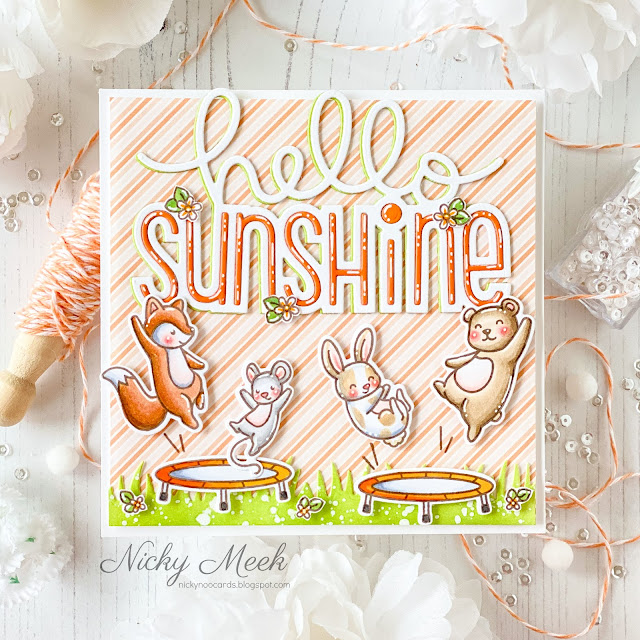
Lawn Fawn - Really High Five


Hello!  An new card today as I continue to play and create with my recent Lawn Fawn purchases.  Here's what I've used:-


I created a square panel of white cardstock and layered over this a smaller square panel of patterned cardstock that I backed with white craft foam and adhered.

The large Hello Sunshine was die cut 3 times.  Once each from white, orange and green cardstock and then adhered together with the green layer peeking out from behind slightly offset.

I die cut the grassy border and ink blended and splashed with watered down white acrylic paint and glued directly.


I stamped the images from Really High Five using Memento Ink in Rich Cocoa and coloured with the following Copic markers:-

Fox - E37, E99, E15, E13, C3, C1, C0, C00, R000
Mouse - T3, T2, T1, T0, R00, R000
Bunny - E43, E31, C3, C1, C0, C00
Bear - E44, E43, E42, E41, R00, R000
Blushes - R22, R20, R00
Trampolines - YR07, YR04, Y38, C3, C1, C0, C00

Images were die cut and applied with dimensional foam tape and I then went around the card highlighting the lettering and the animals with a white gel pen.

Card complete!


Sunday, June 18, 2023

Lawn Fawn - You're A Keeper


Hello and welcome to my blog where I'll walk you through how I made this new card using Lawn Fawn products.

This is the cute little 'You're A Keeper' stamp set that was free with purchase recently.  I believe it is out of stock now but perhaps this card will still inspire something in you.

I have used:-

You're A Keeper

I started by creating an A2 panel from the paper pack.  Over this I layered a frame that I popped up on dimensional foam tape.  I then cut the next frame size down and within this (and it fits perfectly) a die cut of another toning pattern from the same paper pad made using the stackables die.  Love how they work together seamlessly!  I nestled the patterned piece within the smaller frame and flipped them over and backed it with white craft foam then I glued it to the main panel.


I die cut a third pattern from the paper pack.  First I used the stackables again to get the right size and stitched edging then I used the Grassy Border die to create 'grass'.  This was then neatly glued to the background.

I stamped the images and coloured with Copic markers.  Here's what I used.

Beekeeper - E44, E43, E42, E41, R22, R21, R20, R00, W2, W0, C3, C1, C0, BG70
Hive - E44, E43, E42, E41, Y26, YR31, Y21
Bees - Y26, YR31, Y21, E50, BG11, R22

Images were fussy cut and applied with foam tape and then I stamped the little BZZZ behind each bee for fun.

Lastly, I stamped the sentiment on a sentiment strip and applied with yet more foam tape ... I get through this stuff!!!  I decided no further embellishments were required and with that this sweet scene was complete.

Thanks for stopping by,  I'll be back with something new before you know it!


Saturday, June 3, 2023

Lawn Fawn - Berry Special


Nothing says Summer like sweet strawberries and so I just had to treat myself to this 'Berry Special' stamp set by Lawn Fawn.  Here's what I used in the making of this card:-


My colours were all informed by the panel of patterned paper from the What's Sewing On paper pack.  I created a panel that was 1/8 of an inch smaller than A2 and I glued this to an A2 white panel of cardstock and then to my card base.

I created a frame using the second largest frame included in the Stitched Rectangle Frames Die set.  I backed the outer/frame cut with dimensional foam tape and applied it to the patterned panel.  I then ink blended the centre cut using Bundled Sage, Spun Sugar and Worn Lipstick Distress Oxide Inks.  I splashed the panel with a little water and water mixed with a little acrylic paint in white to distress it's appearance.  I applied glue to the opening inside the frame and glued this blended panel down.


I stamped the images from Berry Special using Memento Ink in Rich Cocoa.   I coloured the images with the following Copic markers:-

Strawberry Vines - YG41, G40, G20, R22, R20, R00, YR31
Jam Jar - R22, R21, R20, R00, BG11, C3, C1, C0
Strawberry Carton - E44, E43, E42, E41
Cupcake - E44, E43, E42, E41, YR31, Y21
Bee - YR31, Y21, BG34, BG000
Mice - E31, E41
Overalls - BG34, G00

I highlighted a few points with a white gel pen and then die cut using the coordinating Berry Special dies and then added the images either directly to the frame in the case of the vines or with dimensional foam tape for the actual scene.

To finish up, I added a few more white dots into the background with my white gel pen and added a few sparkling clear sequins.

Thank you for joining me today and I'll be back before you know it with something new!


Thursday, June 1, 2023

Lawn Fawn - Magic Iris Beehive Add-On


Hello crafters, welcome to my blog and a new card that I created using purchases from the most recent and very gorgeous release by Lawn Fawn.   Here's what I have used in the making of this card:-


I used Salvaged Patina Distress Oxide Ink to softly ink blend an A2 panel of white cardstock.  I applied a little more ink at the top and gently faded it out towards the bottom.   I then used the Cloud Background Stencils (just one of the pair of two) and some white pigment ink and ink blended the clouds, these show more as a little a surprise when the card is handled.  I used a white gel pen to add a little bit of outlining to each card to make them more prominent.

I die cut the largest frame from Stitched Rectangle Frames and backed it with skinny strips of dimensional foam tape and applied it to the background and then the panel was adhered to my card base.


I die cut white cardstock using the Beehive die and all it's little accessory images like the blossoms and bees.  I used my Copic markers to colour the images, here's what I used:-

Hive - YR23, Y17, Y15, Y13, Y31, E30, Y00, Y000, W2
Bees, - YR31, Y21, E30, G00
Blushes - R22, R20, R00
Branches - E44, E43, E42
Leaves - YG45, YG41, G40
Blossoms - RV10, R000, R0000, Y17, Y08, Y000

I added Stickles glitter to the bee's wings and when dry I assembled all the little pieces using glue then backed them with foam tape and applied them for a lovely dimensional look.

Last but not least, I stamped and heat embossed the opening/inside of the hive using my chosen sentiment from 'More Magic Messages' and I backed this piece with glue and recessed it through the opening.  A few points were highlighted with a white gel pen.

Absolutely LOVED making this card!  Hope you come back and see what I make next.  Have a happy and crafty day!


Wednesday, May 31, 2023

Lawn Fawn - Really High Five with Secret Garden Window Die


Hello and welcome to my blog and a new card created using products by Lawn Fawn that I recently treated myself to.  Here's what I've used:-


Here's how I made the card.  I first prepped an A2 panel of a lime green coloured cardstock.  Over this I layered a white panel that I die cut using the Itsy Bitsy Polka Dot Backdrop die.   I adhered the panels together and then used the Secret Garden Window die and die cut the decorative opening.  Since the cardstock was double thickness I run it back and forth through my Big Shot a few times until fully and cleanly cut through.

I coloured the greenery attached to the window and added a few more sprigs of flora to flesh it out a little more and then backed the panel with dimensional foam tape and applied it over a panel of cardstock where I'd created a soft pink cloudy background.  This in turn was glued to my card base.


I stamped the images from Really High Five using Memento Ink in Rich Cocoa and coloured the images using the following Copic marker combinations:-

Mouse - W4, W3, W2, W1, W0, R00, R000
Orange Balloon - Y15, Y17, Y19
Bear - E31, E41, R00, R000
Pink Balloon - RV09, RV25, RV06, RV04
Blushes - R22, R21, R20, R00

Images were highlighted with a white gel pen and die cut then applied to the scene with more dimensional foam tape.

To complete the project I stamped the sentiment in a bright pink ink and applied the sentiment strip with ... you've guessed it .... more foam tape!

Thanks for visiting my blog today, I'll be back in a couple of days with something new to share!