Wednesday, October 31, 2018

Yeti Or Not - Hello Bluebird

Hi, thanks for clicking through to my blog today to read more about my latest card for Hello Bluebird Stamps.  This card uses 'Yeti Or Not' from the most recent release.


First of all I created an A2 panel from Bristol Smooth cardstock by die cutting it with a simple edging die for the faux stitched edge affect which just makes it look 'finished'.  I ink blended it using Distress Oxide Ink in Broken China and then splashed it with water and blotted it up for a snowy affect.  I then die cut the mountains from white cardstock using Hello Bluebird's new Glacier Peaks die.  The glacier peak pieces were ink blended with a little more of the Broken China Distress Oxide Ink and adhered.  I die cut the mountains to match the stitched edge of the background panel.


Using Hello Bluebird's 'Christmas Words' die I die cut 'falala' about 4 or 5 times and adhered each to the next to form a stack and then glued it in place.  I stamped the rest of the sentiment in Ranger Archival Ink in 'Coffee' and adhered that strip with foam tape.


On more Bristol Smooth cardstock I stamped my images with Ranger Archival Ink in 'Coffee' and watercolour painted them using Kuretake Zigs.  I added Wink of Stella to several areas for a pretty twinkle when the card is moved (tis the season for twinkle after all)!!  I die cut the images using the coordinating dies for Yeti Or Not and used more foam tape to adhere them.


I decided my friendly Yeti was feeling so festive he had decorated the mountain tops with Christmas lights which delighted the little reindeer friends ... I like my cards to tell a little story wherever possible.

Hope you like the card and you feel inspired.  Happy crafting!

Nicky x

Monday, October 29, 2018

Caroling Critters - Pretty Pink Posh

Hey everyone!  It is sneak peek time at Pretty Pink Posh for the exciting new release scheduled for November 5th .... mark your calendars!


Here, I am introducing Caroling Critters.   When I first saw the new release this mini stamp set immediately caught my attention and I had to play with it first.

I took a panel of A2 cardstock and using a stencil I very softly ink blended a drifted snow background using Distress Oxide Ink in Tumbled Glass.  I die cut the panel once to give it the stitched edge and once more using the Window Frames die from Pretty Pink Posh.  I hand stamped the notes using Ranger Archival Ink in Potting Soil then I applied thick dimensional foam tape behind the A2 panel and stuck it on a 110lb Neenah white cardstock base.  I then added adhesive to the back of the other piece and recessed it carefully through the opening making sure everything was aligned.


Using a scrap of white cardstock I die cut just the bottom of the arched opening from Window Frames again.  I then took one of the dies from Stitched Borders 3 set and die cut to give me a little strip of snow to 'stand' my Caroling Critters on.  I adhered this in alignment at the bottom of the opening.

On Bristol Smooth cardstock I stamped my Caroling Critters with Ranger Archival Ink in Potting Soil and watercolour painted them using a combination of Kuretake Zigs and Arteza waterbrush pens.  I highlighted some points with a Uniball Signo White Gel Pen and then I fussy cut the single image out.  There is no coordinating die for this set but it was not tricky to hand cut.  I applied regular thickness Scotch Foam Tape to the back of the cut out image and recessed it through the opening and adhered it.


Finally, I stamped MERRY CHRISTMAS to a small piece of cardstock in red and glued it down and then I added some essential Christmas twinkle by using some of the jewels from the beautiful new blend called 'Starry Sky Mix'.

I'll be back within a few days with another card featuring the new release and I hope this little look today leaves you excited!  You can see more sneaks over on the Pretty Pink Posh Blog starting from today so be sure to click my link to be taken there for more inspiration.

Until the next time then .......

Nicky x


Little Snowman Agenda - Mama Elephant

Hello!  I treated myself to so many wonderful Mama Elephant goodies recently that I've yet to get to them all due to other card making commitments.  However, this isn't the first time I've played with Little Snowman Agenda as you will know if you follow me.


To make this card I die cut a white cardstock panel and a green cardstock panel using the Grid Window Creative Cuts Die by Mama Elephant.  I kept the negative cuts of the white die cut and set the frame aside for a future card and I kept the positive cut of the green die cut.   I softly ink blended the white parts with Distress Oxide Ink in Spun Sugar and Stamped the lovely sentiment from Merry Greetings because it could not have fit more perfectly into that larger section.   I applied foam tape to the reverse of the green die cut and adhered it to my card base and then applied glue to each negative cut and recessed them carefully in each window opening.


On Copic friendly Neenah cardstock I stamped my images with Memento Ink in black.  I used Copics to colour the snowmen and highlighted a few points with a Uniball Signo White gel pen.  I used Stickles Glitter in 'Crystal' to add a festive touch.   I die cut and applied the snowmen to the windows with more foam tape.  The final touch was the addition of tiny silver micro star 'sequins'.


Another Christmas card completed!!!  I'm getting there!!!  Thank you so much for coming by to read today, see you next time!

Nicky x

Saturday, October 27, 2018

North Pole Littles - Hello Bluebird

Hey everyone, I have a new card for Hello Bluebird Stamps to share with you today featuring the super cute North Pole Littles stamps and dies.  They are set in a scene created by using the 'essential' (in my humble opinion) Spooky Scene die!


First things first .... I softly ink blended an A2 panel of Bristol Smooth cardstock using Distress Oxide Ink in Spun Sugar.  I dotted in some falling snow by hand, using a Uniball Signo White Gel Pen and adhered the panel to my card base and set it to one side.


Next, I took the Spooky Scene die and die cut a white cardstock A2 size panel.  I ink blended the trees using Distress Ink in Pumice Stone.   Now, when you die cut the Spooky Scene you get some negative cuts that you'd perhaps ordinarily throw away or use as scrap.   The centre negative cut is really quite large and I decided to grab a hill die from Hill and Dale and cut a second hill which of course will perfectly match the line of the ground from the Spooky Scene cut.  I then took a Versamark Ink Pad and inked up certain areas of the trees and ground and then sprinkled on some Wow! White Puff Twinkle Embossing Glitter and heat embossed .... this stuff is wonderful, can't say enough good about it! I then adhered all the parts of my Spooky Scene back together on the reverse to hold them in place then applied foam tape and added it to the card base.


Now to add some fun colour!  I stamped my North Pole Littles using Ranger Archival Ink in 'Coffee'.  I watercolour painted them using Kuretake Zigs in Light Beige 074, Flesh Colour 071 and Pale Pink 028 to shade their faces with Light Pink 026 for their cheeks and some of the parcels and ornaments.  The deeper red is Carmine Red 022.  Points of creamy yellow are done with a Tombow Dual Brush marker 020.  Hair is done with either Tombow in shade 912 and the other in 969.  The green colour used is an Arteza Real Brush Pen in Mint Green A177.


Cheeks and other points were highlighted with the Uniball Signo gel pen and then die cut and added to the scene with more foam tape.  The sentiment was stamped on a strip of cardstock and similarly applied.  Pretty adorable right?

Thanks for stopping by to read, I hope to see you next time and if you don't want to miss anything do sign up for emails from this blog.

Nicky x


Wednesday, October 24, 2018

Fall Buddies - Hello Bluebird

Hi!  Thanks for swinging by my blog today to read about my latest card for Hello Bluebird Stamps.  This card features the delightful Fall Buddies stamp set from the latest release.


My card started with a panel of Bristol Smooth that I ink blended with Distress Ink in Tumbled Glass, I blended to a white fade at the bottom so that it would slightly highlight the horizon for a small point of interest.  I then squished a little of the ink onto an acrylic stamping block and added a tiny amount of water and splattered with a paintbrush to distress.


I then used the Spooky Scene Die and I die cut an A2 panel of more Bristol Smooth cardstock.  The die cut comes apart like a jigsaw puzzle.  I kept the outer frame white and set it to one side.  I ink blended the tree and then the grass using Distress Inks.  I put the pieces back together again upside down and taped them together then added dimensional foam tape to all areas and adhered it to the panel and at this point I also adhered the empty scene to the card base.

On yet more Bristol Smooth I stamped all of my images with Ranger Archival Ink in Potting Soil.  I watercolour painted them using Kuretake Zigs, highlighted some areas with a Uni-Ball Signo white gel pen and then fussy cut the images and used more foam tape to adhere them.  I decided to add a little humour with the 'happy fall' sentiment by having my squirrels throwing themselves from the tree onto big piles of autumn leaves beneath them.  I love the feeling of pure joy and that they are relishing the change of season.


With everything in place I considered any final touches and decided on a few wood butterflies and flowers which just seemed to add that perfect finishing accent and the bunny and squirrel each hold up a little wooden heart.

Thank you for stopping by my blog today, I really appreciate it and see you next time!

Nicky x

Monday, October 22, 2018

A Merry Little Christmas - Avery Elle

Hello!

Today I'm sharing another card for Avery Elle that I made using 'A Merry Little Christmas' from the latest release in combination with the new 'Let It Snow Die Set'.


I stamped my chosen images from the stamp set onto Bristol Smooth cardstock, watercolour painted them using Kuretake Zigs  and highlighted some points with a Uniball Signo White gel pen.  They were then die cut.


A panel of Bristol Smooth cardstock was created and ink blended in Spun Sugar Distress Ink, fading away to nothing at the bottom.  The sentiment was stamped in Archival Ink.


The card was assembled by applying the panel to the card base.  The characters and their gifts were applied with dimensional foam tape.  The final touch was the application of several snowflakes which were die cut using elements from the Let It Snow Die Set.

Thank you for stopping by to learn about this card today,  I do hope you enjoyed it!  Happy crafting!

Nicky x

Products Used:-

A Merry Little Christmas
Let It Snow


Thursday, October 18, 2018

Reindeer Friends - Pretty Pink Posh

Hello and thank you for visiting my blog.  I have card for Pretty Pink Posh today featuring 'Reindeer Friends' from a year ago but always worth revisiting for reasons of obvious cuteness!


I decided on an arrangement for my scene using some previously stamped images and it was abundantly clear that this card would need some different dimensions to the usual A2 standard for us card makers.  This card does not conform to any standard size so I will need to hand make an envelope for it and there are many tutorials out there for how to do this.  So, I made my sturdy card base of 110lb white cardstock by Neenah and then scored and folded it and also cut a panel that was slightly smaller dimensions than the base. 


I ink blended this panel with Distress Oxide Ink in Cracked Pistachio, fading it away to nothing to give the appearance of a snowy ground.  I very slightly diluted a little white acrylic paint and splattered it randomly all over the panel to indicate snowfall.  Once dry I backed the panel with white craft foam and applied it to the card base.

I watercolour painted my reindeer and their piles of gifts with Kuretake Zigs and adhered them to the card with dimensional foam tape by Scotch.


The Merry Christmas die cut sentiment is by Pretty Pink Posh also and was die cut twice and the two die cuts glued together and then they were glued to the card slightly curving the words over the scene to subtly frame it.

The final touch was the application of pearly white sequins throughout the scene which also fits with the snowy scene.

Happy crafting friends!

Nicky x

Tuesday, October 16, 2018

Pumpkin Patch - Hello Bluebird

Hello!

I'm back with my second card today and for the second time in a week I'm using Pumpkin Patch by Hello Bluebird Stamps which forms part of their incredible new release!


Since the last time that I played with this stamp set I went more traditional in my choice of colours, this time I decided to go with sweet pastels and switch it up a little.  To that end I took a panel of Bristol Smooth cardstock.  Using Distress Inks in Spun Sugar and Fossilized Amber I delicately and randomly ink blended the panel.  I then used my embossing buddy to prepare the surface for heat embossing.  

In my Misti I took some of the smaller images from the stamp set like a squirrel and pumpkin and acorn and some leaves and I arranged them in a design where I could repeat it twice across the width of the card by stamping once with Versamark Ink then moving the panel over in my Misti and stamping again.  I kept moving my panel and re-inking and stamping until all areas had the pattern and then I heat embossed using white embossing powder.  Once cooled I die cut the panel to give it a faux stitched edge.


I adhered the panel to my card base then from another panel of white cardstock I die cut the Gallery Frame #2 Die  and then layered this over the decorative panel popped up on dimensional foam tape.  I had a leftover die cut from Grassy Knoll which I ink blended softly, again using the Fossilized Amber Distress Ink and then I stamped the grassy tufts using a tiny stamp included in Deer Friend.  I measured it to size and adhered it, inserting it into the gap for a snug fit.

On Bristol Smooth cardstock (I like and always use Strathmore) I stamped my feature image using Ranger Archival Ink in 'Potting Soil'.  It stamped quite dark since I'd just re-inked my pad but it should calm down soon lol.  I watercolour painted the image using Kuretake Zigs and highlighted their cheeks with a Uniball Signo White Gel Pen.  I die cut and adhered the image with more foam tape.


Finally, I stamped the sentiment from Autumn Script.  It actually says Pumpkin Spice but I trimmed off the second word.  I then die cut using the coordinating dies for the stamp set and then die cut 3 more times from white cardstock to build a stack which I adhered together - each time trimming off in the same place since I'd chosen not to use the 'spice' word.  Finally I glued it in place and stamped 'season' on a little strip of cardstock and popped that onto some foam tape so it aligned nicely.


So there it is .... my non-traditional take on the season and I hope that YOU have an enjoyable Pumpkin Season and enjoy the change in temperatures and colours!

I'll see you next time, thanks for stopping by and feel free to ask any questions you may have, I'll be happy to try and answer them for you.

Nicky x

Rooftop Reindeer - Hello Bluebird

Hello again!

I hope you are enjoying all the inspiration coming from Hello Bluebird Stamps design team?  I have another card to share with you this afternoon created using Rooftop Reindeer which is one of the brand new stamp sets.


I took a panel of Bristol smooth cardstock and I stamped the roofline from the stamp set and masked it off below the line so that I could ink blend it above the line with Distress Oxide Ink in Peacock Feathers and then in Chipped Sapphire Distress Ink, I kept blending to a subtle focal point over the chimney.  I splashed and blotted up a little water to make it look more casual.


I heat set the ink blending then stamped the snowflakes with Versamark Ink and heat embossed in white. I removed the mask then die cut to create the faux stitched edge.  I watercolour painted the chimney and then stamped the reindeer on more Bristol Smooth and watercolour painted the images using Kuretake Zigs.  I fussy cut them out since the coordinating dies weren't available to me yet when I was supplied with the product but you can buy them here

I applied glue to the entire surface of the snowy rooftop and the snow on top of the chimney and poured white flock over the entire area and pressed it down hard using a piece of scrap paper and then returned the excess to the container. There are many 'flocks' out there but what I used was by Stampendous and it is called Fuzzy Fun Flock - it is nice true white colour.  Once dry I took some Stickles glitter and added some twinkle here and there to catch the light.


I applied foam tape to the back of the Reindeer and adhered them into the scene.


The final touch was to take one of the lovely sentiments from the set and stamp with Versamark Ink and heat emboss in silver on a piece of cardstock.  I wrapped cream/silver bakers twine twice around the panel then adhered the sentiment strip over the top by making a channel with foam tape in the back.

Word of warning - flock is lovely and really elevates your projects but it is like the gift that keeps on giving and it can fly everywhere .... if you're up for some wrangling then give it a go - I don't regret it!

Hope you're inspired and go and treat yourself to some Hello Bluebird goodies!

See you next time,

Nicky x


Friday, October 12, 2018

Pumpkin Patch and Autumn Script- Hello Bluebird

Hello!  I'm back with more cards today featuring the big and very gorgeous Hello Bluebird Stamps new release which is now available to buy!  I will post another card this afternoon.


I ink blended an A2 panel of Bristol Smooth cardstock with Distress Inks in Faded Jeans, Shabby Shutters and Peeled Paint.  I splashed some water into the sky and blotted it dry then splashed a solution of Faded Jeans to add more interest.  Once fully dry I put the panel into my Misti and stamped the sentiment using Versamark Ink and then heat embossed in white.


On more Bristol Smooth cardstock I stamped out my images using Ranger Archival Ink in Potting Soil.  I watercolour painted everything using Kuretake Zigs then fussy cut each image since I didn't have the coordinating dies yet.  I arranged my scene then took a quick photo so that I didn't forget it whilst I methodically adhered everything using dimensional foam tape.


The final touch was the application of a little Nuvo Crystal Glaze to her glasses, I randomly dotted in some silver gel pen dots into the scene for a super subtle twinkle when the card is handled and I highlighted some points on the adorable little girl using a Uni-Ball Signo White Gel Pen.

I thank you for coming by to read on my blog today, stay tuned for card number two in a few hours!

Nicky x

Thursday, October 11, 2018

Autumn Script with Fall Buddies - Hello Bluebird

Hi!

Here's my second card today playing with delicious goodies from Hello Bluebird Stamps.  This card features the new sentiment set that comes with coordinating dies called 'Autumn Script' together with all the cuties from 'Fall Buddies'.


Taking a panel of A2 white cardstock, I ink blended it using Distress Inks in Stormy Sky, Carved Pumpkin, Rusty Hinge and Brushed Corduroy.  Initially the idea was that Stormy Sky would be the sky (not surprisingly) but when it came to actually beginning to build the scene I flipped it and preferred what I saw.  Using Versamark Ink I stamped the Blowing Leaves Background Stamp and heat embossed with a beautiful Copper embossing powder by Ranger.  The affect is very rich and luxurious.


I also used the Ranger copper embossing powder to stamp the sentiment from 'Autumn Script',  I die cut it and then used the die to cut several more times and then I adhered each cut to the next to build a good stack, finishing with the embossed on on top.  I adhered this into position on the card.  I cut the Gallery Frame 3 Die once from white cardstock and adhered it over the panel using dimensional foam tape.   

On Bristol Smooth cardstock I stamped all of my 'Fall Buddies' using Ranger Archival Ink in Potting Soil.  I watercolour painted them using my Kuretake Zigs and then since I didn't have the coordinating dies at the time, I fussy cut my images and then layered them into the scene using dimensional foam tape.  The finishing touch was the addition of a few rose gold sequins by Pretty Pink Posh.

I hope you like the card and feel inspired, here's one last close up of that background if for no other reason than I'm currently crushing pretty hard on copper embossing!!!


I really appreciate you stopping by to read - feel free to ask any questions in the comments section, see you next time!

Nicky x


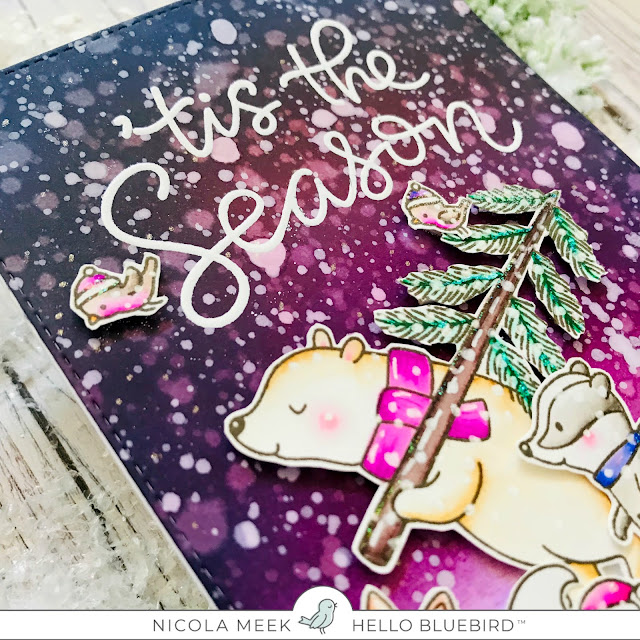
'Tis The Season and Christmas Is Coming - Hello Bluebird

Hello!  I'm delighted to be finally sharing with you a couple of projects today to preview the big new and very wonderful Hello Bluebird release which you can buy October 12th!

My first card today combines the 'Tis The Season sentiment stamp set with the wonderful Christmas Is Coming stamp set.


For this card I richly ink blended my background using Distress Inks in Wilted Violet, Seedless Preserves and Chipped Sapphire, I blended away to nothing at the bottom to give the appearance of snow and then took a little Distress Ink in Picket Fence to further soften where the colour finishes  and to give the appearance that the wind is whipping up the snow from the surface.


I splashed and blotted the background with water.  Then I mixed a little white acrylic paint with a tiny spritz of water and using a small paint brush I splattered on the snow.  I sometimes went for big blobs and other times for small to build depth ... I wanted a real blizzard!  I then put my dried panel in my Misti and using Versamark Ink, I stamped the sentiment and then heat embossed in white.  I repeated this process in order to really make the sentiment stand out on the busy background and it looks even more raised and brighter white for doing that.

Finally, on Bristol Smooth cardstock I stamped my images with Ranger Archival Ink in Potting Soil and watercolour painted them all with my Kuretake Zigs.  I didn't have the dies yet and so I fussy cut the images and adhered them with dimensional foam tape.  Using a Uni-Ball Signo White Gel Pen I hand dotted in the snow all over my characters.  The finishing touch was the application of a little subtle Stickles glitter here and there.


My second card today will be revealed this afternoon on Instagram and here on my blog so stay tuned for that!

Thanks for stopping by,

Nicky x

Monday, October 8, 2018

Polar Peekaboo Pals

Hello!  I'm back today to share my latest card using the newest Avery Elle release.  This card features 'Polar Peekaboo Pals' with the new Three Stars Die Set.


To start with I took a panel of white cardstock and die cut it using the new 'Three Stars Die Set' which makes 3 openings in one pass through your die cutting machine and leaving a stitched edge.   I then stamped and heat embossed the silver sentiment.   I took another panel and ink blended in grey and added the snowflakes by hand with a Uniball Signo White gel pen.  I applied the star panel over the blended panel lifted up on foam tape and then applied it to a 110lb white cardstock base. 


I stamped out my images onto Bristol Smooth cardstock using Ranger Archival Ink in Jet Black.  I watercolour painted them using Kuretake Zigs and highlighted some points with the Uniball Signo White gel pen again.


I die the images and applied them tucked into the scene with dimensional foam tape.  The final embellishment was the addition of a few die cut silver glitter cardstock stars.

I do hope you enjoyed my card and I will see you next time.

Nicky x
Products Used:-

Polar Peekaboo Pals
Three Stars Die

Tuesday, October 2, 2018

Fireside - Avery Elle

Hi!  I'm happy to be sharing a card I made using 'Fireside' the wonderful new stamp set from Avery Elle.


I stamped out all of my images onto Bristol Smooth cardstock using Ranger Archival Ink in Potting Soil.  I watercolour painted them using my Kuretake Zigs and then used a Uni-ball Signo White Gel Pen to highlight some spots and to make patterns on the individual stockings.


I took an A2 panel of Bristol Smooth and ink blended it with Distress Inks in Spun Sugar and Antique Linen and applied the painted elements with varying amounts of dimensional foam tape.


Finally I put the panel into my Misti and I stamped the sentiment with Versamark Ink and heat embossed in gold.  I attached my panel to the 110lb white cardstock base.  Card complete!

Thanks for stopping by to read today, see you soon!

Nicky x

Products Used:-

Fireside