Hello! Come over and join me on the Alex Syberia Designs blog today using this link and learn how I made this card for the New Year! See you over there, thank you!
Welcome back to my blog where I have a new card to share with you today for Hello Bluebird Stamps and which features the stamp set North Star for all your cute New Year cards. To create this card I first ink blended the background using Distress Inks in Wilted Violet and Aged Mahogany. I used a gold shade from the Kuretake watercolour Starry paints to splatter on the 'golden snow' and then used Versamark Ink to stamp the sentiments, heat embossing in super fine gold embossing powder. On Bristol Smooth cardstock the sweet little animals from North Star were stamped using Ranger Archival Ink in Potting Soil. They were watercolour painted using many colours of Kuretake Zigs. Images were highlighted with a white gel pen and die cut using the coordinating dies. Each image was then backed with dimensional foam tape and applied to the background. The card panel was attached to a 110lb cover white cardstock base and then this really rather simple but sweetly opulent card was complete. Wish you a very happy New Year and hours of wonderful crafting. Nicky x
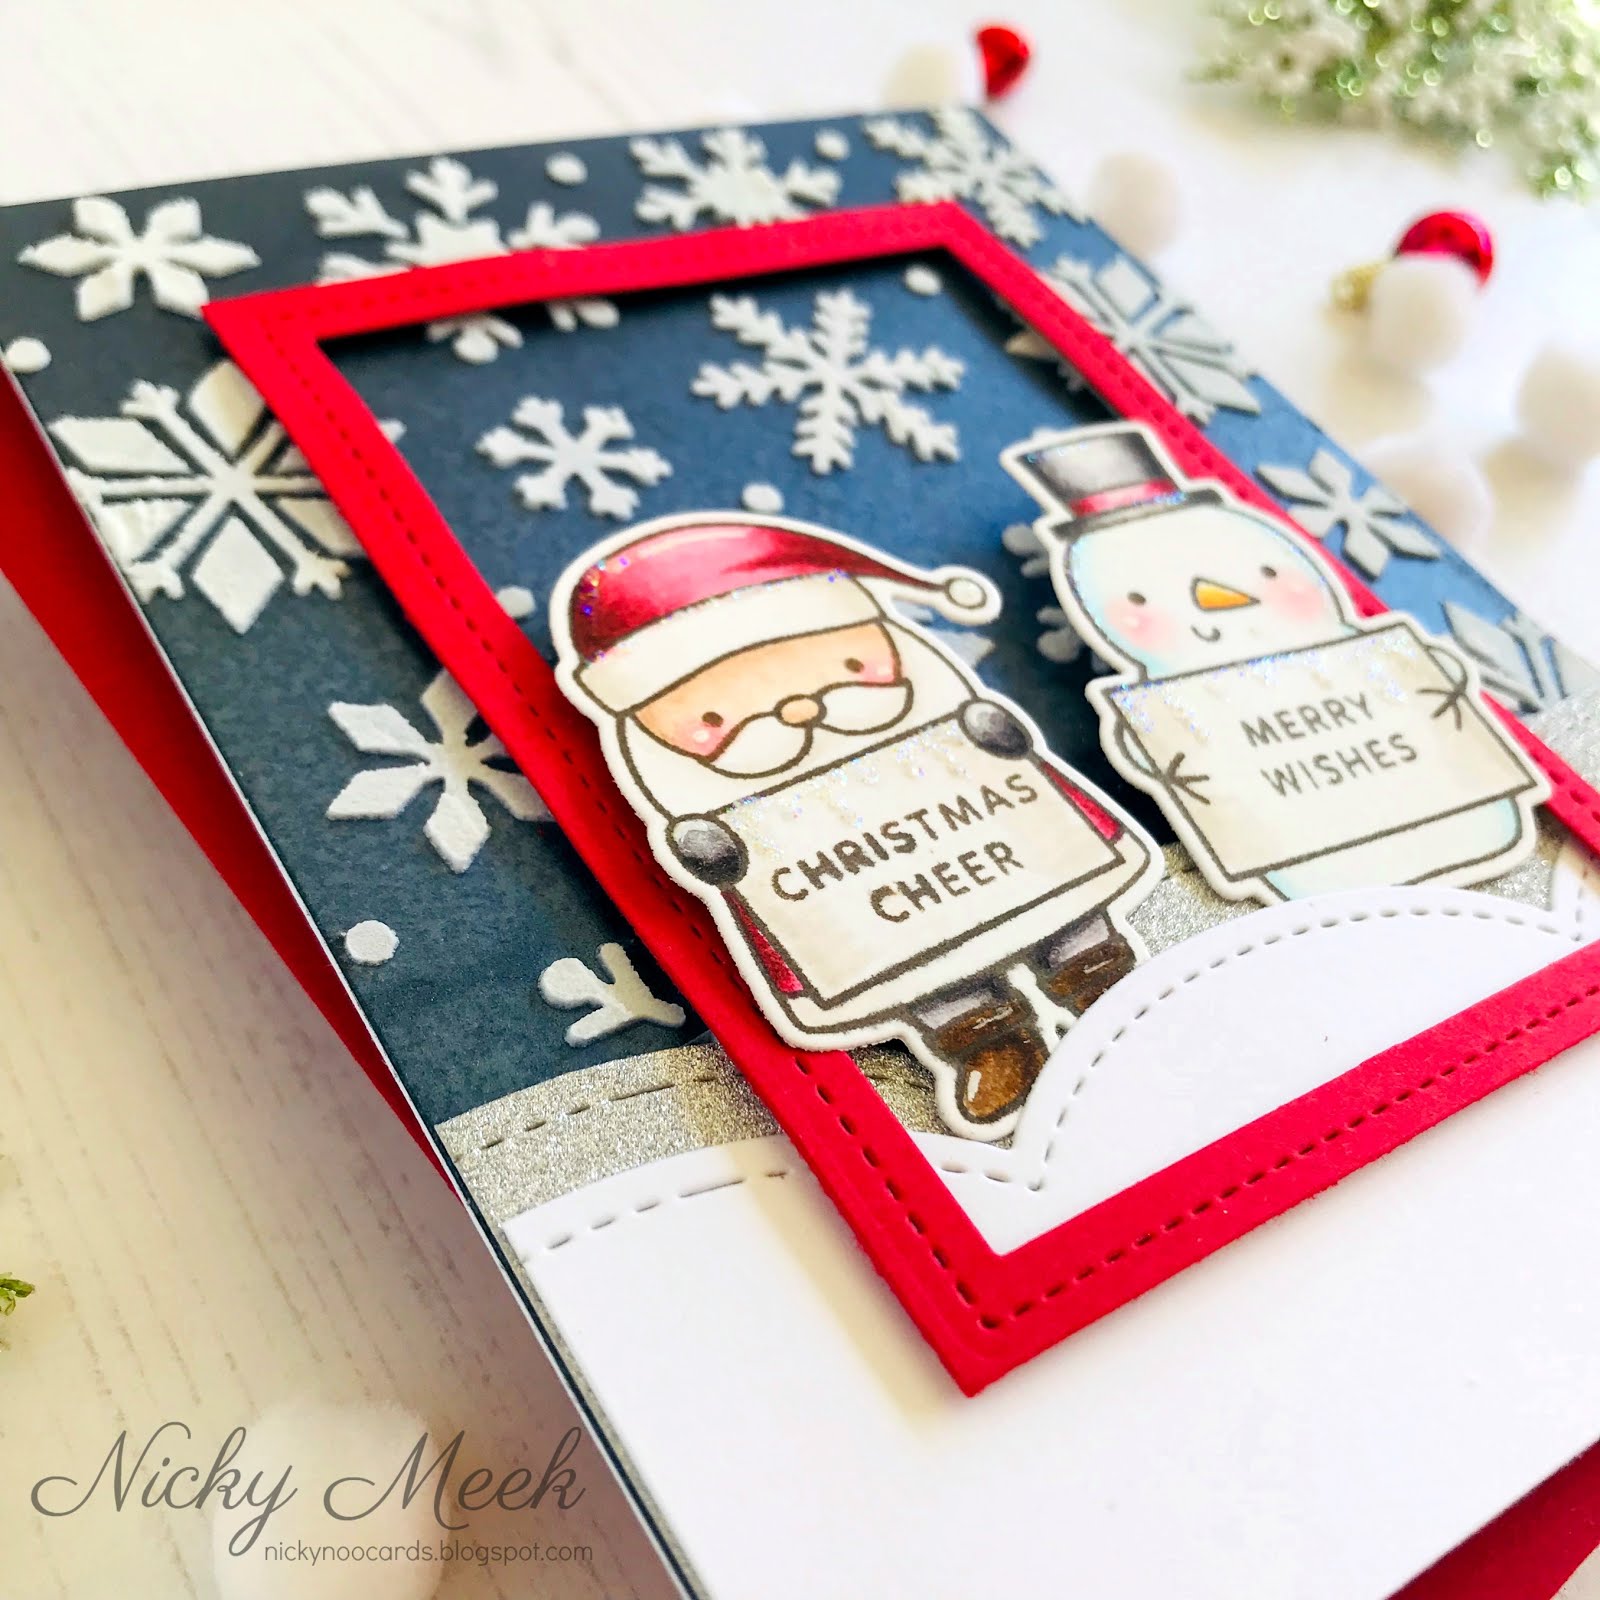
Hello and welcome to my blog, thank you for hopping along to see what is in store with this brand new release by Pretty Pink Posh. The release is already in the shop! There are FOUR $25 gift certificates up for grabs and all you have to do is simply ensure that you leave a comment after reading this blog post and before you click through to the next designer's blog! Winners will be picked randomly and the comments must be left by 11.59PM PST on 10/22/19. Find out if you are one of the lucky winners by going to the Pretty Pink Posh blog. I have TWO cards for you today. This first card features the brand new stamp set Holiday Signs which also comes with coordinating dies. The background was created using a new stencil called Snowflakes, To make the card a panel of white cardstock was ink blended with Distress Oxide Inks in Chipped Sapphire and Black Soot. I then sprayed the panel with Nuvo Mica Mist in Midnight Horizon to give it a pearlescent glimmer which is lovely when the card is handled. Once fully dry I used the stencil and white embossing paste and thickly applied it for nice, dimensional fluffy flakes. The stencil was removed, the panel was set aside to fully dry whilst I got on with something else. From white and silver cardstock and using the Stitched Borders 4 die I cut once from each making the silver portion slightly 'taller' so that it would provide a glittery edge to the snow. Each was adhered to the card base. I also die cut a frame from red cardstock using the Storybook 6 die. I trimmed it down so that it was a simple but bold frame. Backed it with foam tape and applied it to the main panel. On Strathmore Bristol Smooth cardstock I stamped my images from Holiday Signs using Ranger Archival Ink in Potting Soil. I watercolour painted these images using Tombow ABTs in 451, 942, 969 and Kuretake Zigs in Natural Gray, Deep Red, Light Pink, Warm Gray 2, Bright Yellow and Flesh Colour. Points were highlighted with a white gel pen and then they were die cut, backed with a double layer of foam tape and applied inside the frame. The final touch was to grab my Stickles glitter in 'Crystal' and I glittered up some areas on the two characters and I even made dripping icicles along the tops of their signs which you can make out in the image below. ***************************************************************************** My SECOND card for this release is a Happy New Year card that features the new Fireworks stencil for the background together with the new Happy New Year stamp set that also comes with coordinating dies. Finally, the card uses the new Happy New Year Script die. To make this card I used the Fireworks stencil to ink blend the colourful fireworks using Distress Oxides in Worn Lipstick, Twisted Citron, Fossilized Amber and Peacock Feathers. The stencil was removed and the panel attached to a 110lb white cardstock base. The elements I chose to work with from the Happy New Year stamp set were stamped with Versamark Ink onto Strathmore Bristol Smooth and heat embossed in silver. They were watercolour painted with colours to go with the background, Tombow ABTs in 991, 723, 452. Kuretake Zigs in Haze Blue, Beige and Light Gray. These elements (including the embossed words) were backed with foam tape and applied to the scene. The Happy New Year Script was die cut 4 times from white cardstock and once more from holographic cardstock. Each was adhered to the next in a stack to that it would really pop off the card and then it was adhered in its entirety to the centre of the card panel. To finish the card off I found a selection of sequins and shaker fillers to finish the celebratory scene. I really appreciated you coming to read here today. Don't forget to comment before hopping along to the next name on the list which you will find below. Happy crafting! Nicky x
Hi! As promised a 4th Day of cards featuring the new Hello Bluebird Stamps release. This is North Star. For this card I ink blended Bristol Smooth cardstock using Distress Oxides in Tumbled Glass, Peacock Feathers, Broken China, Blueprint Sketch, Chipped Sapphire and Black Soot ..... yup, I pretty much used them all! There's lots of overlapping of the blending and then coming back in with the lighter colours but this is, I believe, how to attain the best affect. I stamped my 'stars' with Versamark Ink and heat embossed in white and then re-stamped just the Happy New Year portion with Versamark Ink and heat embossed in a twinkling embossing powder I have called 'Bridal'. I wanted to build a real depth of 'stars' and to to that end I took a tiny pinch of white embossing powder and sprinkled it over the panel making sure none of it was too thick and then I heat set it by starting underneath the panel for a minute and then finishing with heat directly on top ....... otherwise you're going to blow the powder to the four walls!!!!! I came back in with a Uniball Signo White Gel Pen and dotted in a few more stars again building depth. I die cut my panel to provide the simple stitched edge. On more Bristol Smooth I stamped my images with Ranger Archival Ink in Potting Soil. I watercolour painted them using Kuretake Zigs then fussy cut the images and applied them with different depths of foam tape. Just love those cute fluffy bums! I adhered the panel to the card base. Thanks for coming by to read my method today! See you next time! Nicky x