Showing posts with label Blog Hop. Show all posts

Wednesday, March 26, 2025

Alex Syberia Designs BetterPress Release Blog Hop & Giveaway


Hello and welcome to the Alex Syberia Designs BetterPress Release Blog Hop & Giveaway.  Please ensure that you read all the way to the bottom of my post for Giveaway details and to find a link to the next blog to visit on the hop!  Also, this link is to the Alex Syberia Designs release blogpost.

My first card for this release hop features the following products:-


To create the card I first took a panel of minty green cardstock and did a tone on tone foiling using a minty coloured foil by Spellbinders.  I attached this foiled panel to my card base and framed it out in white using the Good Day Quilted Rectangles Die Set.  This was added with foam tape.


I then took some white cardstock and used the Elegant Blooms PressPlate and the same minty green foil and after foiling it in my Glimmer machine I then die cut using the coordinating die.  I added a little yellow ink blending to the centre of the front facing flower and applied it to the card using foam tape

Next, I used black foil to foil all of the sentiments from the Classic Sentiments PressPlate.  I chose the Big Hugs sentiment for this card and saved the rest for future projects.  I die cut the sentiment and added with foam tape.

To complete the card I added a sweet Panda from Cheerful Panda Moments.  I stamped in black and coloured with Copic markers in C3, C1, C00, R22, R21, R20, R00.  The cheeks were highlighted and then I die cut and applied with foam tape, tucking him partially behind the sentiment.

A few sparkling clear sequins completed this project.  So much fun to foil as it creates a dazzling effect when the card is handled by the recipient.


Alex Syberia Designs is giving away a $50 gift certificate to 1 winner and a $15 gift card to 3 lucky winners. 


Open internationally. All 4 winners will be drawn from the entrants that have played along with this Blog hop by midnight BST April 6th, 2025. Winners will be announced on the Alex Syberia Designs blog 'Giveaway Winners' page on April 7th, 2025.


Tuesday, October 22, 2024

Alex Syberia Designs October Release Blog Hop Giveaway


*************************************


Thank you for joining me on the Alex Syberia Stamps blog hop for this beautiful new release.  Here's a link to Alex Syberia Designs blogpost.   Before I get around to explaining how I made this card you should know that Alex Syberia Designs is giving away a $50 gift certificate to 1 winner and a $15 gift card to 3 lucky winners.  Open internationally.  All 4 winners will be drawn from the entrants that have played along with this Blog hop by midnight BST October 31st, 2024. Winners will be announced on the Alex Syberia Designs blog 'Giveaway Winners' page on November 1st, 2024.

Today My card today features the brand new Stay Cozy stamp set which of course has a coordinating die available separately.  I have also used the Tiny Flowers Cover Die in this project which is a very useful die to keep on hand as an essential.

To create this card I took a white A2 panel of cardstock and die cut using the Tiny Flowers Cover Die.  I adhered this to my card base and set it to one side.


I stamped the Stay Cozy image and coloured with the following Copic markers:-

Skin - E33, E11, E21, E00
Hair - E79, E27, E37, E15, E11
Dress - BG11, G0000, C3, C1, C0  (defined with a black glaze pen)
Boots - BG18, BG72, YR04 (with white gel pen dotted into the centre of each flower)
Fox - E37, E15, E13, E11
Blushes - R22, R21, R20, R00
Blanket - YR07, YG95, E40
Shadow around girl - W4, W3, W1, W0

The image was die cut and applied with foam tape to the background panel at an angle.


To complete the card which I wanted to keep fairly minimalist/CAS, I stamped the 'Stay Cozy' sentiment from the choices included in the stamp set.  I die cut the sentiment using the coordinating die set and then I die cut white cardstock several more times with the same die, I glued the cuts in a stack and then adhered the sentiment to the corner of the card.

A few sparkling clear sequins in two different sizes were the perfect finishing accents.

To continue on this blog hop, please select Lien from the list of blog hop links below and continue on this beautiful journey - thank you!


Friday, October 16, 2020

Pinkfresh Studio - October 2020 Slimline Stamp, Die and Stencil New Release Blog Hop


Hello and welcome to my blog where today I'm joining in as a guest designer with the Pinkfresh Studio design team to help share with you some of the exciting products available in today's new release of slimline stamps, dies and stencils.   Before I reveal my cards, please note that by commenting on my blog post today you stand to win a $25 GIVEAWAY.  Winners will be chosen on October 23rd and you will find out if you are one of the lucky ones by visiting the GIVEAWAY PAGE on that day.  Here are the shipping promotion deals you may be interested in.


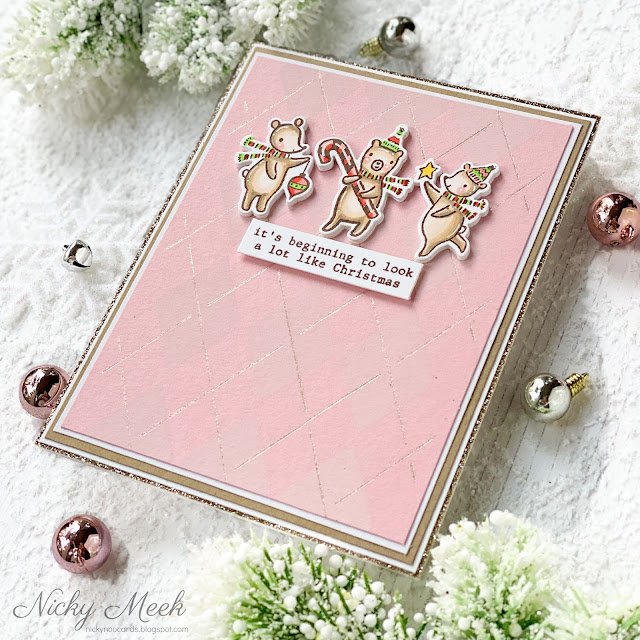
My first card today stays 'seasonal' with a Christmas theme.   It uses the new Argyle Layering Stencil Set for the background.


To make this card I used Distress Ink in Picket Fence to ink blend the first stencil on to pink cardstock.   I then took the second stencil, layered it over the top and I used a silvery/gold Gelly Roll by Sakura to apply the streaks of sparkle which look like metallic thread has been woven through it and catches the light beautifully as seen in the photo below but especially when the card is handled.


I trimmed down this panel and layered it over other panels to get a very sturdy and stacked frame appearance and applied it to a 110lb white cardstock base.


On Copic friendly cardstock I stamped my images from Tree Trimming Friends (from a previous release) using Memento Ink in Rich Cocoa.   I Copic coloured these sweet little images and die cut using the coordinating dies.  I also die cut 4 or 5 more times just from plain white cardstock and adhered each die cut to the next to make a nice dimensional stack.   These characters were attached to the main panel and I stamped a sentiment from the Tree Trimming set and applied that with dimensional foam tape.

                                            *************************************  

My second card jumps all the way into a fresh Spring look and features the brand new and ever so beautiful Be Courageous stamp set that has a coordinating die that cuts out the inside of the frame.   In the background I have used the new slimline Argyle Layering Stencil Set and given it a different look.


To create this card I first die cut a panel of white cardstock using the Slim Diagonal Stitched Rectangles Die which was part of a form release.  This was attached to a slimline card base.   I then used the Argyle stencil to create a background.   I ink blended first with green and then with the second stencil layer with pink ink.   I trimmed down this panel so that the design on the white panel would show and I adhered it.


I have a regular sized Misti which isn't quite large enough to stamp the floral border and so I stamped the image using an extended cutting plate for my Cuttlebug as my giant stamping block.  The image was stamped using Memento Ink in Rich Cocoa and I die cut using the coordinating die which removes the centre to reveal the prettiest frame.


I used Copic markers to colour up the floral images, I backed it with foam tape and applied it over the Argyle.   I was sure to coordinate my colours from the background with my florals.

Finally, I grabbed some coordinating cardstock and a die cut the words 'best' and 'wishes' 6 times over from the 'Phrase Builder : Sending' die set.  I stacked them together glueing each one to the next so that the sentiment really pops and I set it inside the frame.   Last but not least a I chose a smaller sentiment from 'Be Courageous' and stamped and applied that in the lower right hand corner.   A few of Pinkfresh's jewel accents finish out the card.


Thank you so much for visiting my blog.  Don't forget to add your comment for a chance to win the giveaway before visiting the next designer on the hop from the list below.

Take care and happy crafting!

You are invited to the Inlinkz link party!

Click here to enter

Monday, March 23, 2020

Pinkfresh Studio - New Release Blog Hop


I'm delighted to be participating again as a guest designer for this brand new release for Pinkfresh Studio.  Today's release features popular 'slimline' dies.  Please be sure to leave a comment after you've read my post for a chance to win a $25 Pinkfresh Studio gift card.  Winners will be announced March 30th on Pinkfresh Studio's GIVEAWAY PAGE.  You must check this page and claim your prize within 2 weeks


I have three cards today that feature FOUR of the new slimline dies.  


The card above features the new Slim Braided Circles Panel die.   I die cut from white cardstock.  I then ink blended another panel using Distress Oxides where the openings would be.  I backed the white panel with foam tape and applied it over the coloured panel.  I used the Folk Elements die set to create a pretty focal point in each opening.  I die cut each first from gold then pink cardstock and used portions of each to complete each element.  These were adhered into place and then I stamped and adhered the sentiments from Leafy Decor. The whole panel was adhered to a sturdy white cardstock base.


The card above features the new Slim Diagonal Stitched Rectangles die.  I used the smaller panels within this 4 piece set to create a slightly smaller panel and the diagonal stitched edge adds some interest to the ink blended and distressed panel.  The panel was backed with white craft foam and adhered directly to the card base.  Floral elements were stamped and heat embossed in white from the Fancy Blooms  stamp set and coloured with Copics.  LOVE U was die cut using letters from the Kelly Alpha - Upper Case die set.  Each letter was die cut 3 times and layered and adhered together for some nice dimension.   I used some of Pinkfresh's pretty jewel embellishments to finish out my card.


My third and final card above features a combination of two of the new die sets.  First I cut the three openings using the Slim Stitched Scallop Circles Panel die.  I then used the largest die from the 4 piece set called Slim Stitched Rectangles to create the outer stitched edge.  For the background I stamped and heat embossed the Lemon Lush background stamp from the previous release.  I coloured the citrus images in vibrant Copic hues then layered the die cut panel over the top.  Once again I grabbed the Kelly Alpha - Upper Case die set.  This time I die cut the images from vivid orange cardstock just once and I applied them using Kool Tak Foam which is clear so they appear to float over the top for a fun look!  The decorative panel was adhered to a sturdy white cardstock base.

Thank you for coming by for a look at this new release and to take away some inspiration.  Please keep hopping along with the other talented designers.

Nicky x
You are invited to the Inlinkz link party!
Click here to enter

Monday, February 17, 2020

Background Stamp Release - Pinkfresh Studio


Hello and welcome to my blog if you haven't visited with me here before.  I'm delighted to be guesting once again for Pinkfresh Studio and this fun release of background stamps.  Leave a comment after you've read my post for a chance to win a $25 Pinkfresh Studio gift card.  Winners will be announced Monday, February 24th on Pinkfresh Studio's GIVEAWAY PAGE.  You must check this page and claim your prize within 2 weeks
This first card was heat embossed in white using the Diamond Tiles background stamp.  The floral arrangement was made using the Just Because stamp set and coordinating die.  Images were coloured with Copic markers and applied to the background with foam tape and then the whole scene was splashed with white acrylic paint.   The large die-cut sentiments are from the Phrase Building: Sending set.


In this second card I used the same Diamond Tiles Background stamp but in a much more subtle way.  The card was created by ink blending with Twisted Citron Distress Oxide Ink, I blended it deeper at the edges and lighter towards the centre to form a focal point.  I then stamped and heat embossed again using white embossing powder.  I die cut the Foliage Frame twice from two pieces of cardstock.  I kept one as it was and with the second one I used Copic markers to colour up the leaves simply.  I flipped the coloured frame so that it didn't line up with the white frame and adhered everything down to the background panel.  The sentiment is from Leafy Decor and applied with foam tape and a few jewel accents finish out the card.


My third card features the new Floral Diamond background stamp which I've stamped in a vibrant pink.  Layered on top you see the Leafy Decor stamp that comes with a coordinating die. Images were coloured with Copic markers, die cut and backed with foam tape.  On top of that the word 'Hugs' is again from Phrase Builder : Sending die set.


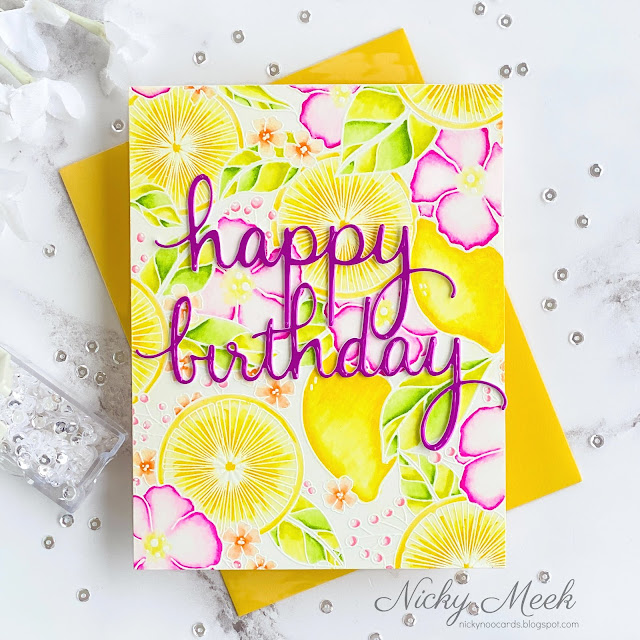
Couldn't wait to get creating with the next background called Lemon Lush.  For this mouthwatering card I stamped the background image using Versamark Ink on to Strathmore Bristol Smooth cardstock and heat embossed in white.  I watercolour painted using Kuretake Zigs.  I then die cut the Sentiment Suite : Happy Birthday three times from white cardstock and once more from a vibrant pink foil affect paper.  They were adhered together in a stack and applied.


I had so much fun creating these cards which are so different for me.  I hope you treat yourself to some background stamps and play with the endless creative possibilities they provide.

Thank you for hopping along to my blog, please use the link below to hop along to the next designer for further inspiration.  Happy crafting!  Nicky x

You are invited to the Inlinkz link party!

Thursday, November 21, 2019

Avery Elle Stamps New Release Blog Hop


I am so excited because our Winter 2019 Release is finally here!!  We have an amazing blog hop full of inspiration today and we are so glad that you are here. Thank you so much for all of your comments and likes during our previews this week.  We read each and every comment and it really makes our day!!

For a summary of all of our new products that are available for purchase right now check out this section in our store .  Be sure to scroll all the way to the end of this post to read about the fun giveaway we are having.  We will be showcasing projects using our new sets starting today and will continue to show them throughout the next few months.  


Hello everybody, thanks for navigating to my blog.  My card for Avery Elle was made by ink blending a panel of kraft cardstock using Distress Oxide Ink in Vintage Photo to create a focal point.  I used Versamark Ink to stamp the sentiments from the new Thanks Thanks sentiment set and then heat embossed in white.   I splattered white acrylic paint beneath the sentiments and where I was about to create a little scene.


I stamped the sweet images from the new Wheelie Great stamp set onto Strathmore Bristol Smooth cardstock and watercolour painted using Kuretake Zigs in Oatmeal, Mid Gray, Warm Gray 2, Natural Gray, Light Gray, Light Pink, Carmine Red, Fl.Green, Light Green, Cobalt Blue and Yellow.  Points were highlighted with a white gel pen.


The images were die cut, backed with Scotch foam tape and applied to the background.  I used pink Nuvo drops to further accent the sweet focal point.  The yellow parts of the bike were glossed up with Glossy Accents Glue.


Thanks for coming by and please continue to read for the giveaway details and to hop to the next designer.


Nicky x


Avery Elle  
Caryn Davies
Heather Campbell
Yainea
Melania Deasy
Katie Gehring 
Amy Kolling 
Ashley Marcu
Elena Roussakis
Nicky Meek

To celebrate our Winter 2019 Release Blog Hop, Avery Elle is giving away a stamp set of their choice to 3 winners.  To enter to win just comment on this post.  There is no purchase necessary and you must be 18 years of age or older to enter.  This giveaway is void where prohibited.  You can also do options 2, 3 and 4 of the following to increase your chances of winning. You have until midnight Sunday, December 1st to enter.  The winner will be announced on the Avery Elle Blog on Monday, December 2nd .  All products are available for purchase in the Avery Elle store right now.  You can check them all out here
To enter to win you can do 1, 2, 3, or all 4 of the following to increase your chances:


  1. Comment here on the Avery Elle Blog
  2. Follow / Tweet us on Twitter (we are @averyellestamps )
  3. Follow / Share us on Facebook (we are www.facebook.com/AveryElle ) .
  4. Follow / Comment on Instagram (we are https://www.instagram.com/averyellestamps/).