Showing posts with label Blueprints 25. Show all posts

Monday, February 26, 2024

My Favorite Things - February Release Countdown Day One


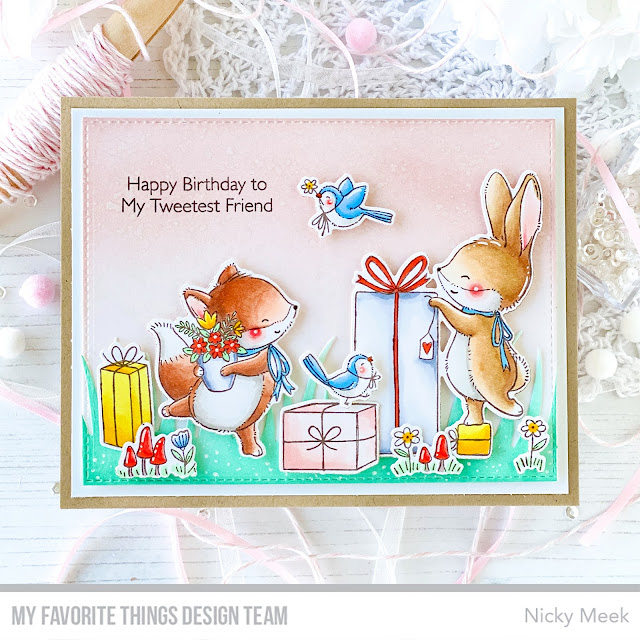
Welcome to my blog and countdown Day 1 to tomorrow's release from MFT Stamps which you can buy at 10am Eastern!  My card today uses the new Stacey Yacula illustrated stamp set, here's what I've used to make it:-


I took an A2 panel of white cardstock and die cut using Blueprints 25 to give it the stitched edge affect.  I grabbed another panel used the same die again and then used the Tall Grass Die-namics to cut my grassy border.  I ink blended the panels and splashed them with Perfect Pearls loosened with water.  The grass was glued directly to the pink panel and I stamped the sentiment.  I backed the panel with white craft foam and sized this card up to A6 by adding a white mat then a kraft mat behind it, then glued to the card base.


I stamped the images with Memento Ink in Rich Cocoa and coloured with the following Copic marker combinations:-

Bunny - E23, E55, E31, E30, E50, W2, W0, W00
Fox - E25, E75, E13, E11, E00, W2, W0, W00
Birds - B12, B41, W00
Red - R05, R22
Yellow - Y19, Y15, Y13
Pink - R00, R000
White - C3, C1, C0, C00
Blushes - R22, R21, R00


Images were highlighted with a white gel pen and applied with foam tape and then the card was complete.

Thank you for stopping by my blog today and don't forget to visit and subscribe to the MFT You Tube Channel for endless how-to videos, inspiration and product reveals.


Friday, January 5, 2024

My Favorite Things - January Release - 4 Days To Go!


The new MFT release is crazy adorable and will be available for purchase January 9th at 10am Eastern.  My card today features the following products:-

Blueprints 25 Die-namics

Please note that from this point forwards, coordinating die-namics for stamp sets will no longer be available separately.  This means that you must either commit to buying the stamps and dies together immediately or only buy the stamp set on it's own.  Buying both together is at a discounted rate.


I stamped a white panel using the main cloud image and Memento Ink in Rich Cocoa  to create a background and die cut using Blueprints 25.

I stamped the piglets I'd be needing from Cupigs with the same ink and everything was coloured with following Copic colour combinations:-

Pigs - R11, R01, R00, R0000, W3, W2, W1, W00
Clouds and 'Diapers' - C3, C1, C0, C00, BG000
Brown - E77, E74, E71, E70
Blushes, R22, R21, R00

Points were highlighted with a white gel pen and applied with foam tape for dimension.

I glittered some of the hearts on the clouds and the 'cupigs' angel wings ... because glitter makes everything more fun - tell me I'm wrong!


To finish up I simply stamped the sentiments on two sentiment strips and added a little colour like the background and added the strips at playful angles with foam tape.

Thank you for stopping by my blog today and don't forget to visit and subscribe to the MFT You Tube Channel for endless how-to videos, inspiration and product reveals.


Wednesday, February 22, 2023

My Favorite Things - Wednesday Sketch Challenge - WSC634


Welcome to a new Wednesday Sketch Challenge for My Favorite Things.   You can find out out how to enter one MFT's challenges by visiting their site, read on for how I made my card to fit the sketch.

Products Used:-


To follow the sketch I first created an A2 panel with a stitched edge using Blueprints 25 and patterned paper.  I adhered this to a white panel to reinforce it then glued the whole thing to a card base.  Next task was die cut the large tag from Blueprints 9.  I did this twice, once so that I could ink blend a background and the the second so that I could die cut the scalloped top and bottom borders which are so pretty.  After ink blending the main tag I backed the scalloped pieces with foam tape and applied.  The tag was backed with white craft foam and applied to the patterned base.  Let's get that dimension going!


I stamped the images using Memento Ink in Rich Cocoa and coloured with the following Copic markers:-

Girl Skin - E33, E11, E21, E00
Girl Hair - E44, E42, E0000
Girl Clothes - B00, B000, B0000, T4, T3, T2, T0 and C3, C1, C00
Balloon - RV63, RV02, RV10
Box - E44, E43, E42, E41, E0000, B00, B000, B0000
Kitten - C3, C1, C0, C00
Blushes - R21, R20, R00, R000

I used my white gel pen to dot in interest to the background, polka dots to the blue ribbon and highlights on cheeks etc, then I die cut and applied with dimensional foam tape.

I popped the panel in my Misti and stamped the sentiment and then fed pink baker's twine through the top of the tag and pulled to a little knot finishing by snipping the ends.


Thank you for stopping by my blog today and don't forget to visit and subscribe to the MFT You Tube Channel for endless how-to videos, inspiration and product reveals.


Sunday, January 29, 2023

My Favorite Things - Vault Release Countdown Day 2


Hello and welcome to Countdown Day 2 to the new Vault Release from MFT Stamps which you will be able to purchase on January 31st at 10am Eastern.

My card uses the following products:-

Banner Day Celebrations

I used Blueprints 25 to create a full sized A2 panel with a stitched edge .... this is a great die set because so many cards start with an A2 panel and with this set you also get a couple of sentiment strips along with other fun and useful elements.

I used the Plaid Background Builder stamp set together with MFT inks to create a cheerful plaid background which when completed I adhered to my prepared card base.


I then used MFT's Prestige Cardstock and die cut the Fresh-Cut Flowers die-namics.  I used Copic markers to add a little subtle shading to the greenery and some petals for some subtle interest and then glued the elements together and gathered the stems into a casual bunch, binding them with a little tape.  I flipped the bunch over and adding little bits of foam tape behind the flowers and leaves and then turned it over again and adhered it to the plaid background.

To finish, I used Blueprints 25 again, selecting one of the sentiment strips and I stamped the white strip I created using a sentiment from the Banner Day Sentiments stamp set.  I backed this strip with a double layer of dimensional tape so that it floated above the bound bunch of flowers and hid the tape.


Thank you for stopping by my blog today and don't forget to visit and subscribe to the MFT You Tube Channel for endless how-to videos, inspiration and product reveals.