Showing posts with label Tall Grass Die-namics. Show all posts

Tuesday, February 27, 2024

My Favorite Things - February Release Day!


Ready to shop?  The February release from MFT Stamps is now available for you to buy.  Before you go, read on for the details of how I made this card and we'll start with what I've used:-


I took a panel of white cardstock and used the stencil to create the sky and then I came in around the edges with the same ink which was Tumbled Glass Distress Oxide.  I applied this to the card base then popped it in my Misti and stamped the sentiment.

Next, I die cut two grass edges using the Tall Grass Die-namics.  I ink blended the cardstock prior to die-cutting and I used Twisted Citron and Mowed Lawn to blend.  I applied the larger grass piece with foam tape and then to create some even better dimension I applied the second and smaller grass section with more foam tape.  I like to build 'meaty' cards!!!


Images from You Make Moo So Happy illustrated by Yuzu were stamped using Memento Ink in Rich Cocoa - my absolute favourite and I coloured using the following Copic marker combinations:-

Cows - C3, C1, C00, E74, E71, E70, R00, E00, T5, T4
Balloon - R59, R39, R29, R27, R24, R05
Sunflowers - YR24, Y19, Y17, Y15, YG13
Clouds -- BG000, BG0000
Log - E44, E43, E41
Blushes - R22, R21, R00

I highlighted the images and die cut using the coordinating dies and added them to the scene with foam tape.


Happy shopping everyone and have fun with your new products everyone, I'll be back with one more card for this release tomorrow, so be sure to check that out.

Thank you for stopping by my blog today and don't forget to visit and subscribe to the MFT You Tube Channel for endless how-to videos, inspiration and product reveals.


Monday, February 26, 2024

My Favorite Things - February Release Countdown Day One


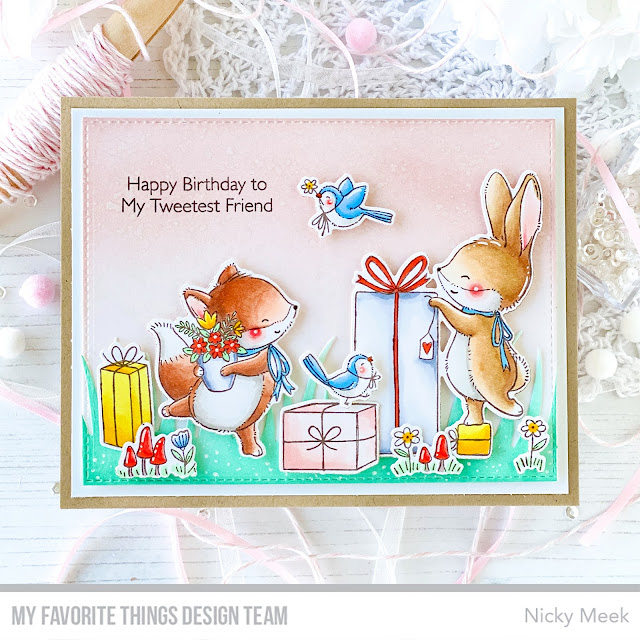
Welcome to my blog and countdown Day 1 to tomorrow's release from MFT Stamps which you can buy at 10am Eastern!  My card today uses the new Stacey Yacula illustrated stamp set, here's what I've used to make it:-


I took an A2 panel of white cardstock and die cut using Blueprints 25 to give it the stitched edge affect.  I grabbed another panel used the same die again and then used the Tall Grass Die-namics to cut my grassy border.  I ink blended the panels and splashed them with Perfect Pearls loosened with water.  The grass was glued directly to the pink panel and I stamped the sentiment.  I backed the panel with white craft foam and sized this card up to A6 by adding a white mat then a kraft mat behind it, then glued to the card base.


I stamped the images with Memento Ink in Rich Cocoa and coloured with the following Copic marker combinations:-

Bunny - E23, E55, E31, E30, E50, W2, W0, W00
Fox - E25, E75, E13, E11, E00, W2, W0, W00
Birds - B12, B41, W00
Red - R05, R22
Yellow - Y19, Y15, Y13
Pink - R00, R000
White - C3, C1, C0, C00
Blushes - R22, R21, R00


Images were highlighted with a white gel pen and applied with foam tape and then the card was complete.


Thank you for stopping by my blog today and don't forget to visit and subscribe to the MFT You Tube Channel for endless how-to videos, inspiration and product reveals.


Thursday, August 17, 2023

MFT Stamps August Release Spotlight


We're continuing to spotlight the August release by MFT Stamps and this is my latest card using a stamp set illustrated by Yuzu Illustration.  Here's what I've used:-

A2 Stitched Rectangles Set 2 Die-namics

I prepped 2 white panels I die cut both using the Stax Die-namics and with one of them I used the new Tall Grass Die-namics then ink blended using Shabby Shutters Distress Oxide Ink.  I ink blended the white panel using Worn Lipstick Distress Oxide Ink and I glued the grass strip to it and then the whole panel was backed with white craft foam and then glued to another A2 panel then to the card base.  I popped the whole panel into my Misti and double stamped the sentiment.


I stamped the images I was wanting to work with Memento Ink in Rich Cocoa and coloured with the following Copic colours:-

Shrubbery - G24, G43, YG61
Bench - W5, W4, W3, W2, W1, W0, T7
Pup - C1, C0, C00, R08, R05
Girl Skin - E33, E21, E00, E000
Girl Hair - E44, E43, E42, E51, E40
Girl Top - R08, R05, R22, R21
Girl Joggers - E43, E42, E41
Girl Sneakers - C1
Blushes - R22, R21, R20, R00

Images were die cut then applied to the scene with foam tape or glued directly.  I highlighted with a white gel pen.


Thank you for stopping by my blog today and don't forget to visit and subscribe to the MFT You Tube Channel for endless how-to videos, inspiration and product reveals.