Showing posts with label Torn Paper Edges Die-namics. Show all posts

Tuesday, December 13, 2022

My Favorite Things - December Release Day!


The December release from MFT Stamps is now available for purchase and I'm sharing a card made using the brand new Stacey Yacula illustrated stamp set Pawsitive Vibes.   Here's what I used in the making of this card:-


I created a mini slimline panel of white cardstock and used the Torn Paper Die-namics to create the interesting edge ..... I figured it looked like the dog chewed it lol!

I ink blended with Distress Oxides to create a soft background and splashed it with water to soften the look further.   I stamped the sentiment in the corner.   I applied this panel to a card base, making sure to trim down the card base so that you couldn't see it behind the 'chewed' edges.


I stamped the images I'd be using from Pawsitive Vibes using Memento Ink in Rich Cocoa and I coloured the images with the following Copic marker combinations:-

Dog House - C7, C5, C3, C1, C0, C00, E50, E87, E44, E43
Large Dog -  E33, E11, E01, E0000
Dachshund - C3, C1, C0, C00, E74, E71, E70
Pug - T6, T5, T4, T3, E42, E41, E40
Dog Bed - RV25, RV13, T5, T3, T1
Dog Bowl - G00, T3, T2, T1
Tennis Ball - FYG1, C3, C1

I highlighted one or two points with a white gel pen, die cut and adding the images to the background using dimensional foam tape.

I stamped some hearts floating above them and adding a few sparkling clear sequins to complete the scene.


Thank you for stopping by my blog today and don't forget to visit and subscribe to the MFT You Tube Channel for endless how-to videos, inspiration and product reveals.


Thursday, December 1, 2022

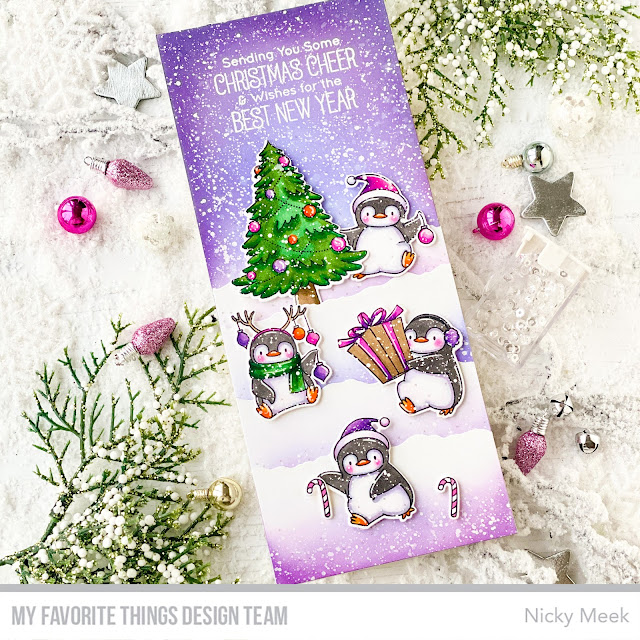
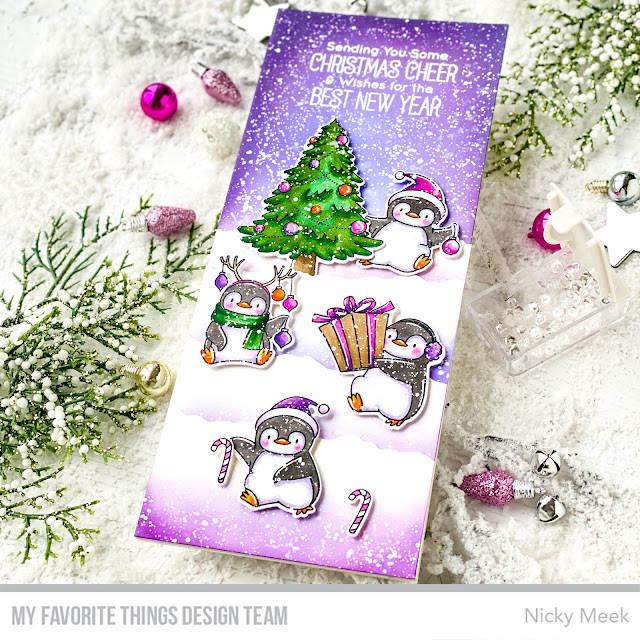
My Favorite Things - Holiday Penguins


I continue to churn out the Christmas cards, my favourite to make by a mile!   This card for MFT Stamps features the following products:-


I created a slimline panel and I ink blended it using Shaded Lilac, Seedless Preserves and Villainous Potion Distress Oxide Inks.  I grabbed another slimline panel and using the Torn Paper Edges Die-namics, I die cut 4 layers of snow which I ink blended with the first two shades mentioned above and then I adhered them to the background.

I stamped and heat embossed the sentiment at the top of the background panel and then covered this area with a little post it tape and spattered the entire card surface with water and then with white acrylic paint loosened with water.  When I was happy with the overall affect I removed the mask carefully spattered a little more paint where the sentiment was, but not enough to make it hard to read, just so that it blended in.


I stamped the images from Holiday Penguins with black Memento Ink and coloured them with the following Copic marker combinations.

Penguins - T5, C3, C1, C0, RV55, BV000, V0000, YR07, YR04, Y38
Blushes - RV06, RV55, RV10
Tree - G29, G19, YG67, YG45
Parcel - E43, E44, E87, RV06, RV55
Purple - V17, V15

I die cut the images and then placed a little tiny piece of Post It tape to cover the facial features of the penguins and then I spattered all of the images as I did with the background, removing the facial mask right at the end and applying all of the elements to the background using dimensional foam tape.

I highlighted a few points on each image and then used a metallic gel pen so randomly apply pale gold dots throughout the entire scene because I love a subtle little twinkle when a card is handled.


Thank you for stopping by my blog today and don't forget to visit and subscribe to the MFT You Tube Channel for endless how-to videos, inspiration and product reveals.


Tuesday, November 15, 2022

My Favorite Things - Playful Penguins


Thanks for waddling all the way over to my blog today where I have a new card for MFT Stamps featuring the adorable Yuzu illustrated Playful Penguins stamp set.   Here are the products used in this project:-


To kick things off I first ink blended a mini-slimline panel of white cardstock using a layered blend of Speckled Egg and Cracked Pistachio Distress Oxide Inks.   I then liberally sprinkled water over the ink and then watered down some white acrylic paint and splattered that too.  Once dry I used the Torn Paper Edges Die to give the fun raw edge and I scaled down a mini slimline card base so that it wouldn't show behind the torn edges and glued the background down.


I stamped the Playful Penguins with black ink and used the following Copic markers to colour them:-

Penguin Bodies - T5, T4, T3, C3, C1, C0 , C00, YR04, Y38, Y19
Blushes - RV34, R83, R81, RV000
Brown Cardigan and Scarf - E87, E44, E43, E42, E41
Pink Sweater R81, W4, W3, W2, W1
Igloo - BG11, BG70

Points were highlighted and decorated with a white gel pen and then I die cut the images and applied them to the scene with foam tape.

To finish up, I stamped the sentiment and applied this with foam tape and I stamped Merry Christmas inside my card and I took the smaller of the two star dies from the coordinating die set and die cut some white stars/flakes and popped each one up on a tiny piece of dimensional foam tape.  Card complete!


Thank you for stopping by my blog today and don't forget to visit and subscribe to the MFT You Tube Channel for endless how-to videos, inspiration and product reveals.


Sunday, November 13, 2022

My Favorite Things - Coolest Friends


Thanks for jingling all the way over to my blog today to read the details for this new slimline Christmas card that I've made for My Favorite Things.   Here are the products used in this project:-


I created a background panel by ink blending with Distress Oxide Inks in Spun Sugar, Victorian Velvet and Black Soot and creating a soft focal point.  I then did a lot of splashing with water and then mixed white acrylic paint with a drop or two of water to loosen it up and liberally splattered that mixture by tapping it off the end of a small paint brush.

I created 3 edges using the Torn Paper Die-namics and white cardstock and I quickly ink blended with Victorian Velvet and Black Soot so that a little would show before the next layer and so on, on up and these were glued in a stack to the card base.


I stamped the Coolest Friends images with black ink and coloured the images with the following Copic marker combinations:-

Pink - R83, RV11, T5, T3, T1
Penguins - T5, T4, T3, C3, C1, C0, C00, RV000
Snowmen - R83, RV11, RV000, C3, C1, C0, C00
Brown - E43, E42, E40
Bells - Y21, E0000, T2, T0

I used a white gel pen to highlight certain points and create patterns on their scarves etc then die cut the images and applied them with dimensional foam tape.

I die cut the JINGLE letters from Frosted Alphabet and glued the frosting die cuts to the main letter and then basically to finish the rest of the card it was a whole lot of Stickles glitter 'work'.  I made the letter icing ombré by combining white glitter, merging with silver glitter and then a muted pink glitter to fit the theme.  I also dotted the white glitter around amongst the snow and glittered points on the characters and elsewhere and then I dried it with a mini desk fan for an express finish!


Thank you for stopping by my blog today and don't forget to visit and subscribe to the MFT You Tube Channel for endless how-to videos, inspiration and product reveals.