Showing posts with label embossing. Show all posts

Tuesday, April 14, 2026

Simon Says Stamp - Fresh Crocus Duo


Welcome to my blog and a new card for Simon Says Stamp featuring products from their most recent 'In My Heart' release.  Here's a hand list of links to the products you see used here:-


I started with the background panel which I trimmed smaller than A2.  I used a brayer on the inside of the Fanfare Embossing Folder and rolled on Salvaged Patina Distress Oxide Ink.  I was sure to roll this ONLY on the side where the pattern is in 'dips' (not raised) so that the ink would not be on the raised pattern and keeping it white after running it through my die cutting machine.  I then spattered on some Peacock Feathers Distress Oxide Ink that I loosened with a drop or two of Solar Spray in Crocodile Tears for some  pretty iridescence.  This panel was backed with white craft foam and applied to a white card base.


I die cut the focal panel from white cardstock using the Teardrop Pinpoint Frames die and ink blended softly in the centre with the Salvaged Patina again.  This panel was added with dimensional tape to the embossed panel.

I die cut the Fresh Crocus Duo from white cardstock and ink blended using Salvaged Patina, Peacock Feathers, Twisted Citron and Mowed Lawn.  I assembled the blooms with glue, backed them with foam tape and applied to the white panel.


To complete the project  I die cut the Giggle Hello 3 or 4 times, I ink blended one of the cuts and then glued them all together then to the card.  I threaded some toning coloured cord around one of the blooms and tied it to a bow and dotted in some interest around the flowers with a gel pen.  Lastly I added some jewel accents and with that this card was finished!

I appreciate you visiting my blog today and I'll be back very soon with something new.


Tuesday, July 27, 2021

My Favorite Things - July Card Kit Release Day - Celebrate You!

Happy to share that the July card kit Celebrate You by My Favorite Things is now available for purchase.  I have a new card today to share with you featuring elements from this release.


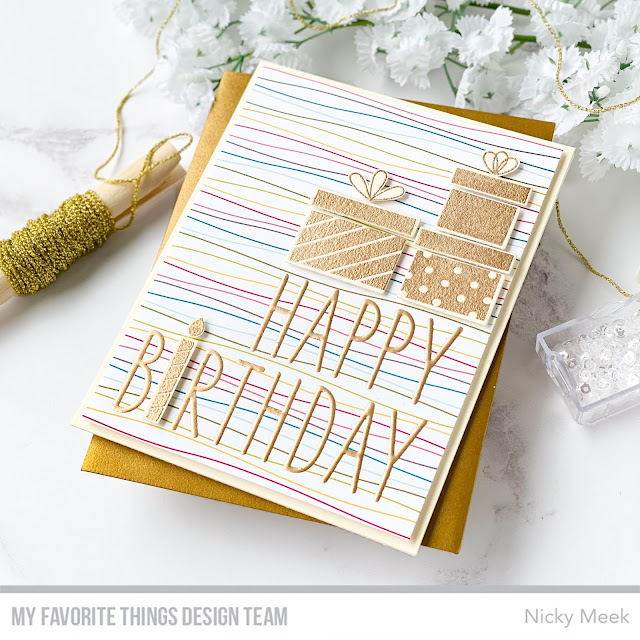
The card started by creating an A2 panel of Chantilly Cream Prestige Cardstock and adhering it to a prepared white cardstock base.    Then I created a small panel of cardstock using a design from the Party Time 6 x 6 Paper Pad which forms part of the kit.


I popped the patterned panel in my Misti and stamped the oversized sentiment from Celebrate you using Versamark Ink and I heat embossed in gold.  I repeated this process 2 or 3 more times so that the sentiment was nicely raised and embossed.

The panel was backed with white craft foam and mounted on the Chantilly Cream panel.

I stamped the candle and gifts with Versamark Ink on more of the cream cardstock and heat embossed just once in gold.  Elements were die cut and backed with foam tape, arranged and applied.


Above zoomed in photo shows how nicely the wiggly coloured line paper works with the smart gold.

I hope you treat yourself to the kit .... you deserve it after all!   Happy shopping and crafting friends, I always appreciate you stopping by and love to hear from you all in the comments below.   Take care!


Wednesday, December 19, 2018

Merry Pigs - Hello Bluebird

Hello!

I needed to make a Happy New Year card for personal use and so I called upon my favourite Merry Pigs by Hello Bluebird Stamps and the sentiment is from North Star, also Hello Bluebird.


I created a background using Distress Oxide Ink.  I ink blended the brighter colours of Cracked Pistachio and Worn Lipstick first and then used Chipped Sapphire and Black Soot to fill in and darken the scene for an amazing show of Aurora Borealis.  I used my heat gun to dry it quickly and then using Versamark Ink and my Misti Stamping Tool I stamped the sentiment and heat embossed in gold, repeating two more times so that the sentiment is very dimensional.  I then used some of the stars and also stamped and embossed although for the purposes of this card they are confetti which my pig seems to be throwing in celebration!


I applied the panel to my card base.  I then die cut the Gallery Frame #1 Die and the Gallery Frame #3 Die.   I applied the #1 cut with dimensional foam tape and then the #3 cut with more dimensional tape - making for a very deep and layered frame which gives the card a lovely substantial feel.


On Bristol Smooth cardstock I stamped my images with Ranger Archival Ink.  I watercolour painted them using Kuretake Zigs in  No.028 Pale Pink, No.045 Pale Green, No.021 Light Carmine and No.094 Gray Brown for the 'feet' and No.026 Light Pink for the blushing cheeks.  I highlighted some points with a Uni-Ball Signo white gel pen.  I applied the pigs to the scene using thick dimensional foam tape.

Card complete and perhaps a little inspiration for some of you looking to send some new year cheer!

See you next time and feel free to ask any questions you may have, thank you!

Nicky x

Tuesday, April 10, 2018

Golden Wedding Anniversary Card

Hi crafty friends!  Recently a friend commissioned a card from me for some relatives of hers who were about to celebrate their 50th wedding anniversary ... which is kind of a big deal right?  I didn't want to make something that was utterly predictable and resorted to my own style, why would I do anyone else's style?


In brief this card consists of a 110lb Neenah cardstock base.  The base panel was gently ink blended with Distress Ink to form a soft blue backdrop to an embossed '50' in gold using Versamark Ink and Simon Says Stamp gold embossing powder.  A panel of white cardstock was die cut with the faux stitched edge, it was then die cut once more with a circular die and then lined/backed with a sheet of acetate to form the shaker window.

The panel had Scotch Dimensional Foam tape added to the reverse, creating a circular enclosed window area which I filled with a mix of sequins that I had on hand but importantly contained micro beads from Martha Stewart.  I love to include these micro beads because they stop the shaker contents from becoming lodged and keeps everything moving far more freely as the card is shaken and it makes a pleasing shuffling sound.  I'm a fan!  The panel was adhered to the base .... and yes .... some beads get away from you when doing this since they are experts at rolling away at hight speed but you COULD seal the shaker unit with another piece of acetate before applying to the base if you don't want to wrangle beads!!!!

All of the other card elements from the florals, to the birds to the banner were hand stamped using Banner & Wreath from Avery Elle in Ranger Archival Ink in Black . They were then die cut and watercolour painted and then adhered into the scene with dimensional foam tape and I finished out the scene with a few accenting sequins care of Pretty Pink Posh.


I'm really grateful that you stopped by the blog today to read how this card came together and if you haven't made a shaker card yet ... or in a while, I encourage you give it a go, it is worth the effort and is sure to delight.  Please use the comments section if you want any further detail, I'd love to help, encourage and enable you!!!!

Nicky x