Showing posts with label One-of-a-Kind Friend. Show all posts

Friday, June 23, 2023

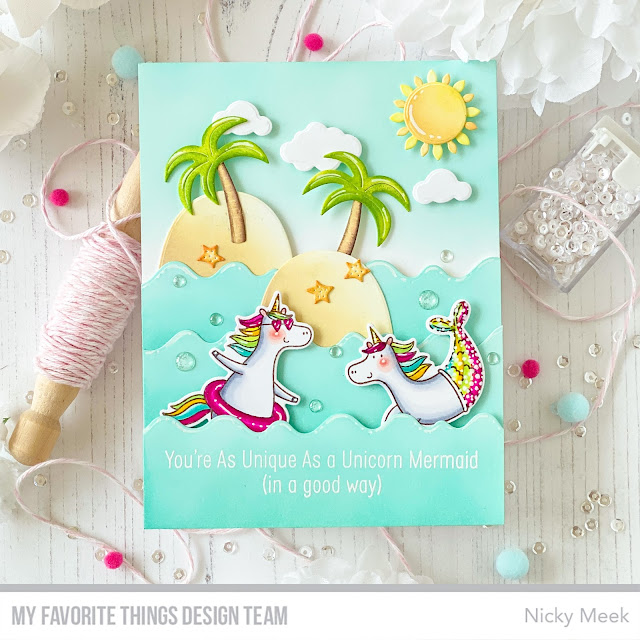
My Favorite Things - Island Paradise Die-namics with One-of-a-Kind Friend


Hi!   My card today is actually written up in detail on the MFT Newsletter email which I encourage you to sign up for if you're not already - it's a way to know ahead of time what is coming from MFT including sales.  For those of you who don't want your inbox filled, here are all the details for this project!   Because this was a newsletter post you will find there's a little more detail than usual as I show you how I build one of my scene cards which are my preferred style ... time consuming but still preferred!

Here are the products I've used:-


One-of-a-Kind Friend

One-of-a-Kind Die-namics

Island Paradise Die-namics


I started the card by die cutting all the pieces of scenery I would be needing and also stamping and die cutting the featured images from One-of-a-Kind Friend.  I then put all the pieces together and settled on a layout as shown in the image below.


87C8C393-2C7F-41A9-9A99-4D37801235B9.jpeg


Happy with the layout I then started to ink blend all of the different components.  The sky and ocean were done using Salvaged Patina Distress Oxide Ink.


04CCFA76-7FB4-4F0B-8241-5CBCAA5B7490.jpeg


I keep reassembling the components as I go along, it helps me to choose colours wisely for the next stage.


0509283B-E3C6-4D03-AAE2-810DE2979702.jpeg


The little mounded islands were blended with Antique Linen, the Starfish with Spiced Marmalade, Palm Fronds with Twisted Citron and Mowed Lawn, Palm Trunks with Antique Linen, Tea Dye and Ground Espresso and finally the Sun with Dried Marigold and Squeezed Lemonade.  I used mini sponge daubers for the tiny or intricate parts like the palm fronds.


Nothing is glued down yet!


I then coloured the fun unicorn images from One-of-a-Kind friend with the following Copic marker combinations:-


6AF29E3B-9E0A-4993-AA1D-22292FF0EC0E.jpeg


Happy with everything, all that was left to do was highlight some points with a white gel pen and then I attached everything with either a single or double layer of dimensional foam tape. With a scene card like this I always start at the top and the back and then layer forwards.  I like to build a lot of dimension with my scene cards, you can fit a lot more in that way and besides, they feel really substantial when they are handled by the recipient and that's a good thing!  Before attaching the bottom portion of the ocean, I stamped the sentiment with Versamark Ink and heat embossed in white, then it was applied.


A few water droplet style embellishments completed the playful scene!


204F5176-EC07-48DD-8EFA-A08EAE9BEC3A.jpeg


Hope you can squeeze in some crafting time soon and have a great day!


Nicky


Thank you for stopping by my blog today and don't forget to visit and subscribe to the MFT You Tube Channel for endless how-to videos, inspiration and product reveals.


Sunday, June 11, 2023

My Favorite Things - June Countdown Day 2


This is Countdown Day 2 to the June 13th release by MFT Stamps and today I'm revealing the new One-of-a-Kind Friend stamp set.  Here's what I've used:-

A2 Stitched Rectangles Stax (Set 1) Die-namics

I created a panel from the colourful new Rainbow Plaid paper pad and using the the Stitched Rectangles.  This panel was glued to an A2 white panel and to the card base.

I used another size in the Stax set to create a second smaller panel which I stencil ink blended using the new Tiny Clouds stencil.  I used MFT inks to do this, pulling colours from the paper pad and doing a sort of rainbow wash.  I backed this panel with white craft foam and adhered it to the plaid background.


I stamped three of the unicorns from the One-of-a-Kind Friend stamp set and coloured them with the following Copic marker combinations:-

Blue Unicorn - C3, C1, C0, C00, B41, B91, BG0000
Green Unicorn - C3, C1, C0, C00, YG11, G20, YG0000
Yellow Unicorn - C3, C1, C0, C00, Y02, Y000, Y0000
Flamingo Inflatable - RV63, RV52, RV10, C3, C1, C0, C00
Blushes - RV63, RV52, RV10

I used a white gel pen to highlight a few areas and then die cut with the coordinating die-namics and applied with dimensional tape.

To complete the scene, I stamped the sentiment on a sentiment strip and applied with foam tape and a few clear crystal embellishments finished it off with a sparkle.


Thank you for stopping by my blog today and don't forget to visit and subscribe to the MFT You Tube Channel for endless how-to videos, inspiration and product reveals.