Showing posts with label Pinkfresh Studio. Show all posts

Friday, October 16, 2020

Pinkfresh Studio - October 2020 Slimline Stamp, Die and Stencil New Release Blog Hop


Hello and welcome to my blog where today I'm joining in as a guest designer with the Pinkfresh Studio design team to help share with you some of the exciting products available in today's new release of slimline stamps, dies and stencils.   Before I reveal my cards, please note that by commenting on my blog post today you stand to win a $25 GIVEAWAY.  Winners will be chosen on October 23rd and you will find out if you are one of the lucky ones by visiting the GIVEAWAY PAGE on that day.  Here are the shipping promotion deals you may be interested in.


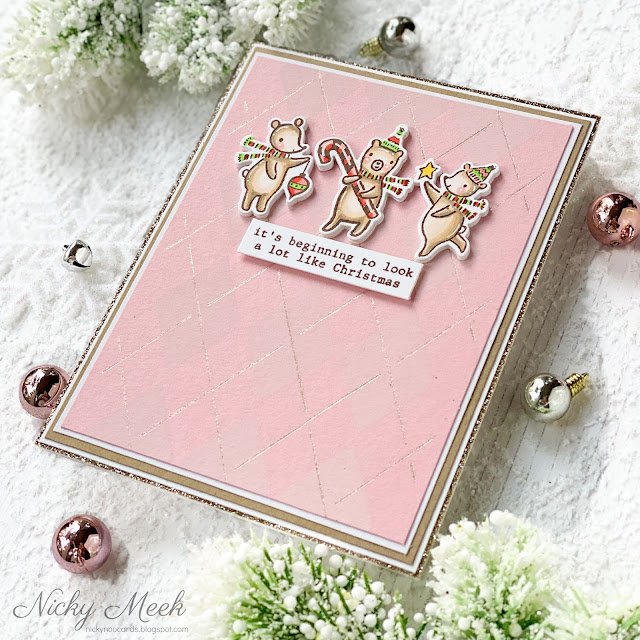
My first card today stays 'seasonal' with a Christmas theme.   It uses the new Argyle Layering Stencil Set for the background.


To make this card I used Distress Ink in Picket Fence to ink blend the first stencil on to pink cardstock.   I then took the second stencil, layered it over the top and I used a silvery/gold Gelly Roll by Sakura to apply the streaks of sparkle which look like metallic thread has been woven through it and catches the light beautifully as seen in the photo below but especially when the card is handled.


I trimmed down this panel and layered it over other panels to get a very sturdy and stacked frame appearance and applied it to a 110lb white cardstock base.


On Copic friendly cardstock I stamped my images from Tree Trimming Friends (from a previous release) using Memento Ink in Rich Cocoa.   I Copic coloured these sweet little images and die cut using the coordinating dies.  I also die cut 4 or 5 more times just from plain white cardstock and adhered each die cut to the next to make a nice dimensional stack.   These characters were attached to the main panel and I stamped a sentiment from the Tree Trimming set and applied that with dimensional foam tape.

                                            *************************************  

My second card jumps all the way into a fresh Spring look and features the brand new and ever so beautiful Be Courageous stamp set that has a coordinating die that cuts out the inside of the frame.   In the background I have used the new slimline Argyle Layering Stencil Set and given it a different look.


To create this card I first die cut a panel of white cardstock using the Slim Diagonal Stitched Rectangles Die which was part of a form release.  This was attached to a slimline card base.   I then used the Argyle stencil to create a background.   I ink blended first with green and then with the second stencil layer with pink ink.   I trimmed down this panel so that the design on the white panel would show and I adhered it.


I have a regular sized Misti which isn't quite large enough to stamp the floral border and so I stamped the image using an extended cutting plate for my Cuttlebug as my giant stamping block.  The image was stamped using Memento Ink in Rich Cocoa and I die cut using the coordinating die which removes the centre to reveal the prettiest frame.


I used Copic markers to colour up the floral images, I backed it with foam tape and applied it over the Argyle.   I was sure to coordinate my colours from the background with my florals.

Finally, I grabbed some coordinating cardstock and a die cut the words 'best' and 'wishes' 6 times over from the 'Phrase Builder : Sending' die set.  I stacked them together glueing each one to the next so that the sentiment really pops and I set it inside the frame.   Last but not least a I chose a smaller sentiment from 'Be Courageous' and stamped and applied that in the lower right hand corner.   A few of Pinkfresh's jewel accents finish out the card.


Thank you so much for visiting my blog.  Don't forget to add your comment for a chance to win the giveaway before visiting the next designer on the hop from the list below.

Take care and happy crafting!

You are invited to the Inlinkz link party!

Click here to enter

Monday, March 23, 2020

Pinkfresh Studio - New Release Blog Hop


I'm delighted to be participating again as a guest designer for this brand new release for Pinkfresh Studio.  Today's release features popular 'slimline' dies.  Please be sure to leave a comment after you've read my post for a chance to win a $25 Pinkfresh Studio gift card.  Winners will be announced March 30th on Pinkfresh Studio's GIVEAWAY PAGE.  You must check this page and claim your prize within 2 weeks


I have three cards today that feature FOUR of the new slimline dies.  


The card above features the new Slim Braided Circles Panel die.   I die cut from white cardstock.  I then ink blended another panel using Distress Oxides where the openings would be.  I backed the white panel with foam tape and applied it over the coloured panel.  I used the Folk Elements die set to create a pretty focal point in each opening.  I die cut each first from gold then pink cardstock and used portions of each to complete each element.  These were adhered into place and then I stamped and adhered the sentiments from Leafy Decor. The whole panel was adhered to a sturdy white cardstock base.


The card above features the new Slim Diagonal Stitched Rectangles die.  I used the smaller panels within this 4 piece set to create a slightly smaller panel and the diagonal stitched edge adds some interest to the ink blended and distressed panel.  The panel was backed with white craft foam and adhered directly to the card base.  Floral elements were stamped and heat embossed in white from the Fancy Blooms  stamp set and coloured with Copics.  LOVE U was die cut using letters from the Kelly Alpha - Upper Case die set.  Each letter was die cut 3 times and layered and adhered together for some nice dimension.   I used some of Pinkfresh's pretty jewel embellishments to finish out my card.


My third and final card above features a combination of two of the new die sets.  First I cut the three openings using the Slim Stitched Scallop Circles Panel die.  I then used the largest die from the 4 piece set called Slim Stitched Rectangles to create the outer stitched edge.  For the background I stamped and heat embossed the Lemon Lush background stamp from the previous release.  I coloured the citrus images in vibrant Copic hues then layered the die cut panel over the top.  Once again I grabbed the Kelly Alpha - Upper Case die set.  This time I die cut the images from vivid orange cardstock just once and I applied them using Kool Tak Foam which is clear so they appear to float over the top for a fun look!  The decorative panel was adhered to a sturdy white cardstock base.

Thank you for coming by for a look at this new release and to take away some inspiration.  Please keep hopping along with the other talented designers.

Nicky x
You are invited to the Inlinkz link party!
Click here to enter

Monday, February 17, 2020

Background Stamp Release - Pinkfresh Studio


Hello and welcome to my blog if you haven't visited with me here before.  I'm delighted to be guesting once again for Pinkfresh Studio and this fun release of background stamps.  Leave a comment after you've read my post for a chance to win a $25 Pinkfresh Studio gift card.  Winners will be announced Monday, February 24th on Pinkfresh Studio's GIVEAWAY PAGE.  You must check this page and claim your prize within 2 weeks
This first card was heat embossed in white using the Diamond Tiles background stamp.  The floral arrangement was made using the Just Because stamp set and coordinating die.  Images were coloured with Copic markers and applied to the background with foam tape and then the whole scene was splashed with white acrylic paint.   The large die-cut sentiments are from the Phrase Building: Sending set.


In this second card I used the same Diamond Tiles Background stamp but in a much more subtle way.  The card was created by ink blending with Twisted Citron Distress Oxide Ink, I blended it deeper at the edges and lighter towards the centre to form a focal point.  I then stamped and heat embossed again using white embossing powder.  I die cut the Foliage Frame twice from two pieces of cardstock.  I kept one as it was and with the second one I used Copic markers to colour up the leaves simply.  I flipped the coloured frame so that it didn't line up with the white frame and adhered everything down to the background panel.  The sentiment is from Leafy Decor and applied with foam tape and a few jewel accents finish out the card.


My third card features the new Floral Diamond background stamp which I've stamped in a vibrant pink.  Layered on top you see the Leafy Decor stamp that comes with a coordinating die. Images were coloured with Copic markers, die cut and backed with foam tape.  On top of that the word 'Hugs' is again from Phrase Builder : Sending die set.


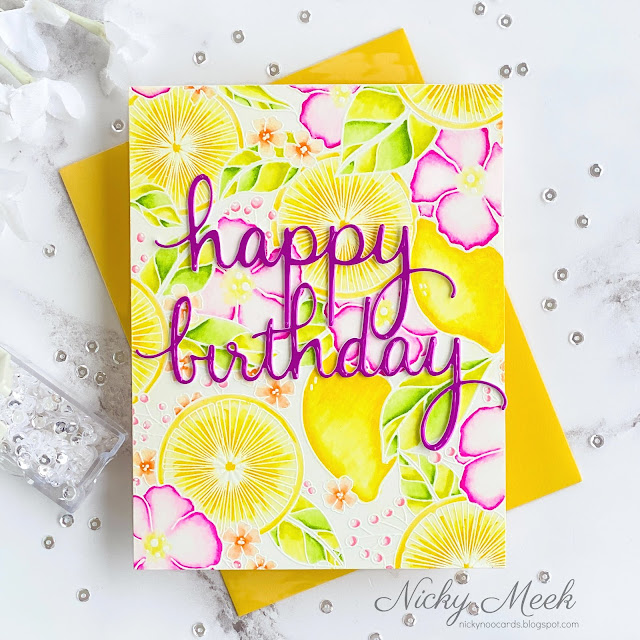
Couldn't wait to get creating with the next background called Lemon Lush.  For this mouthwatering card I stamped the background image using Versamark Ink on to Strathmore Bristol Smooth cardstock and heat embossed in white.  I watercolour painted using Kuretake Zigs.  I then die cut the Sentiment Suite : Happy Birthday three times from white cardstock and once more from a vibrant pink foil affect paper.  They were adhered together in a stack and applied.


I had so much fun creating these cards which are so different for me.  I hope you treat yourself to some background stamps and play with the endless creative possibilities they provide.

Thank you for hopping along to my blog, please use the link below to hop along to the next designer for further inspiration.  Happy crafting!  Nicky x

You are invited to the Inlinkz link party!

Monday, September 30, 2019

PINKFRESH STUDIO HOLIDAY RELEASE BLOG HOP


Pinkfresh Studio will be giving away the entire release on their blog and on their Instagram and by commenting on my post here today one lucky person will receive a $25 gift certificate.  Winners will be chosen Monday, October 7th and announced on the Pinkfresh Studio Giveaway Page which you can find HERE.  You must check this page and claim your prize within 2 weeks.  All orders over $100 will ship free within the United States - no code necessary, shipping will be discounted automatically.

*******************************************************************************************************

I was delighted to be invited to join the talented Design Team at Pinkfresh Studio for this their big holiday release blog hop.

I have THREE cards for you today and this first one features Skiing By a brand new stamp set that comes with coordinating dies.


To make this slimline card with finished dimensions of 8 1/2 x 3 1/12 inches, I created a card base and set it to one side.  I created a panel of the same dimensions and I die cut it with the 'hill die' 4 times over and ink blended the edges using Distress Oxide Ink in Tumbled Glass.  From the remaining top section I used the mountain die and cut.  The glacier toppers were also die cut from more white cardstock and also ink blended the edges with the Tumbled Glass.  Finally, I ink blended the sky portion.


Piece by piece I put the jigsaw puzzle of pieces back together adhering them one at a time to the card base and again I set it to one side.


On Bristol Smooth cardstock I stamped the images from Skiing By using Ranger Archival Ink in Potting Soil.  I watercolour painted them using Kuretake Zigs in Oatmeal, Beige, Gray, Cobalt Blue, Carmine Red and Light Pink.  Points were highlighted with a white gel pen and they were die cut and applied to the scene using dimensional foam tape.

The little tree images were simply stamped using a green ink and die cut and glued to the scene.


For the finishing touch I used 1st and 2nd generation stampings of the snowflake image throughout the entire scene and I put the tiniest dot of Stickles glitter in Crystal into the centre of each snowflake for a subtle winter sparkle.

The sentiment was stamped and applied with more foam tape to complete the card.

******************************************************************************

My second card features the new and very elegant Merry Days stamp set and coordinating die.


An A2 card base was created and set to one side.  An A2 panel was created and the I took the coordinating die and die cut that panel.  I pushed out all of the images and discarded them, I glued the surround to the card base and then recess the tree frame and glued that too.


I stamped the tree image on to Bristol Smooth cardstock using Versamark Ink and heat embossed in super fine silver embossing powder.  I very delicately watercolour painted using Tombow ABTs in shades 991, 243, 772, 942, 912 and 977.


The images were die cut and recessed into the corresponding space on the card background.


I wanted to keep the card very CAS and decided no further embellishment was required other than to stamp and heat emboss the sentiments which I popped up on dimensional foam tape.

***************************************************************************************************

My third and final card features the new Cozy Winter Wishes stamp set.


This is one large stamp with a few accessory stamps included (but which I didn't use since I wanted to create what is essentially a single layer card .... unless you count sequins)!?

I stamped the image using Ink On 3 on to Bristol Smooth cardstock.  I watercolour painted using Tombow ABTs in shades 977 and 991 and also Kuretake Zigs in Marine Green, Turquoise Green, Green, May Green and Wine Red.


A few points were highlighted with a white gel pen and then I did quite a bit of glittering using Nuvo Glitter Drops in White Blizzard.

To continue the sparkling affect that brings this card to life when it is handled and it catches the light, I applied several sparkling clear sequins and dots of pale gold gel pen.

Thank you so much for hopping along with me!  Happy crafting!

Nicky x


You have arrived to me from -
Natasha Valkovskaya

Your next stop is -
Rachel Alvarado

For the full hop list please go to -
Pinkfresh Studio