Hi! There's a 25% off sale going on at Purple Onion Designs on all stamps! Early Christmas present to yourself? I have a new card featuring stamps from Pine Cone Trail today. I stamped the Winter Trail Background from Pine Cone Trail on to Copic friendly white cardstock with Memento Ink in Rich Cocoa. Separately I stamped Jasper (Snow Shoe Fox) and Ember (Skiing Bunny) with the same ink. All images were coloured with Copic markers and highlighted with a white gel pen. The sentiment was stamped and the panel applied to a sturdy 110lb white cardstock base. Ember and Jasper were fussy cut and applied to the scene using dimensional foam tape. Shadows were also added with Copic markers to complete the scene. Enjoy your sale purchases! Nicky x
Hello! Today is Hello Bluebird Stamp's turn for their Design Team to share their tags for the big 25th Days of Christmas Tags event hosted by Tracey McNeely whose blog you can find HERE.
I have made a trio of tags using Hello Bluebird's Stitched Tag Builder Die. These shaker tags also use Skating Party and their coordinating dies and the silver branches are from Littles Holiday Extras. I worked with a limited colour palette of white, pink and red with just a touch of silver and enclosed some starry shaker mix in each shaker that also features an ink blended background created using Spun Sugar Distress Oxide Ink. The Skating Party sweeties were stamped and watercolour painted using Kuretake Zigs in Deep Red, Light Pink, Beige, Mid Gray and Warm Gray 2, they were then die cut and applied over each window opening. Points were highlighted with a white gel pen. The silver branches were stamped with Versamark Ink and heat embossed in silver, die cut and adhered to frame out the little scene below. The finishing touch was to tie 3/8 of an inch of red and white gingham ribbon. Thanks so much for coming by to view these tags, I hope you're inspired. Happy crafting! Nicky x
Hey there! I have a new slimline card for you today featuring stamps from the new Julian Charlton illustrated collection for Purple Onion Designs. These are the 'Happy Winter Forest Friends'. This card uses the open images (ready for you to colour) but there are closed 'silhouette' images too, so check out my blogpost from yesterday with the Silhouette closed images. The card was created by ink blending the background with Tumbled Glass and Broken China Distress Oxide Inks. I added snowflakes by hand in a sort of simplistic/cartoonish fashion since I thought the quirkiness worked with the style of the sweet stamps. The background panel was applied to the card base. I then used a 'hill' die from my collection and cut the two banks of snow from white cardstock then ink blended the edge using residual ink in Broken China remaining on my blending tool from creating the background. These were adhered to the background. The images were stamped on Copic friendly cardstock using Memento Ink in Rich Cocoa. They were coloured with Copic markers and fussy cut, backed with foam tape and applied to the scene. The sentiment was stamped on a strip and also foam backed and applied and the bird perched playfully on top. The finishing touches were limited to highlighting points on the images with a white gel pen and using Stickles glitter in 'Crystal' to add that essential Christmas twinkle to the project. I'll be back before you know it with a new project! Happy crafting! Nicky x
Hello! Kind of a fun day for the Design Team at Purple Onion Designs as we preview a brand new 'Silhouette' collection of stamps from illustrator Julian Charlton. This card features solid silhouette images for something completely different. Imagine the possibilities!!!! Featured in this card are Frances the Deer, Claude the Hedgehog, Sam the Snowman, Frederick the Fox and Toby the Bear. The collection will be available for purchase Friday, November 29th. Tomorrow the Design Team will be previewing the open images that you can colour from the same new illustrator Julian Charlton. But first for THIS card ......... I created a slimline card base and panel with finished dimensions of 8 1/2 x 3 1/2 inches. I ink blended the panel using Distress Ink in Stormy Sky. I applied this to the card base and using a white gel pen I added the snow. I used a simple hill die to create the little snow hills and adhered these to the background. On white cardstock I stamped the new images using die inks by Simon Says Stamp. I was going for a soft and retro look and I used Cloudy Sky, Pale Blush Pink, Barely Beige and Cobblestone. I used my Misti so that I could repeat stamp to get the perfect coverage necessary. Images were then fussy cut, backed with foam tape and applied. The sentiment was stamped in the same way and can be found here in Holiday Blurbs and applied and finally I found some pretty soft white snowflake embellishments in my collection and I glued these into the scene. I hope you are as delighted and intrigued by these new images from Julian Charlton and are excited for the new possibilities they offer. There are open images for you to colour in the new release too and I will show you in future projects how to mix the open and closed images together or use them independently. Happy crafting! Nicky x
Hello! I have a new card today for Hello Bluebird Stamps featuring the adorable stamp set called First Snow. Also used in this project is the Hill and Dale die for the snow hills and the sentiment is from Typed Christmas. To make this card I created the background using Copic markers then splattered it with white acrylic paint and finally I applied large drops of Nuvo Crystal Drops in Simply White. This was set aside to dry for several hours. Once dry I die cut two hills using Hill and Dale. These were applied to the background panel after using Tumbled Glass Distress Ink to edge them. Once in place I used Stickles in 'Crystal' to make the glistening edge. On Strathmore Bristol Smooth I stamped the critters from First Snow with Archival Ink. I watercolour painted them, highlighted points with a white gel pen and die cut the images. They were backed with foam tape and applied to the scene. To finish, I stamped the sentiment from Typed Christmas on to some pale pink cardstock and applied it with foam tape and I applied a few sparkling clear sequins into the sky area for some final sparkle. Thanks for stopping by, see you next time! Nicky x
I am so excited because our Winter 2019 Release is finally here!! We have an amazing blog hop full of inspiration today and we are so glad that you are here. Thank you so much for all of your comments and likes during our previews this week. We read each and every comment and it really makes our day!! For a summary of all of our new products that are available for purchase right now check out this section in our store . Be sure to scroll all the way to the end of this post to read about the fun giveaway we are having. We will be showcasing projects using our new sets starting today and will continue to show them throughout the next few months.
Hello everybody, thanks for navigating to my blog. My card for Avery Elle was made by ink blending a panel of kraft cardstock using Distress Oxide Ink in Vintage Photo to create a focal point. I used Versamark Ink to stamp the sentiments from the new Thanks Thanks sentiment set and then heat embossed in white. I splattered white acrylic paint beneath the sentiments and where I was about to create a little scene. I stamped the sweet images from the new Wheelie Great stamp set onto Strathmore Bristol Smooth cardstock and watercolour painted using Kuretake Zigs in Oatmeal, Mid Gray, Warm Gray 2, Natural Gray, Light Gray, Light Pink, Carmine Red, Fl.Green, Light Green, Cobalt Blue and Yellow. Points were highlighted with a white gel pen. The images were die cut, backed with Scotch foam tape and applied to the background. I used pink Nuvo drops to further accent the sweet focal point. The yellow parts of the bike were glossed up with Glossy Accents Glue. Thanks for coming by and please continue to read for the giveaway details and to hop to the next designer. Nicky x
To celebrate our Winter 2019 Release Blog Hop, Avery Elle is giving away a stamp set of their choice to 3 winners. To enter to win just comment on this post. There is no purchase necessary and you must be 18 years of age or older to enter. This giveaway is void where prohibited. You can also do options 2, 3 and 4 of the following to increase your chances of winning. You have until midnight Sunday, December 1st to enter. The winner will be announced on the Avery Elle Blog on Monday, December 2nd . All products are available for purchase in the Avery Elle store right now. You can check them all out here. To enter to win you can do 1, 2, 3, or all 4 of the following to increase your chances:
Comment here on the Avery Elle Blog
Follow / Tweet us on Twitter (we are @averyellestamps )
I have a new card for Hello Bluebird Stamps today that I made for fun (one can never have too many Christmas cards on hand at this time of year)! No stamping at all on this card - I think that's a first for me. This card uses the Winter Woods Overlay Die that comes with its own snowman! To create this card used red ink and Black Soot Distress Oxide Ink to darken the edges of a panel of red cardstock to make a lovely focal point. I splattered this panel with white acrylic paint and set it aside to fully dry. A panel of white cardstock was taken and the Winter Woods Overlay die cut. The frame was backed with foam tape and applied to the scene. The large centre negative cut was retained and I used the Hill and Dale die to cut a wavy hill for the snowman to eventually stand on. This was also backed with foam tape, recessed and applied. The different parts of the snowman were die cut and coloured with Copic markers, highlighted and decorated with a white gel pen and then assembled. He was backed with yet more foam tape and applied to the scene. The sentiment was stamped on a speech bubble from Photo Stack and applied. Thank you so much for coming to my blog today. Happy crafting! Nicky x
Hello! Here's my third and final card for Miss Ink's Christmas release for which I'm guest designing! This is Calm and Bright in combination with Snowy Village. To make this card I took an A2 panel of Copic friendly white cardstock and I stamped the Snowy Village image with Memento Ink. I coloured the village using Copic markers. I stamped the Snow Village again on to masking paper. The image was fussy cut and then laid over the image on the main panel and I then started to ink blend the sky using Distress Oxide inks in Tumbled Glass and Broken China and Stormy Skies. The mask was removed. On more Copic friendly cardstock the images from Calm and Bright were stamped again using Memento Ink. I coloured them with Copic markers and fussy cut then backed them with foam tape and applied. The sentiment was stamped. The panel was applied to a 110lb white cardstock base. To finish up the scene, points were highlighted with a white gel pen and then from the top down I used the gel pen to add the snow in different sized dots. I also added the white smoke coming from the chimneys. Finally I grabbed Stickles glitter in 'Diamond' and decorated the fir trees and the rooftops and the backs of the sweet sleeping critters. Card complete! Happy crafting. Nicky x
I have a new card for Hello Bluebird Stamps today that I'm excited to share. This card features Snowball Fight one of the latest stamp sets and the very pretty Warm Wishes word die. To start this card off I took a panel of smooth white cardstock and grabbed my Clarity Stencil Brushes and I ink blended the background using Spun Sugar and Tumbled Glass Distress Inks. I die cut the Warm Wishes die 3 times from white, pale pink and a slightly deeper pink background that perfectly matched the ink blending. I adhered them together slightly offset so that you can see the three colours and then glued this to the decorative panel. To build the big pile of snowballs, I took the group of snowballs image from the Snowball Fight stamp set and stamped the image three times on masking paper. I fussy cut these 3 images. I grabbed some Copic friendly cardstock and using pale gray ink I started across the bottom with stamping the design, masking and stamping where necessary to overlap and slowly I repeated this building the snowball pile higher and higher. I fussy cut the snow pile, backed it with foam tape and applied it to the panel. I used a Copic marker to add colour to the snowballs and then glittered them using Stickles in 'Crystal'. On yet more Copic friendly paper I stamped the kittens from the stamp set ... could they BE any cuter? I coloured them with Copic markers and highlighted some points with a white gel pen. I also emphasised their eyes just a little with a black waterproof marker with a very fine tip. Images were fussy cut and also backed with foam tape and applied. Just a few finishing touches. Firstly I stamped the little sentiment to a strip of cardstock and popped it up on foam tape and applied it and then I chose some Nuvo Drops and Dream Drops and more Stickles glitter and dotted the colours randomly to create some twinkle and fun! Happy crafting everybody - see you next time! Nicky x
Hello, today I have another card for the holiday season. This card features Polar Playtime by Avery Elle, together with their Wonky Scalloped Frames Die and Wonky 3D Bow and the sentiment is from Snow Fun. To start with, I had lots of fun ink blending the background, I used Picked Raspberry, Aged Mahogany and Black Soot Distress Inks to achieve this look. I then loosened up some white acrylic paint with a splash of water and splattered until my heart was content, setting it to one side to fully dry afterwards. I die cut the white scalloped frames and backed them with foam tape and I also stamped the penguins from Polar Playtime onto Bristol Smooth using black ink and watercolour painted them using Kuretake Zigs in Green, Oatmeal, Light Pink, Bright Yellow, Orange, Natural Gray and Wine Red. I die cut the images, backed them with foam tape and then adhered both frames and penguins to the background. I die cut and constructed the bow from the Wonky 3D Bow die using some matte gold cardstock in my collection. I adhered it into position and then used a double layer of foam tape discretely inside each loop so that the card could be mailed and the bow wouldn't be crushed. Note .... I didn't remove the protective cover to the top layer of foam. The bow was adhered into position. Lastly, I stamped the sentiment from Snow Fun using Versamark Ink and heat embossed in gold. I backed it with yet more foam tape and applied. I felt the warm gold touches in this card worked well with the rich colour of the background. Finally I dotted in some gold gel pen dots into the background and highlighted points on the penguins with a white gel pen. Hope you like the card, thanks for coming by to read. Nicky x
I have a new card for the Miss Ink Stamps new release. This is a pretty stamp set called Woodland Hearth. I stamped the main background image using Memento Ink onto Copic friendly cardstock. I stamped the additional three bunnies on more cardstock. I coloured the main image panel using entirely Copic markers. I coloured up the three bunnies then fussy cut them and backed them with foam tape and applied them to the scene. I created shadows in the scene again using Copic markers. The sentiment from Woodland Hearth was stamped with Versamark Ink and heat embossed in silver. The panel was attached to a 110lb white cardstock base. Starting from the top of the panel and slowly working my way down I added the snow using a white gel pen and the final touch was the application of a few sparkling clear sequins for accents. I'll be back with an other card for Miss Ink on the 12th. Hope to see you then. Happy crafting! Nicky x
I am happy to be guest designing for Miss Ink Stamps today to help promote their Christmas release. My card today combines their Season's Greetings sentiment set with the Woodland Hearth stamp set. The card was created by stamping the background image on white cardstock trimmed slightly smaller than A2 size. The trees were dotted with silver Stickles glitter. The panel was backed with craft foam and applied to the card base. Using some circle dies from my crafting stash I die cut a larger circle from silver glitter cardstock and one size down from white cardstock. I ink blended the white one in the centre very softly with Distress Oxide in Spun Sugar. I adhered the two circles together and then to the background panel. The adorable image of the kissing bunnies from Woodland Hearth was stamped with Memento Ink and coloured with Copic markers. It was fussy cut, backed with foam tape and applied. The sentiment from Season's Greetings was stamped with Versamark Ink and heat embossed in silver on a strip of cardstock which was backed with foam tape and applied. Points were highlighted with white gel pen to finish off this CAS card. Thanks for stopping by, I have two more and very different cards coming up in the next few days for this new release. Happy crafting, Nicky x
Hey there! I'm representing Avery Elle today with this shaker gift tag for the 25 Day of Christmas Tags - month long event organised by Tracey McNeely and her blog found HERE. To create my shaker tag I die cut the Classic Flag die from this set 3 times. Twice in light grey cardstock and once more from white cardstock. I stencil ink blended a background of clouds on the white die cut and adhered it to one of the grey ones to form the back of the tag. I set this to one side. Next, I cut a window out of the remaining grey die cut using the Large Pierced Scallops Die set. I backed the opening with a piece of acetate and built a shaker until around the window with dimensional foam tape. I filled the shaker portion with a selection of 'snowy' sequins that I had then adhered the back to the front sealing the contents in. I used a 1/8 inch hole punch to make the opening for my baker's twine and threaded through a double strand. I die cut the larger of the two sentiment strips in the Classic Flags die set and I stamped the sentiment from Snow Fun with Versamark Ink then heat embossed in red. Taking centre stage are some cuties also from the Snow Fun stamp set. These were stamped with Ranger Archival Ink in Potting Soil on to Bristol Smooth cardstock then watercolour painted using Kuretake Zigs in Wine Red, Haze Blue, Light Pink and Bright Yellow. Also a Tombow ABT was used in shade 969. Some points were highlighted with a white gel pen then all images were die cut, backed with foam tape and applied to the top of the shaker window and the sentiment strip was applied underneath them to ground them. A few Sparkling Clear sequins from Pretty Pink Posh were adhered to the outside for a final twinkle. Thank you for stopping by to read how to make this tag today and I hope you are enjoying all the gift tag inspiration this event is bringing. Until the next time then, happy crafting! Nicky x
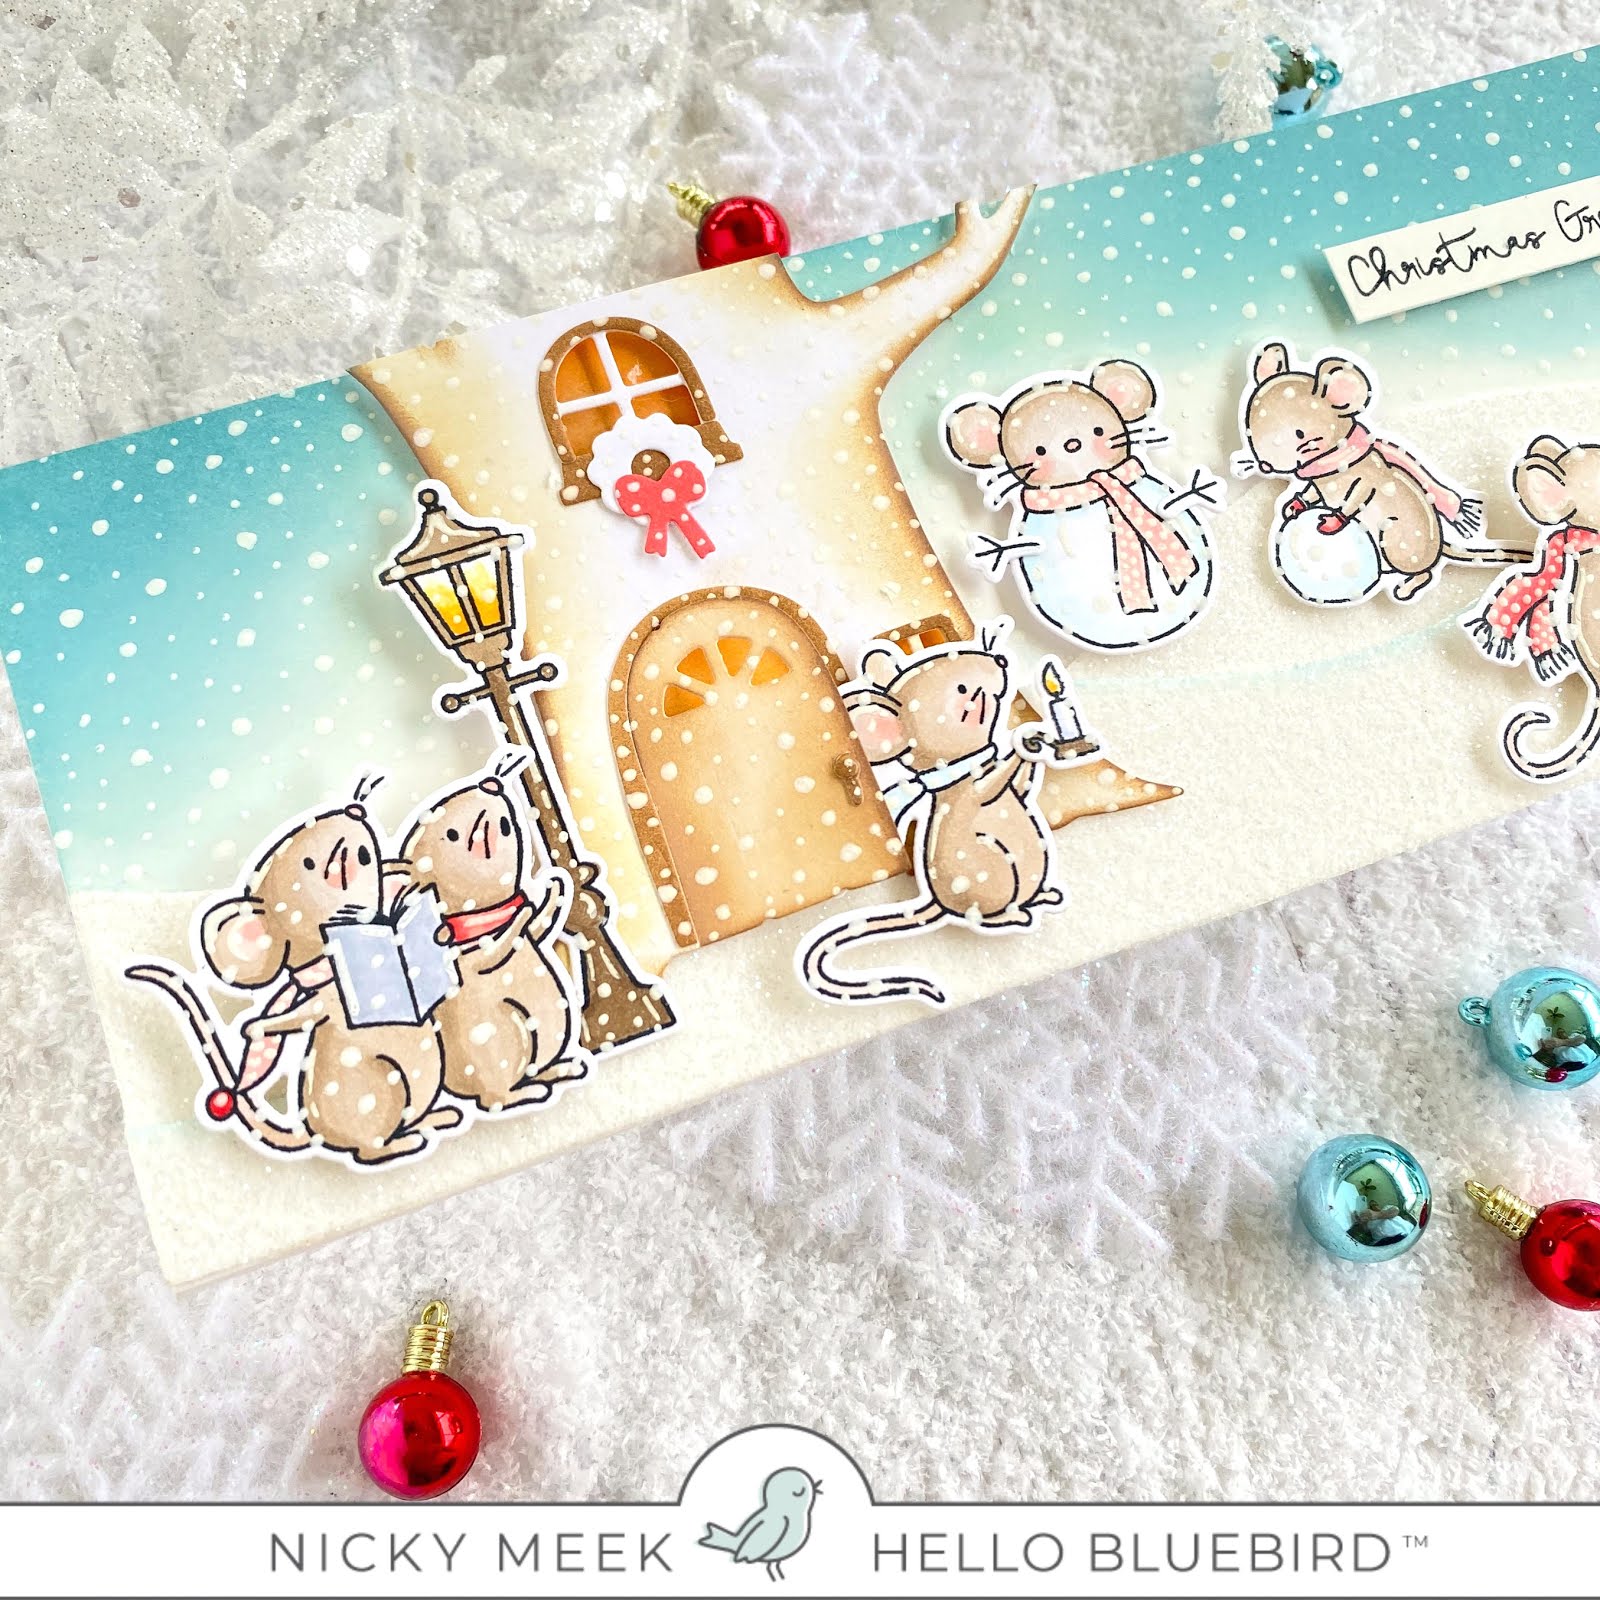
Hello Bluebird'sMerry Mice is just so delightful and I had many extra images coloured so I couldn't resist putting them into a scene that I've had in my head for a while now and of course it is one of my slimline cards. Mrs. Mouse has seen that the snow is really picking up and she steps outside and beckons the family to come inside where it is cosy and warm. The kids want a little longer outside in the heavy snow. Some are practicing their Christmas caroling and the other two are playing in the snow. Mr. Mouse has gone to collect the mail from the mailbox, maybe it is a greeting from his cousin!? A slimline card has a finished size of 8 1/2 x 3 1/2 inches. From a sheet of white cardstock I prepared a sturdy base and set it to one side. I also prepared a matching sized panel from the same sheet of cardstock. I ink blended this panel with Distress Oxides in Tumbled Glass and Broken China to a fade in the centre where I imagined my future horizon. I created another panel of cardstock trimmed to size. Using the Hill and Dale die I prepared two long strips of cardstock that I'd layered over with Scor-Pal 5" tape. These sticky strips were thoroughly covered in Distress Glitter, the excess tapped off and returned to the pot. A sheet of cardstock was placed over the strips that were lying glitter side up ad using the side of a blunt implement I burnished the glitter but rubbing up and down which forcefully adheres the glitter and very successfully stops glitter loss. The upper hill was applied directly to the background panel and the bottom hill was applied popped up on foam tape to build dimension. I then die cut the Treehouse Scene Die from smooth cardstock. I ink blended all the parts and assembled the tree back together again and using foam tape applied it to the scene with a little warm glow behind the windows to make it look cosy and welcoming. The wreath handing from the upper window is from the Treehouse Holiday Add-On set. I chose to keep it white since I didn't want to introduce another colour to a limited colour palette card. I had previously stamped all the elements from Merry Mice on to Copic friendly cardstock. I coloured everything with Copic colours, die cut them and highlighted points with a Uni-ball Signo white gel pen. I applied them to the scene, popped up on one or two layers of foam tape to tell the story. The pretty sentiment is from Christmas Is Coming, was stamped on a strip of white cardstock and backed with foam tape to match the dimension of the other elements. The final touch was time consuming and takes a little nerve because it can feel like sabotage to add white dots all over your perfectly good 'finished' card. You will doubt yourself as you go, but persist and stay with it and the pay-off will come. I work from top to bottom and make different sized dots with a white gel pen. It is vitally important in my opinion to dot the hard lines of your elements, to blur the edges otherwise it doesn't look real. I double checked at the end that everything got the coverage I wanted to give the illusion of heavy snow and when I was satisfied I adhered the decorative panel to the already prepared base and the card was completed. Hope you give this technique a try. Happy crafting! Nicky x