Showing posts with label grassy knoll. Show all posts

Saturday, January 27, 2024

Hello Bluebird Stamps - Bear Family


Hello and thank you for joining me on my blog today where I have a new card for Hello Bluebird Stamps featuring  various stamp and die sets.  Here's what I've used:-


I used a cloud stencil from my stash together with 'Blush Pink' Ink from The Stamp Market to create the background panel which I adhered to my card base.

I die cut sturdy white cardstock using the Winter Woods Overlay Die and ink blended using Distress Oxide Ink in Tea Dye and Vintage Photo.  I backed this with foam tape and applied to the cloudy background.  I used a die from the Pond Builder Die to create the greenery in the trees and I used the Grassy Knoll Die to create the grass.  Both grass and tree greenery were ink blended using 'Leafy' and 'Greenery' from The Stamp Market.   I distressed with some spatters of the ink and then applied to the scene.


I stamped the bears from both Bear Family and Little Hugs using Memento Ink in Rich Cocoa and I coloured them and the flowers using the following Copic marker combinations:-

Bears - E44, E43, E42, E41
Blushes - R21, R20, R00
Flowers - G07, BG15, Y19

Images were die cut and applied with foam tape or glue to keep building some dimension.


I took the sentiment strip from the Snow Globe Builder Die.  I stamped the sentiment on one but die cut 4 more times to make a nice chunky stack which I glued together and then to the scene.

To finish I simply highlighted the coloured images and dotted some 'daisies' into the grass.

I encourage you to have fun and mix and match all of your Hello Bluebird products to continue to create unique and wonderful scenes.




Friday, July 28, 2023

Hello Bluebird Stamps - Vegetable Market


If you would like to learn the details for this my latest card for Hello Bluebird Stamps, please join me on the HB Blog today using THIS LINK.  Thank you!


Sunday, July 9, 2023

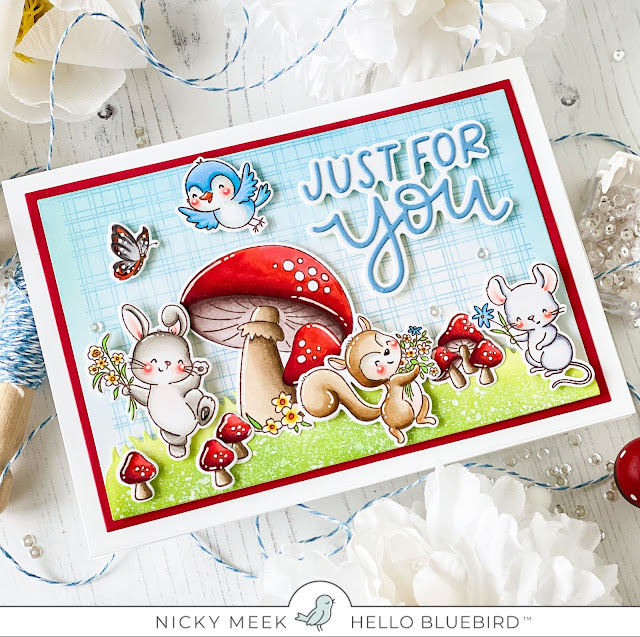
Hello Bluebird Stamps - July Release - Bloomin Happy


It's Day Two of Previews for tomorrow's release by Hello Bluebird Stamps.  The release goes live 7/10 at 7pm MST.   Here's what I've used in the making of this new card:-

Bloomin Happy
Bloomin Happy Die
Just For You Words Die

I prepared a full A7 white panel of cardstock.  I added a smaller red panel using the Nesting A7 die set and then created one more smaller white panel which I stamped with the Woven Background Stamp and after stamping I ink blended around the edges  to create a soft focal point.  All the panels were glued together and to the card base.  I created another panel in the feature panel size and used the Grassy Knoll die to create some grass to ground everything on.  I ink blended here with Distress Oxide Inks in Twisted Citron and Mowed Lawn, I distressed with a spritzing of water and then I mixed water with white acrylic paint and spritzed again then applied to the background with dimensional tape.


I stamped the images from the adorable Bloomin Happy stamp set using Memento Ink in Rich Cocoa and I coloured with the following Copic marker combinations:-

Toadstools - R59, R39, R37, R08, R05, E77, E74, E71, E70, E44, E43, E42, E41
Bluebird - B02, B41, C0, C00, YR09, YR07
Butterfly - YR09, T6, T4, T2, T0
Bunny - W4, W3, W2, W0, W00
Squirrel - E44, E55, E42, E41, E40
Mouse - C3, C1, C0, C00
Blushes - R22, R20, R00, R000

I highlighted with a white gel pen then die cut and applied all the images to the background using either a single or double layer of dimensional foam tape.  This is a large and substantial feeling card, that's how I like to build them!

To finish I used the new Just For You Words Die, creating the background with white cardstock and the detail letter words on top in a blue cardstock toning nicely with the background.  Finally a few sparkling clear sequins take the eye around the card.

Come back tomorrow for another exciting reveal and set your alarm for 7pm Eastern tomorrow!  It is recommended to shop early!!!


Monday, August 1, 2022

Hello Bluebird Stamps - August Colour Challenge


Hello and welcome to my blog where today I'm sharing a cheerful inspiration card to help stir your imagination for the next Hello Bluebird Color Challenge #hellobluebirdcolorchallenge4.   Read the Hello Bluebird Instagram post or their blog for all the details including dates and rules.   You can also read the details, interact with the design team and other customers on the 'Hello Bluebird Friends' Facebook Group.   Search for it and join by answering the 3 questions when prompted! 

Here are the products used in my project:-

Unicorn Tales Stamps

Unicorn Tales Dies

Nesting A7 Die

Grassy Knoll Die

Rainbow Sky Die

Magical Sparkle Words Die

Sparkles Script Stamps

I dug into my coloured cardstock stash and pulled out a gorgeous fuschia pink, buttercup yellow and of course white.  I started by using the Nesting A7 and creating a white panel, then a yellow panel then a pink panel using the 3 largest sizes from the set.  I glued them in a stack and attached them to my card base.

I created a white panel to match in size with the pink panel and then I used the Grassy Knoll Die to create the two cloud layers you see at the bottom.   These were adhered directly with glue for the back panel and with foam tape for the smaller front panel.


Next, I used the Rainbow Sky Die to create the clouds and rainbow.  The clouds were created with white cardstock and the rainbow with white glitter cardstock.   I used Copic markers to partially colour each strip of rainbow (see colours listed below).  The rainbow and clouds were adhered either directly or with foam tape.

I stamped the images from Unicorn Tales and coloured them with the following Copic markers:-

Unicorns - C3, C1, C00
Red - R29, R08
Yellow - Y19, Y15
Orange - YR07, YR04
Blush - RV02, RV10, RV000

The unicorns were die cut and adhered with foam tape.  Points were highlighted with a white gel pen.


Last but not least I die cut a stack of the word Sparkle from Magical Sparkle Words Die and glued them together finishing with the white glitter cardstock used earlier, this was centred and adhered and then the additional sentiment words come from 'Sparkles Script'.

To embellish I used a scrap of the white glitter cardstock and used the multiple hearts die from Rainbow Sky Die to create a bunch of little hearts that I adhered throughout the scene.

I would love it if you could carve out some time to join the challenge, the winner is chosen randomly, your skill level doesn't matter one bit, it's just pure fun!


Sunday, May 22, 2022

Hello Bluebird Stamps - Sweet Dreams

Welcome to my blog where today I'm sharing a new card using products from the latest Hello Bluebird Stamps release.


This is a mini slimline card and I have used the following Hello Bluebird products:-

Sweet Dreams stamps and coordinating dies
Nesting Mini Slimline die
Starry Sky die
Grassy Knoll die

I kicked things off by creating a white glitter panel in a mini slimline size and over this I layered another panel that I had first ink blended using Distress Oxide Inks in Spun Sugar and Shaded Lilac.    I also created a cloud edge at the base of the card using the Grassy Knoll die which I ink blended to tone and applied with foam tape.


I stamped the images from Sweet Dreams and coloured them with Copic markers.

Bunny - W5, W4, W3, W2, W0, W000
Fawn - E55, E31, E41, W3, W1
Bear - T7, T6, T5, T4, T3, T1, T0, E31
Fox - E99, E15, E13, E11, T4, T2
Blushes and Ears - R21, R20, R00, R000
Clouds - BV00, BV000, B60, R000, R0000

Images were die cut using the coordinating dies and highlighted with a white gel pen and applied to the scene with dimensional foam tape.

I chose the sentiments from the set and stamped the in dark gray ink to tone with the bear, I die cut with their coordinating dies and applied again with foam tape.

A few clear jewel accents were adhered to complete the scene.


Thanks for stopping by, I'll be back soon with something new!


Saturday, April 23, 2022

Hello Bluebird Stamps - Word Buddies Woodland

I have a new card today for Hello Bluebird Stamps that features their darling Word Buddies Woodland stamp set and the High Rise Tree Scene Die.


To start the card I first created an A2 panel of cardstock and ink blended the sky using a cloud stencil from my crafty stash.   I stamped the sentiment which is from the Spring Gatherings stamp set and then applied the panel to my card base.

I die cut the High Rise Tree Scene Die and ink blended it with Distress Oxide Inks and applied it to the scene with dimensional foam tape.  I then used the Grassy Knoll die to create two strips of grass which I ink blended and applied behind and in front of the base of the tree.


I stamped the images from Word Buddies Woodland and coloured them with Copic markers.   Here are the colours I've used:-

Squirrels - T7, T6, T5, T3, T1
Bunnies - E41, E0000
Raccoon - W7, W5, W4, W2, W0
Bear - E87, E44, E43, E42, E41

I also stamped and coloured the Mole from the Bloom and Grow stamp set.

T4, T3, T2, T1

Images were die cut using the coordinating dies and then adhered to the scene.   Many Hello Bluebird stamp sets have little flower images and so I coloured some up and applied blossoms to the tree and tucked them behind the ears of a couple of the cute critters.   Card complete!


I really appreciate you coming by my blog today and I'll be back soon with a new project to share with you.


Thursday, May 20, 2021

Hello Bluebird Stamps - Bloom and Grow

I have a new card today for Hello Bluebird Stamps that features the new stamp set called Bloom and Grow.   Read on for the details!


To create my card I first ink blended the background using Speckled Egg Distress Oxide Ink and I splashed on a little Peacock Feathers loosened with a drop of water.   This was adhered to my card base.

I sed the Grassy Knoll die to create both the grass and cloud portions.  The grass portion was ink blended with Distress Oxide Ink in Kitsch Flamingo.   The grass was adhered to the background panel with dimensional foam tape whilst the cloud portion was stamped with a sentiment from Bloom and Grow and then it too was adhered with dimensional tape.


On Copic friendly cardstock I stamped my images from Bloom and Grow and coloured them with Copic markers.  Points were highlighted with a white gel pen and then I used the coordinating dies to die cut each of the images which I arranged and adhered with either a single or double layer of foam tape for some super duper dimension.


To finish up the card I returned to the stamp set and used one of the 'buzzy trails' and carefully stamped them in behind the butterflies.

Another card complete!   Happy crafting!


Wednesday, May 5, 2021

Hello Bluebird Stamps - Rain Or Shine

Hi and welcome to my blog for this the second day of Previews for the May 6th Hello Bluebird Stamps new release!   The release goes live and 7pm MST.  My card today features the adorable new stamp set Rain or Shine which comes with coordinating dies and in the background there .... that is the gorgeous new stand-alone die called Partly Cloudy.


To create the card I used Distress Oxides in Peacock Feathers and Mowed Lawn to ink blend both the background panel and a grass panel that was die cut using the Grassy Knoll Die.   I splashed up both pieces using watered down dots of both inks and set them aside to dry.

Meanwhile I took a panel of white cardstock and I die cut the Partly Cloudy die.   I adhered the die cut to my background panel and selected some of the die cutouts to insert back within the cloud frame and discarded those I didn't want.    The Grassy Knoll die cut was then adhered to this.


On Copic friendly cardstock I stamped my images from Rain or Shine and coloured them all with Copic markers and highlighted a few points with a white gel pen.   They were die cut using the coordinating dies and backed with foam tape, arranged and then adhered down.


Included in the new release is a new die set of small alphas called Jane Small Alpha and I think you're going to find these incredibly useful due to their scale.   I die cut the letters for FRIEND 4 times over from heavy white cardstock and adhered them in stack for a nice chunky sentiment.   I then carefully applied them to the grass in a straight line using some washi tape as my guide.

The 'Hello' is from the older Maverick stamp set and I just simply stamped it to a white strip of cardstock which again was applied with foam tape.

A few sparkling clear sequins were the perfect subtle finishing touch!

Visit the Hello Bluebird Blog today and see the new stamps and dies we're previewing today as well as other inspiration from the rest of the Design Team and our guests.   Comment for a chance to win a gift card to the shop!   Good luck!


Wednesday, March 31, 2021

Birch Trees Background Stamp - Hello Bluebird Stamps

Today I'm sharing my final card for Hello Bluebird Stamps latest release and this one features the new Birch Trees background stamp.  I paired this background image with Frosty Mornings from Hello Bluebird, together with tree tops from Pond Builder and of course their Grassy Knoll die.


This background stamp has a lot of bold areas.  A Misti or other stamping platform is going to be a huge help to you.   To get a good impression I placed the stamp into my Misti and I attached the cardstock to the door of it (kind of the wrong way round, but it really helps).    The first inking was with Versamark Ink and subsequent inkings were with my coloured ink - the juicier the better, foam pad ink pads would be best.


I ink blended my Pond Builder tree-tops and my Grassy Knoll portion with two shades of Distress Oxide Inks and then I spattered on some texture using an old toothbrush and some watered down paint.  These green portions were backed with foam tape and applied.

The Frosty Mornings characters were stamped and Copic coloured, points were highlighted with a white gel pen and they were die cut and backed with foam tape and applied to the scene.


To finish up, I stamped the sentiment on black cardstock using Versamark Ink and heat embossed in white, this was applied with foam tape and a few sparkling clear sequins completed the scene.

The decorative panel was applied to a sturdy cardstock base and the card was complete.

Happy crafting!


Tuesday, March 30, 2021

Simple Stripe Background Stamp - Hello Bluebird Stamps

Hi!   This new card for Hello Bluebird Stamps uses their new background stamp called 'Simple Stripe'.  I paired this background image with Storybook Friends and the Hello Friend word die and the grass strip of course was made using the Grassy Knoll die.   Framing out the scene is the Gallery Frame #2 die.


I placed my stamp in my Misti and inked it up and stamped and then repeated the process for a nice smooth finish.  I die cut some blue cardstock using the Grassy Knoll die and stuck it behind the Gallery Frame die cut, backed with foam tape and applied.

I stamped my images from Storybook Friends and Copic coloured, die cut and highlighted and also adhered with foam tape.


I made several die cuts of the Hello Friends word die, several in white and one more time with the same blue cardstock used for the grass.  I adhered them in stacks and then followed the stripes on the background to adhere them to the scene.


A few sparkling clear sequins were adhered and the decorative panel applied to a sturdy white cardstock base.   Card completed!

Thanks for stopping by and happy crafting!


Thursday, February 25, 2021

Old Oak Background Stamp with Garden Party - Hello Bluebird Stamps

This month Hello Bluebird Stamps will be re-releasing all of their old rubber background stamps as clear stamps.  On release day there will also be several brand new background scene stamps to enjoy.   Today I'm using the Old Oak Background Stamp for my card.  This is one of my very favourites and it is so useful.


I stamped the  BG image using dark green ink on to a panel of white cardstock.  I then used Distress Oxides to 'antique' the edges creating a soft focal point.    I used a circular die to cut the opening.   Another panel of cardstock was ink blended with deep fuchsia and dark green inks.  I splattered it with water and added splatter of toning colours including a little metallic gold.

The 'oak' panel was backed with foam tape and adhered to the ink blended panel which in turn was adhered to a white cardstock base.


I used the Grassy Knoll die to cut a piece of cardstock that I ink blended with green ink and splattered up a bit for interest.   This was adhered directly to the card front.

On Copic friendly cardstock I stamped my Garden Party images and from Oh Nuts! the branches.  I used Copic markers to colour the images and finished by die cutting them, highlighting a few points with a white gel pen.   These images were all backed with foam tape and applied to the scene.


I used some water droplet style embellishments and adhered them and stamped the sentiment and applied that.  Another card completed. I hope you are inspired .... happy crafting!


Tuesday, March 17, 2020

Easter Egg Hunt - Hello Bluebird Stamps

Today's card for Hello Bluebird Stamps has a lovely soft look because I used a no-line Copic technique.  Featured here is the Easter Egg Hunt stamp set.


To create this card I first made the background panel by brushing on Distress Inks with Clarity Stencil Brushes, then distressing with paint splashes.

The clouds and grassy hills were created using the Grassy Knoll die set.  Once they'd been die cut I ink blended them using Cracked Pistachio for the grass and Tumbled Glass for the clouds.   I took what would be my lower portion of grass and I stamped and heat embossed it with the Easter Blessings sentiment from the Spring Banner Script stamp set.  The embossing is very raised because I used my Misti and repeated the process 3 or 4 times.


I assembled these die cuts with foam tape behind them and applied them to the background panel which in turn was adhered to a 110lb white cardstock base.

On Copic friendly cardstock I stamped my images from Easter Egg Hunt using Nuvo Hybrid Ink in 'Soft Suede'.  I inked up my stamps and stamped them off once on some scrap paper and then stamped again on my Copic paper which gives just enough of an image to colour in but you can make the lines disappear.

I coloured the images with an array of Copic markers then highlighted some points and finally I die cut, backed them with foam tape and added them to the scene.


I used a Sakura Gelly Roll Pen in a pale silvery gold to accent the butterfly wings a little and I dotted a little more into the hazy background and with that the card was complete.

Happy crafting!

Nicky x

Thursday, March 5, 2020

Springtime Easter Card - Hello Bluebird Stamps

Hello, welcome to my blog!  I have a new card today for Hello Bluebird Stamps and it is Easter themed.   I've combined images from Spring Gatherings and Springtime for this card, they work beautifully together.


The first step was to create the pastel plaid background panel which I did using a 4 part stencil kit by Honey Bee Stamps (although I only used 3 of the 4).   I brushed on Distress Inks using Clarity Stencil Brushes for a super soft look with no hard edges.  I applied this panel to a white cardstock base.


I die cut the Gallery Frame #2 Die and used just the frame which I backed with foam tape and applied to the background.  I then used the Grassy Knoll die to create the section of grass which I delicately ink blended with Distress Ink in Cracked Pistachio.  I stamped the sentiment and backed this portion with foam tape also and applied it within the frame.

On Copic friendly cardstock I stamped the images from the two stamp sets using Memento Ink in Rich Cocoa.  I used an array of Copic markers to colour everything and then I die cut and applied them to the background using either a single or double layer of foam tape to achieve some fun depth.


Cheeks were highlighted with a white gel pen and I decided that no other embellishment was needed for this card.

Appreciate you stopping by to read today.  Happy crafting!

Nicky x

Wednesday, February 26, 2020

Field Mice with Rainbow Sky Die - Hello Bluebird Designs

I have a new card for Hello Bluebird Stamps today that features the darling Field Mice stamp set in combination with the Birch Trees Die and the Rainbow Sky Die.


To kick things off I ink blended a panel with Tumbled Glass and a little Spun Sugar.   I die cut the rainbow shapes from the Rainbow Sky Die and ink blended the edges with pastel Distress Inks and adhered them to the background.  Layered over that I placed a white die cut like low clouds from the After The Rain Scene Die.  Almost done with the background, I also die cut the Birch Trees and edged this in Antique Linen Distress Ink and a little Ice Spruce too.  These too were applied to the scene.


I used the Grassy Knoll die to die cut two strips of grass from cardstock I had ink blended with Spun Sugar.  I applied this to the background panel.

I die cut the white frame using the Gallery Frame #1 die.  I backed it with foam tape and applied it.   The skinny pink frame can produced by using any of the Hello Bluebird Scene dies.  I made mine from toning pale pink cardstock and directly glued it.

On Strathmore Bristol Smooth cardstock I stamped the images of the mice from Field Mice using Ranger Archival Ink in Potting Soil.  I watercolour painted the images using Kuretake Zigs, highlighted the cheeks and other points with a white gel pen  and backed them with foam tape and applied them so that they were looking into each other's eyes.


A couple of quick finishing touches.  First of all I stamped the sentiment and applied it popped up on foam tape and I found a pretty little heart embellishment in my stash and floated that above the sweet twosome.  The whole decorative panel was then attached to a 110lb cover weight white cardstock base which is necessary for such a substantial card.

I appreciate you stopping by today, happy crafting!


Nicky x

Tuesday, February 4, 2020

Garden Friends - Hello Bluebird Stamps

Welcome back to my blog!  I have a new card for Hello Bluebird Stamps today that uses the beautiful Garden Friends stamp set.


To create this card I first made the background panel.   I ink blended some smooth cardstock with Tumbled Glass and Ice Spruce Distress Inks and splashed it all over with Tumbled Glass, Seedless Preserves and a beautiful white metallic paint from Kuretake's Starry Colors watercolour paints.  I set this panel to one side to dry and then ink blended a piece of cardstock with more Seedless Preserves  and die cut with the Grassy Knoll die.  Finally, I splashed it with a little water to distress it and blotted it up right away.   This piece was backed with foam tape and applied to the panel.


A piece of white cardstock was die cut with the Gallery Frame #4 Die.  This was also backed with foam tape and applied to the background panel.

On Copic friendly cardstock I stamped the images from Garden Friends using Memento Ink in Rich Chocolate.    Images were coloured using a large variety of Copic markers, they were die cut and applied to the scene backed with either a single or double layer of foam tape to build depth.


Finishing touches time!  The bird's rosy cheek was highlighted with a white gel pen.  The insect top right was given a little Wink of Stella on its wings and the sentiment was stamped to a little strip of cardstock and applied.  Finally and to add to the the dewy look of the card I used some water droplet style embellishments.

Hope you're inspired to create your own fantasy garden scene, it's fun to push the colours a little beyond reality!

Happy crafting!

Nicky x