Well hello there! Thank you for hopping along today with the Avery Elle new release blog hop designers. I'd like to introduce you to the brand new stamp and coordinating die set called 'Pool Party'. Before I continue, I want to be sure you continue scrolling past where I sign off - this will take you to the other designers participating in this blog hop and to the giveaway rules. Enjoy!

To know me is to know I love to make slimline cards and this is one of them. This card has a finished size of 8 1/2 inches x 3 1/2 inches. I created my 110lb white cardstock base and set it to one side and I also cut a full size panel to fit which I used Washi Tape to mask off the edges and then I ink blended using Distress Oxides in Tumbled Glass, Broken China, Crushed Olive and Mowed Lawn. I also splattered on some water and blotted it up a few seconds later. I used a Distress Ink pen to quickly add some texture to the lawn. The mask was carefully removed.

On Strathmore Bristol Smooth and using Ranger Archival Ink in Potting Soil, I stamped all of my cute images from Pool Party.
I watercolour painted everything using the following list of Kuretake Zig colours - Gray, Beige, Dark Brown, Haze Blue, Cool Gray (1), Flesh Colour, Yellow, Pale Pink, Light Blue, Vanilla and Light Pink. All elements were then die cut using the coordinating dies, backed with dimensional foam tape and applied to the background panel. Points were highlighted with a Uniball Signo White gel pen.

I popped the panel into my Misti and stamped the sentiments 2 or 3 times so that they were nice and bold against the colourful background, I attached the panel to the card base and the final touch was the addition of several Sparkling Clear Sequins by Pretty Pink Posh as embellishing accents.
This stamp set is perfect for all your sizzling summer cards!
Thanks for stopping by, keep scrolling to click on the next designer on the list and to read how to enter to win a free stamp set from Avery Elle (it's all below)!
Nicky x
Avery Elle
Caryn Davies
Heather Campbell
Yainea
Melania Deasy
Katie Gehring
Amy Kolling
Ashley Marcu
Elena Roussakis
Nicky Meek
To celebrate our Summer 2019 Release Blog Hop, Avery Elle is giving away a stamp set of their choice to 3 winners. To enter to win just comment on this post. There is no purchase necessary and you must be 18 years of age or older to enter. This giveaway is void where prohibited. You can also do options 2, 3 and 4 of the following to increase your chances of winning. You have until midnight Sunday, May 26th to enter. The winner will be announced on the Avery Elle Blog on Monday, May 27th . All products are available for purchase in the Avery Elle store right now. You can check them all out here.
To enter to win you can do 1, 2, 3, or all 4 of the following to increase your chances:
- Comment here on the Avery Elle Blog
- Follow / Tweet us on Twitter (we are @averyellestamps )
- Follow / Share us on Facebook (we are www.facebook.com/AveryElle ) .
- Follow / Comment on Instagram (we are https://www.instagram.com/averyellestamps/).
Thanks for stopping by to take a peek. Have a great day!
A new day and a new card for Hello Bluebird Stamps. Once again I'm using those little cuties from Party Parade.

A panel of white cardstock was ink blended using Distress Oxides in Worn Lipstick, Squeezed Lemonade and Peacock Feathers. I then squished a little of the Worn Lipstick onto my craft mat, added a drop of water and then using an old toothbrush I picked up some of the colour and ran my thumb over the bristles spritzing the pink colour through the yellow and blue background.

From another panel of white cardstock I die cut the frame from the Gallery Frame #3 Die. I backed it with dimensional foam tape and applied it to the background.

The Party Parade characters were stamped on to Strathmore Bristol Smooth cardstock using Ranger Archival Ink in Potting Soil. They were watercolour painted using Kuretake Zigs in Gray Brown, Light Pink, Blue Gray, Orange, Light Carmine, Light Blue, Yellow, Light Brown and Oatmeal. Points were highlighted with a white gel pen, they were die cut and backed with either 1 or 2 layers of foam tape and applied to the scene.
I used the Charlie Alpha Die and the Charlie Numbers Die to create the HB2U sentiment. Each number or letter was die cut 4 times to create a nice meaty stack, each being glued to the next using Ranger Multi Medium Matte.

Time for the finishing touches. I used Nuvo Crystal Glaze to add a glossy appearance to the balloons and drum and I also adhered a selection of my favourite Sparkling Clear Sequins by Pretty Pink Posh.
Many thanks for coming by to read, I'll be back soon with another card!
Nicky x
I'm continuing to enjoy playing with the sweet images from Sunny Meadow Fair, the new stamp collection illustrated by Stacey Yacula for Purple Onion Designs.

For this slimline card (8 1/2 inches by 3 1/2 inches) I ink blended a panel using Distress Inks in Milled Lavender, Spun Sugar and Peeled Paint. I then stamped the fairground background image using Memento Ink in Fog.

Using Versamark Ink I stamped the sentiment and heat embossed using Wow Embossing Glitter in Calypso. I then applied this panel to a white cardstock base and set it to one side.

On Strathmore Bristol Smooth cardstock I stamped my feature images from Sunny Meadow Fair using Ranger Archival Ink in Potting Soil. All images were watercolour painted using Kuretake Zigs in Oatmeal, Mid Brown, S.Almond Pink, Pale Pink, Light Gray, Gray, Cool Gray (1), Light Pink and Turquoise Green. Also a Tombow ABT was in used in shade 991 (the yellow). Images were fussy cut.

Do these cute critter images look extra dimensional to you? It's not your imagination. I used a trick whereby I flip the prepared images over on to a rubber mat and I use a round ended stylus and make circular movements (not at the edges) and using medium pressure until the image starts to dome or curl forwards. Keep flipping the image to check progress and don't do too much or you can damage it but this adds wonderful dimension AND has the added bonus of making your dimensional foam tape less noticeable from the side. Win win!

This last image shows you how the heat embossing sparkles nicely. Certain points on my images were highlighted with a white gel pen and I decided no other embellishment was required.
Card complete!
See you next time, thanks for coming by to read.
Nicky x
I'm back today with a new slimline card for Hello Bluebird Stamps. This card uses the new Garden Friends stamp set and I've also used the Pond Builder Die in a slightly unusual way.

This is as I said, a slimline card. The finished measurements are 8 1/2 x 3 1/2 inches and you can source Size 9/Invitation envelopes for these dimensions.
I created a panel of white cardstock. I used the pond builder die to cut all the different elements just from that one single panel. I then used the following Distress Oxide inks to ink blend each separate piece - Crushed Olive, Peeled Paint, Broken China, Faded Jeans and Tumbled Glass.

I used an extra thick foam tape to adhere the top overhanging tree greenery and a regular foam tape for the lower (light coloured) overhanging tree limb, attaching them to the card base. I then used glue to adhere the sky portion directly to the card base. The grassy bank was backed with regular foam tape and again the water portion was directly glued. Tons of dimension and interest.

I die cut some of the stones from Pond Builder also. I watercolour painted them using Kuretake Zig in Mid Gray and they two are backed with dimensional foam tape.
On Strathmore Bristol Smooth the elements from Garden Friends that I was using were stamped using Ranger Archival Ink in Potting Soil. They were watercolour painted using the following Zigs. Orange, Light Pink, Oatmeal, Olive Green, Deep Red and Cobalt Blue. Points were highlighted with a white gel pen and I put water ripples around the stones.

All images were die cut, backed with foam tape (I get through a lot of this stuff lol) and attached.
The sentiment was stamped using Versamark Ink on a strip of black cardstock and heat embossed in white.
Finally some sparkling clear sequins by Pretty Pink Posh were glued using Ranger Multi Medium Matte because it dries beautifully clear and is very strong and they make me think of sparkling water droplets.

I'll be back again very soon with a new card. I invite you to sign up for emails and never miss a post!
Nicky x
It's been a little while since I made one of my infinity shaker cards but when I saw the Big Happy Birthday Die by Mama Elephant that I'd probably be making a few of them. I love a bold sentiment like this and I decided to go back and show Lunar Animals some love!

For my card I cut an A2 panel of Bristol Smooth cardstock. I ink blended it using Festive Berries Distress Ink making it slightly darker at the top and fading it gradually towards the bottom. I then laid over a starry stencil I have (you could use anything you like and through that I applied white pigment ink. I removed the stencil and once dry I die cut my panel using the die from Mama Elephant's Cloud 9.

I then took a stamp storage pocket and slid the 5 1/2 inch length of my background panel into the 5 1/2 width of the storage pocket. Now, you want and need for this to be a very snug fit but obviously you don't want the panel to bend. Take your time and ease it in carefully all the way to the bottom of the pocket. If it is not very snug you will lose some shaker contents around the back of the panel.

I then flex the storage pocket open, slightly bending the panel so that I can accurately pour in my shaker contents. I keep adding and checking my quantities until I have the right look and quantity. You can use anything you like including micro beads seed beads, sequins and other shaker fillers. Once I'm happy I then lay the unit flat on the my craft table and firmly wrap the other 50% of the storage pocket around the back of the panel ... doubling it back on itself and I stick it down with generous amounts of my Scotch Tape Runner tape. I then adhere the pocket to my A2 card base. I recommend 110lb cardstock because the base has to support some weight.
All of the rest of decoration of this card is on top of the storage pocket. I die cut the sentiment twice, sticking one layer to the next and then I adhered that to the front and the Lunar Animals were stamped with Ranger Archival Ink in Potting Soil on Bristol Smooth. They were watercolour painted using the following Kuretake Zigs, Yellow, Orange, Light Pink, Light Carmine, Carmine Red, Light Gray, Mid Gray, Dark Gray, Beige, Oatmeal and Brown. They were die cut and also applied after adding their little party hats. Points were highlighted with a white gel pen and with that, another card is complete!
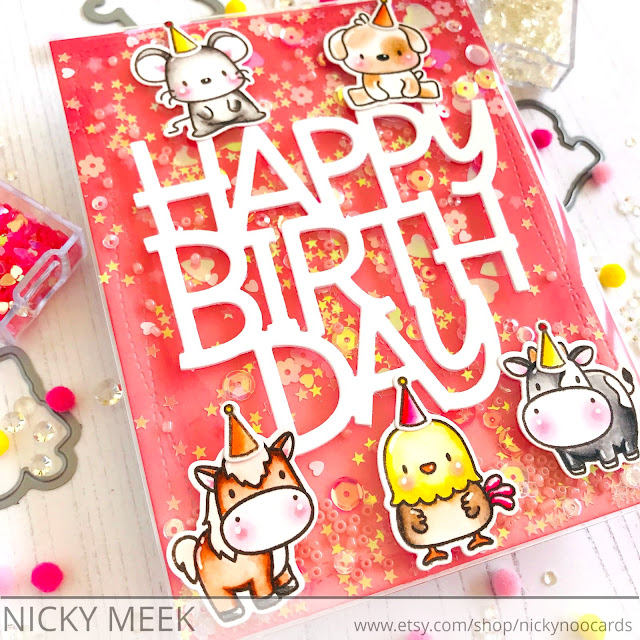
I think this card would be loved for kids and big kids alike! The contents move about freely and make a satisfying noise - using seed beads as part of the mix particularly helps with this and they help to move the sequin mix around.
See you next time!
Nicky x
I'm back today with another card for Purple Onion Design's brand new release of the Stacey Yacula illustrated 'Summer Meadow Fair'. Clicking the link provided takes you to the bundled entire release at a 30% savings which is valid until the 14th May only. A 30% savings for 24 stamps and 30 images. My card today is a slimline card with dimensions of 8 1/2 x 3 1/2 inches.

I prepared a panel of cardstock by masking off the edges with washi tape and I ink blended with Clarity Stencil Brushes using Broken China and Mowed Lawn. I also loosened up a little white acrylic paint with a spot of water and splattered it all over and set the panel aside to dry having removed the wash tape mask.

On Strathmore Bristol Smooth the characters and other images were stamped using Ranger Archival Ink in Potting Soil. They were watercolour painted using Kuretake Zigs in the following colours - Dark Brown, Flesh Colour, Pale Pink, Light Pink, Mustard, Oatmeal, Mid Gray, Carmine Red, Light Blue, Yellow, Cool Gray (1) and Warm Grey (2).
From left to right the images are - Misty (Horse), Dusty (Mouse With Ball), Wooley (Lamb), Dolly (Mouse With First Prize Ribbon), Billy (Goat), Cotton Candy Cart and Pink (Pig With Cotton Candy/Ice Cream).
All images were fussy cut, backed with dimensional foam tape and adhered into position on the prepared panel.

I stamped the sentiments from the new Carnival/ Fair Blurb Set in my Misti using a toning pink ink and repeated the stamping so the pink had great coverage. They were backed with foam tape and applied.
Finally I used a few sparkling clear sequins by Pretty Pink Posh for accents.
I hope you check out the new release!
See you soon with another card for Purple Onion!
Nicky x

Hi and welcome to my blog! I imagine you are hopping along through the list of designers participating in the hop that celebrates the new Pretty Pink Posh release. My card uses the new Animal Signs stamp set.
Before I go any further it's important to point out that there are 4 $25 gift certificates up for grabs with two winners each day of this blog hop. Winners will be randomly picked but be sure to leave your comments on each blog post by 11.59pm PST on 5/8/19 at to be eligible to win. Winners will be announced on the Pretty Pink Posh blog. Good luck everybody!

My card also uses the new Lattice Background Die, although I used it as a stencil. I made a die cut then ink blended through that onto white cardstock with Distress Inks in Spun Sugar and Worn Lipstick. This panel was adhered to the card base. I used one of the dies from the Stitched Border 1 set to make the zig zag edge on the pink cardstock. I backed that with dimensional foam tape and applied it.

On Strathmore Bristol Smooth I stamped my animal images using Ranger Archival Ink in Potting Soil. I watercolour painted the images using Kuretake Zigs in Mustard, Mid Gray, Blue Gray, Light Pink, Light Carmine and Warm Gray (2). Points were highlighted with a white gel pen and they were die cut.
I used Versamark Ink and stamped the sentiments and heat embossed in gold. They were backed with more of the foam tape and adhered.

The final touch was to adhere a scattering of gold flat cup sequins to tone with the gold sentiments and because I love pink and gold together!
Many many thanks for stopping by today, please click on the next person on the list below to be taken to the next inspiring designer.
Nicky x


