Showing posts with label Halloween. Show all posts

Sunday, September 29, 2024

Hello Bluebird Stamps - All The Spooks


I'm continuing to play with the amazing Fall Kits from Hello Bluebird Stamps and today my card features the 'All The Spooks' stamp set which was part of the Halloween Speciality Kit (now sold out).

Firstly, I used the Nesting Deckle Mini Slimline die to create what would be the feature panel.  I ink blended using Distress Oxide Inks in Shaded Lilac, Dusty Concord and Black Soot.  I dotted in some interest with a white gel pen and a metallic gel pen then backed the panel with craft foam and applied it to a larger white panel then to a slightly larger black panel then to the card base.


I stamped the images from All The Spooks using black ink then coloured with the following Copic markers:-

Ghosts - C3, C1, C0, BV000, BV0000
Blushes - R22, R20, R00
Pumpkins - YR27, YR09, YR04, YR21

I die cut the images using the companion dies.


Each image was backed with dimensional foam tape and applied to the the ink blended background and then to finish things up I just highlighted the ghost's cheeks and points on the pumpkins with a white gel pen.

I hope you like my Ghost Story card, such a cute stamp set!


Thursday, September 26, 2024

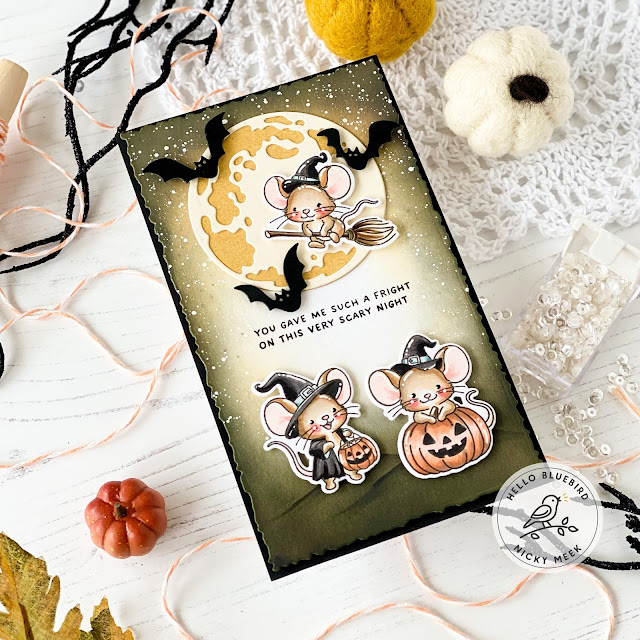
Hello Bluebird Stamps - Fright Mice


Hello friends!   Today I have created a new card for Hello Bluebird Stamps using the Fright Mice stamp set from the recent (but now sold out) Halloween Speciality Kit.  I already had all of the images coloured from the first time I made and shared a card with Fright Mice and knew when I had a couple of hours I'd get to use the remaining coloured images.  So, without further delay here's what I used to make this card:-

Fright Mice Stamp Set
Fright Mice Die
Light of the Moon Die
Nesting Deckle Mini Slimline Die

I used the deckle die to create a white panel of cardstock (largest die from the set).  I ink blended the panel using Dried Marigold and Black Soot Distress Oxide Inks.  I then covered the bottom portion of the panel with kitchen paper and with the rest I splattered on some diluted white acrylic paint.  I then used Copic markers to give the suggestion of some ground for the mice to eventually stand on.


I stamped the sentiment in black ink and then die cut and formed the 'Light of the Moon' die cut pieces and glued in place.

So I had those Fright Mice already coloured so here are those colours again from my first card a few days ago:-

Mice - E34, E31, E41, W00, W3, W1

Blush - R22, R21, R20, R00

Black - T7, T5, T4

The images were highlighted with a white gel pen, backed with foam tape and then applied to the scene.


The 'Light of the Moon' die set includes the 3 bat images which I die cut from black cardstock and applied with foam tape and I gave them glimmering eyes with a metallic gel pen and dotted in a few stars in the background with the same pen.

This whole decorative panel was backed with a panel of black craft foam and applied to a slightly larger black panel of cardstock which in turn was adhered to the card base.

Thanks for stopping by, I'll be back soon with something new!


Saturday, September 21, 2024

Hello Bluebird Stamps - Who Wants Candy


Come and join me on the Hello Bluebird Stamps blog today if you're interested in learning how I made this card featuring the Who Wants Candy stamp set which formed part of the Halloween Speciality Kit that was recently released.  Please use this link to go directly to the post.  Thank you!


Monday, September 16, 2024

Hello Bluebird Stamps - September Kits Release Day!


Today is the day the wait is over, the Hello Bluebird Stamps September Kits are releasing this evening at 7pm MDT and if  you're looking for some Halloween fun then the Halloween Speciality Kit has got you covered.  Here's what I've used to make this card:-

All The Spooks
All The Spooks Die
Halloween Words Strips Stamp
I took the Halloween Words Strips Stamp and used it as a background stamp!  I stamped and embossed a panel of Blush cardstock by The Stamp Market using Versamark Ink and heat embossed in white.  I adhered this to my card base and framed it out with a white die cut frame creating using the Gallery Frame #1 Die.  This frame was applied with dimensional tape.


I stamped a selection of images including the oversized sentiment from All The Spooks.  I used Versafine Onyx Black ink to do this because it gives you such a lovely rich black image, usually with use one stamping!  I coloured the images using the following Copic marker combinations:-

Spooks - C3, C1, C0, BG70
Blush - R22, R21, R20, R00
Headstone - W4, W3, W2, W0
Candy Corn - YR02, YR01, R01, Y13, Y06, Y02, C3, C1

The images were die cut using the All The Spooks companion die and applied to the scene with dimensional tape.


To complete the card I simply glued in place 3 different sizes of sparkling clear sequins by Pretty Pink Posh.  Card done!

Thanks for stopping by and happy shopping later today.


Sunday, September 15, 2024

Hello Bluebird Stamps - September Halloween Speciality Kit


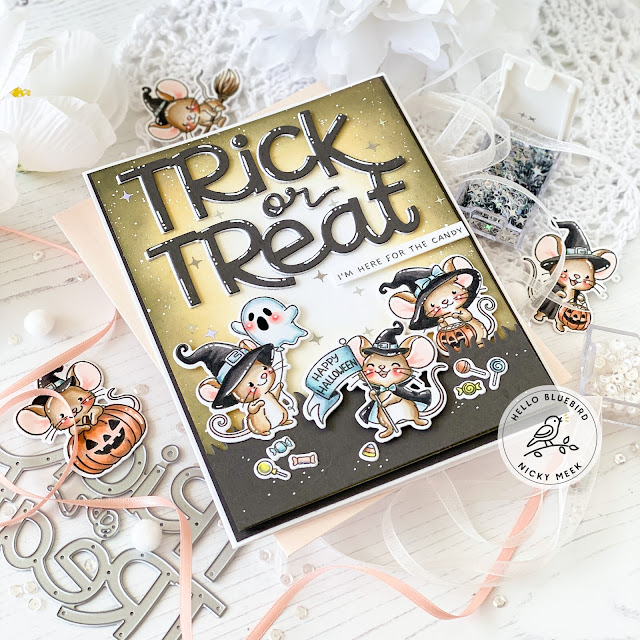
Not long to go now before Monday's huge new kit release goes live at Hello Bluebird Stamps.  You can but the new kits at 7pm MDT tomorrow September 16th.  Today I'm revealing a card that was created using products from the 'Halloween Speciality Kit' and in addition I've used dies that you can find in Hello Bluebird's 'Essential' category.  I've used:-

Fright Mice
Fright Mice Die
Trick or Treat word die

I generally like to start with my background panel and this was no exception.  I ink blended a panel using Distress Oxide Inks in Dried Marigold and Black Soot.  I spattered it with white acrylic paint loosened with a drop or two of water.  I backed this panel with craft foam and glued it to a slightly larger panel of Eiffel Tower cardstock by MFT.  This in turn was glued to an A6 card base which gave me a little white surround around the feature panel too which I always like the look of.


I stamped the images from Fright Mice which is one of the brand new Halloween stamp sets included in the Halloween Speciality Kit.  I coloured the images using the following Copic marker combinations:-

Mice - E34, E31, E41, W00, W3, W1
Blush - R22, R21, R20, R00
Spooky Balloon & Banner etc - C3, C1, C0, BG70, BG11
Black - T7, T5, T4

The images were die cut using the companion die.  I highlighted points with a white gel pen.

I took more of the same Eiffel Tower cardstock and created the grass using the Grassy Knoll die which I applied with foam tape, I also die cut the same cardstock one time using the Trick or Treat die.  I then die cut sturdy white cardstock 3 times more using the same die and I glued the words in stacks then glued it to the background before highlighting the lettering with a white gel pen.


To finish the card I added candy images scattered at the feet of the mice.   I stamped the smaller sentiment on a strip and applied with foam tape and then I added some 4 point star embellishments through the eerie sky for some final sparkle.

I certainly hope you enjoyed my card today.  I will be back here tomorrow with a final preview card before the release goes live.


Friday, September 13, 2024

Sunny Studio Stamps - Halloween Card


Hey there, thanks for stopping by my blog today but I'm actually over on the Sunny Studio Blog today with everything you need to know about how I made this Halloween themed card.  Use this link to go straight to their blog and read allll about it! Thanks and have a lovely day!


Friday, October 13, 2023

Hello Bluebird Stamps - Candy Crew


Hello!  I'm back with a new Halloween project for Hello Bluebird Stamps featuring stamps from their most recent release.  Here's what I've used to make this card:-

Candy Crew
Candy Crew Die
Full Moon Scene Die

This is a 5 1/4 inch square card and to kick things off I created the background from a white panel which I ink blended with Tumbled Glass, Prize Ribbon, Chipped Sapphire and Black Soot Distress Oxide Inks.  I then used white and metallic gel pens to dot in the star filled sky.

I die cut the Full Moon Scene Die from black cardstock and glued it to the panel, then to my card base.


I stamped the images from Candy Crew in black ink and coloured with Copic markers in the following combinations:-

Moon - C3, C1, C0, C00, E50
Bear on a Broomstick - T6, T5, T4, T3, T0
Broomstick - E77, E44, E43, E42, E50, Y19
Bunnies - C5, C3, C1, C0, C00
Brown Bear - E44, E43, E42, E41
Pumpkins/Orange Combination - YR09, YR04, Y38, T4, T2
Dark Blue Combination - B99, B97, B95, T6

Points were highlighted with a white gel pen and the companion die used to die cut.  Critter images were applied to the scene with dimensional foam tape and everything else was glued directly including sliding the moon behind the tree limb.


To finish, I used the metallic gel pen again and a ruler and drew a line for the silky thread the spider is dropping down on and then I stamped the sentiment and applied that with foam tape.  Card done!

Have fun making your own Halloween projects and I'll be back soon with something new ... count on it!


Monday, October 2, 2023

Hello Bluebird Stamps - Halloween Tags


Come and join me on the Hello Bluebird Blog today where I have all the details for this trio of Halloween themed gift tags made using the Spooky Text stamp set which formed part of the brand new release.  Use THIS LINK to go directly to the post.  Thank you and have a wonderful day!


Friday, September 29, 2023

Hello Bluebird Stamps - Fall/Halloween New Release Day!


Set your alarm(s) for 7pm MST this evening to get your hands on Hello Bluebird's brand new Fall/Halloween release.  Orders are shipped strictly in the order received and with Halloween not too far off you'll want to be at the front of the line because the owners can get quickly overwhelmed with orders.  It can take a few days to clear orders just from the first night!  Don't say I didn't warn you lol!!

Here's what I've used in the making of this card:-

Sabrina
Sabrina Die

I prepped a slimline panel of white cardstock and I ink blended a 'dirty pink' sky using Spun Sugar, Victorian Velvet and Black Soot Distress Oxide Inks.  I smudged some Black Soot across the die cut moon from the Full Moon Scene Die to give the illusion of drifting clouds then adhered the moon in the middle of the lightest of the pink shade so that now we have a lovely glow affect.

Next I die cut black cardstock using the Tall Trees Die and glued this down over the moonlit background.


I stamped one of the two Sabrina's included in the stamp set and coloured her and the other elements with the following Copic marker combinations:-

Skin - E34, E33, E11, E21, E00, R21, R00
Hair - E40, E51, E44, R81
Clothing - T6, T4, T3, RV95, RV93
Cat - T6, T4
Bats - T6, T4, RV93
Pumpkins - YR09, YR07, YR04, R81, T6, T4, YG91

All images were die cut and applied to the scene with foam tape.  Points were highlighted throughout the scene with a white gel pen included dots for stars in the sky and a few more dots in the sky were added with a metallic gel pen.


I finished my card by adding 3 reflective silver cardstock stars and by stamping the sentiment with Versamark Ink and heat embossing in white on a black strip and attaching with foam tape.

Please visit the Hello Bluebird Blog today to see the new products being revealed and enjoy inspirational projects from my fellow Design Team members.  Leave a comment there before you navigate away and you'll be entered to win one of TWO $50 gift certificates to the Hello Bluebird shop.  Winners will be announced a couple of hours before the release goes live.  Good luck and happy shopping!


Friday, September 8, 2023

Hello Bluebird Stamps -


A little Halloween fun in today's card for Hello Bluebird Stamps.  All the details for it can be found on the Hello Bluebird Blog HERE.


Friday, October 14, 2022

Hello Bluebird Stamps - October Challenge


Thank you for navigating to my blog today where I'm sharing some quick details for my inspiration card for the latest Hello Bluebird Stamps challenge.   As shown at the bottom of the graphic this is #hellobluebirdhalloweenchallenge and you can find all the details/rules for the challenge on the Hello Bluebird Instagram or on their Blog.

You can enter just by the Halloween theme, by the colours of the mood board or combine the two.  I decided for this challenge to just go by theme.

Products Used:-

Trick or Treat Stamps (tiny sentiments).

I used a pale gray ink and stamped the sweet spooks from Frightful Little Bits over and over until my panel was filled with the images.  Where there were a few slightly larger gaps I stamped the little sentiment words from Trick or Treat.


I then spent an enjoyable few hours colouring the images using the following Copic colour combinations:-

Spooks - BG11, BG0000, C1, C0
Blushes - RV42, R11, R000
Orange - E95, YR00
Yellow - YR20, E50
Black - T5, T3, W2
Brooms - E42, E50, W3

I highlighted points on each image with a white gel pen then backed the panel with white craft foam and adhered it to a gray panel that is A2 and then attached this to my card base.

I haven't made a background/wallpaper card in so long so I enjoyed this project very much.

Good luck with your challenge entries, a random winner will receive a $50 gift certificate.   Challenge ends October 30th and the winner will be announced on Halloween October 31st.  Have fun!


Thursday, August 25, 2022

My Favorite Thing - August Slimline Challenge


Are you fired up and ready for a brand new Slimline Challenge at MFT Stamps?

Halloween scenes are all the better when they feature lots of space for spooky surprises. So, what better canvas for your creepy creation than a slimline card design? Join the me and other members of the design team this month in creating a Halloween-themed slimline card packed with your Halloween essentials.

Products used:-


So I started out by using Carved Pumpkin and Black Soot Distress Ink to ink blend my background panel.  I backed this panel with craft foam and applied it to a larger black panel.

I stamped a partial sentiment on a white sentiment strip and die cut the word SPELL 3 times over using black cardstock scraps and the Frosted Alphabet Die-namics (didn't use the frosting portion for this project).   These letter were adhered in stacks.

I also used the slimline stencil to create a grounding of black grass.


I stamped the images from the stamp set using black ink and coloured the images with the following Copic colours:-

Black - T9, T6, T5, T3, T1
Orange - YR09, YR07, YR04, Y38
Purple - V17
Moon - YR0000, C3, C1, C0, C00
Green Eyes - YG41, G40
Hair  - C3, C1, C0
Broom - E31, E44, E43, E50
Skin - E04, E11, E21, E00, R22, R21, R20, R00

I highlighted with a white gel pen and die cut with the coordinating die-namics and I applied the images to the background using dimensional foam tape.

To finish up, I positioned and glued the sentiments in place and finally I dotted in the stars again with my trusty white gel pen.


Thank you for stopping by my blog today and don't forget to visit and subscribe to the MFT You Tube Channel for endless how-to videos, inspiration and product reveals.


Monday, September 27, 2021

Halloween Dress Up - Rachelle Anne Miller Creative Studios

I have a new card for Rachelle Anne Miller Creative Studios today using the 'Halloween Dress Up' digital stamp image.    I downloaded the digital image and sent it to my home printer after reducing the image from 100% down to 90%.  I printed it twice at that size, first copy on to Copic friendly cardstock, second copy on to a sheet of masking paper. 


I trimmed the Copic cardstock printed panel down to an A2 panel and Copic coloured the image using the following colour palette:-

Skin - E04, E11, E21, E00
Cheeks - R00, R20
Costume (left) - E43, E44, R000
Costume (centre) - YR31, Y17, Y38, YR14
Costume (right) - V01, V12, V15, V04, YG95, YG93, YG91

Points were highlighted with a white gel pen.


I fussy cut the masking paper print out and layered it over the primary image and then ink blended using Distress Oxide Ink and then splattered water and coloured paints to soften up the look and add interest.   I carefully removed the mask.


To finish up the card I first applied the panel to a card base.  Next, I die cut the Gallery Frame #4 die by Hello Bluebird Stamps from white cardstock and backed that with foam tape and applied it.    I stamped the sentiment with Versamark Ink on to black cardstock and heat embossed in white.  Last but not least a few sparkling clear sequins add a little fun.

Happy crafting!