Showing posts with label Mama Elephant. Show all posts

Monday, October 28, 2024

Mama Elephant - Holiday Block Set


Creating for fun with wonderful products by Mama Elephant, I used the following products to create this Christmas card:-


I prepared an A2 panel of sparkling silver cardstock.  Over this I layered a white A2 panel that I die cut using the Galactic Cover Creative Cuts.  I adhered these panels to my card base.


Using Memento Ink in Black Tuxedo, I stamped the images from Holiday Block Set and I coloured with the following Copic markers:-

Bunny - W4, W3, W1, W00, R0000
Penguin - T6, T4, T2, C3, C1, C0, R0000
Puppy - E55, E31, W4, W2, W1, W0
Fox - E11, E00, C3, C1, C0, W00
Blushes - R22, R21, R20, R00

I die cut the images using the coordinating Creative Cuts and then I used an edge die from my stash to create some snowy ground for the critters to stand on and I used a little W1, W0, BG0000 to add some interest and shadows.  I adhered this to the bottom of the main panel then added the critters and the large sentiment with dimensional foam tape.


To complete the scene, I added the stars which I shaded on the side with the C1 Copic marker and I glittered the front face.  I applied these with foam tape and then a few sparkling clear sequins were the finishing touch.

Another Christmas is done - yay!  Thanks for stopping by!


Wednesday, October 16, 2024

Mama Elephant - The Nutcracker


Hello friends, thanks for visiting my blog today where I'm share my second card created using The Nutcracker stamp set from Mama Elephant Stamps.  This card also uses the coordinating dies for the stamp set and I used the fun Combo Rectangle Creative Cuts.

To create this card I first made all the mats by using the combo Rectangle Creative Cuts.  I glued all the stacks together but I placed some white craft foam behind the green mat to start building some depth and because I like my cards to feel very substantial when handled.


With the top most panel, I ink blended using inks from The Stamp Market in 'Minty' and 'Fresh Mint' and I splattered it with white acrylic paint loosened with a drop or two of water.  When dry, I popped the panel in my Misti and stamped the sentiment which is included in the stamp set.  I glued this panel in place.

I stamped the 3 Nutcracker soldiers with black ink and coloured them with the following Copic marker combinations:-

Green - G19, G07, YG07, G00, G0000
White/Grey - C3, C1, C0
Black - T9, T7, T5, T3
Skin - E33, E11, E21, E00


The images were highlighted with a white gel pen then die cut using the coordinating dies and applied to the background with dimensional foam tape.

To finish, I added some sparkle to decorative parts of their uniforms in the form of Ranger's Stickles in 'Crystal' and with that this card was complete.  Another Christmas card done!


Monday, October 14, 2024

Mama Elephant - The Nutcracker


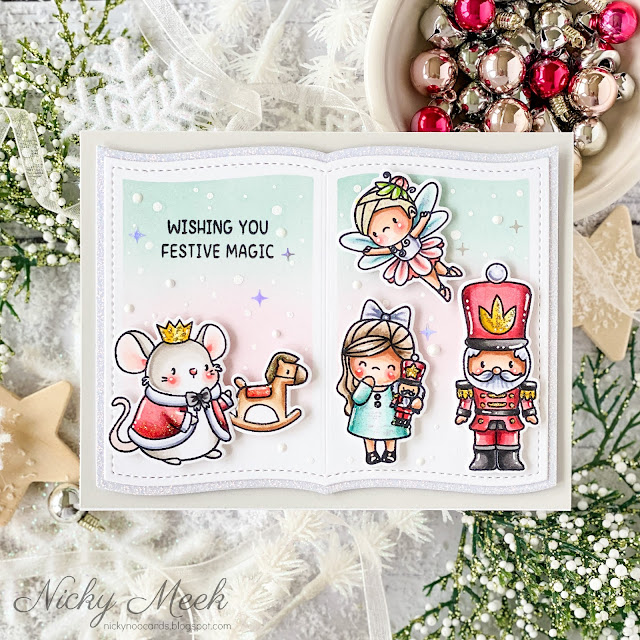
Hello!  Today I'm creating for fun with some new purchases from Mama Elephant.  They've just had an amazing new holiday release and I couldn't resist treating myself.   This card was made using the new The Nutcracker  stamp set and coordinating die together with their Turn the Page Creative Cuts which are a match made in heaven.

I prepared a pale grey A2 panel of cardstock and adhered it to my card base.  I then used the Turn the Page die and used the larger die to die cut sparkling white cardstock and the smaller die was used to cut white cardstock.  I then needed to create a 'stencil' in effect, in order to ink blend the open pages.  To do this I used the sentiment inner cuts and die cut some acetate which after use I could just clean off and re-use another time.  

With the 'stencil' prepared I ink blended using Speckled Egg and Spun Sugar Distress Oxide Inks.  I stamped the sentiment and then made a snowy background using white acrylic paint and I dipped a stylus in the paint and dotted the snow exactly where I wanted it.


I stamped the images from The Nutcracker with black ink and coloured the images with the following Copic markers:-

Mouse - W4, W3, W0, W00, R24, R22, R21, C3, C1, C00
Rocking Horse - E34, E31, E77, E44, R24, R22
Girl - E33, E11, E21, E00, BG32, G00, G0000, E44, E43, E41
Fairy - E33, E11, E21, E00, C1, C0, R22, R20, R00, BG32, G00, G0000
Nutcracker Soldier - R24, R22, R21, R20, Y19, Y13, T7, T5, T4, T3, E33, E11, E21, E00, C3, C1

I highlighted with a white gel pen and die cut the images.


I glued the 'book' panels together, backed them with dimensional foam tape and applied to the grey panel.  I backed the coloured images with more foam tape and adhered them and for the finishing touches I glittered parts of the character's clothing etc and applied some 4 point star holographic embellishments amongst the falling snow.

Thank you for stopping by my blog today.  I'll be back in a couple of days with something else new to hopefully inspire your own projects.  Enjoy your day!


Wednesday, September 4, 2019

Summer Splash - Mama Elephant

Hey there!  I recently managed to carve out some free time to create this birthday card for someone special to me using Summer Splash by Mama Elephant.  You can find the coordinating dies here and the background is a great one, it's the Hillside Cover - Creative Cuts also by Mama Elephant which is one of the most useful dies in my stash.


To start the card off I grabbed a panel of white cardstock and used the Hillside Cover die to die cut it.  I masked off the frame using washi tape and then using another panel of scrap cardstock I created a shape I could take into each opening of the die cut thus masking off the rest of the openings and ink blended one by one.  I used Tumbled Glass and Squeezed Lemonade Distress Oxides for this.  The mask was removed.


I stamped the sentiment from the Wishing You stamp set by shaping it onto my stamping block to match the curve of the Hillside Cover Die.

My cute little elephants from Summer Splash were stamped with Ink On 3 Fade Out Ink onto Bristol Smooth cardstock.   This ink is designed specially for the no-line watercolour painting affect which is what I've done here.   I used Kuretake Zigs to paint in Carmine Red, Lemon Yellow, Light Blue, Light Gray and Gray Brown.


All images were die cut, backed with foam tape and tucked into the scene.

I took a white gel pen and highlighted one or two spots and embellished with these pretty pink hearts by Trinity Stamps for the perfect girly finish.

The whole panel was adhered to a lovely sturdy 110lb white cardstock panel and another card is complete!

I imagine this is my last summery card for many months so I made sure to enjoy the project.

See you soon I hope!

Nicky x


Wednesday, May 8, 2019

Lunar Animals Infinity Shaker - Mama Elephant

It's been a little while since I made one of my infinity shaker cards but when I saw the Big Happy Birthday Die by Mama Elephant that I'd probably be making a few of them.  I love a bold sentiment like this and I decided to go back and show Lunar Animals some love!


For my card I cut an A2 panel of Bristol Smooth cardstock.  I ink blended it using Festive Berries Distress Ink making it slightly darker at the top and fading it gradually towards the bottom.  I then laid over a starry stencil I have (you could use anything you like and through that I applied white pigment ink.  I removed the stencil and once dry I die cut my panel using the die from Mama Elephant's Cloud 9.


I then took a stamp storage pocket  and slid the 5 1/2 inch length of my background panel into the 5 1/2 width of the storage pocket.  Now, you want and need for this to be a very snug fit but obviously you don't want the panel to bend.  Take your time and ease it in carefully all the way to the bottom of the pocket.  If it is not very snug you will lose some shaker contents around the back of the panel.


I then flex the storage pocket open, slightly bending the panel so that I can accurately pour in my shaker contents.  I keep adding and checking my quantities until I have the right look and quantity.  You can use anything you like including micro beads seed beads, sequins and other shaker fillers.  Once I'm happy I then lay the unit flat on the my craft table and firmly wrap the other 50% of the storage pocket around the back of the panel ... doubling it back on itself and I stick it down with generous amounts of my Scotch Tape Runner tape.  I then adhere the pocket to my A2 card base.  I recommend 110lb cardstock because the base has to support some weight.

All of the rest of decoration of this card is on top of the storage pocket.  I die cut the sentiment twice, sticking one layer to the next and then I adhered that to the front and the Lunar Animals were stamped with Ranger Archival Ink in Potting Soil on Bristol Smooth.  They were watercolour painted using the following Kuretake Zigs, Yellow, Orange, Light Pink, Light Carmine, Carmine Red, Light Gray, Mid Gray, Dark Gray, Beige, Oatmeal and Brown.  They were die cut and also applied after adding their little party hats.  Points were highlighted with a white gel pen and with that, another card is complete!


I think this card would be loved for kids and big kids alike!  The contents move about freely and make a satisfying noise - using seed beads as part of the mix particularly helps with this and they help to move the sequin mix around.

See you next time!

Nicky x

Saturday, March 23, 2019

Wish Upon A Star - Mama Elephant

It was true love at first sight when I clapped eyes on Wish Upon A Star by Mama Elephant.  I knew that I had to have it since my head suddenly flooded with design ideas for the set.


I wanted to play with the height of a slimline card for this stamp set.  This card's dimensions are 8 1/2 inches x 3 1/2 inches.  I also created a panel that was slightly smaller and masked off the edges and I ink blended using the following Distress Oxide Inks - Festive Berries, Cracked Pistachio, Peacock Feathers, Chipped Sapphire and Black Soot.  I wanted the 'Aurora' colours in the greens and pinks to be super subtle so I used quite a bit of the Chipped Sapphire and Black Soot over the top of them to bring the colour down.


I mixed some white acrylic paint with a drop of water to loosen it.  Using an old toothbrush I splattered the white droplets all throughout the background colour.  Using a paintbrush I then used the same solution and splattered some larger blotches.  Once dry I added in some dots of pale gold gel pen for some wonderful subtle sparkle as the card is handled.  The mask was then removed and the panel was backed with white craft foam and applied to the sturdy 110lb white cardstock base.


On Strathmore Bristol Smooth cardstock I stamped my images using Ranger Archival Ink in Potting Soil.  I then watercolour painted my images using the following colours:-

Kuretake Zigs in Oatmeal, Mid Gray and Light Gray.  Tombow ABT's in 761 and 020.


The moon, clouds and stars were given a treatment of Spectrum Noir Glitter Pen for a gorgeous subtle shimmer and then each image was die cut and applied to the scene using dimensional foam tape.

The sentiment was stamped to a strip of cardstock and also backed with foam tape and applied.


The final touch was the application of a few flat, silver micro star 'sequins'.  This card is so much about the twinkle in the movement of it.  It was a lot of fun to create and I can't wait to use this stamp set in a completely different way next time.

Thanks for stopping by, happy crafting!

Nicky x

Sunday, March 10, 2019

Fly With Me - Mama Elephant

Hi!  Few things are more fun than creating new baby cards!  My extended family have just welcomed a new baby girl and so I set about making the perfect card!  I have used Fly With Me by Mama Elephant.


Finished card dimensions are 3 1/2" wide x 8 1/2".  From an A4 sheet of cardstock cut the length at 7 inches then score and fold in half (4 bar).  My panel is cut from the remainder of the A4 sheet and the dimensions are 3.2" x 8.2".  Worth writing those down for future reference!  For your coordinating envelopes just Google 'slimline envelopes' (this search yields the best results).  Sometimes they are referred to as 'invitation envelopes' and also '#9 envelopes' or even 'Size 9 envelopes'.


I masked off the edges of my panel and ink blended it using a Clarity Stencil Brush in Spun Sugar Distress Ink.  I then squished a little Worn Lipstick Distress Ink onto my acrylic block, spritzed a tiny bit of water next to it, mixed it and then splashed it randomly.  I removed the masking and stamped the sentiment from New Family using Ranger Archival Ink in Potting Soil and set the panel to one side.


On Bristol Smooth cardstock I stamped my images again using Ranger Archival Ink in Potting Soil.  I watercolour my images using Kuretake Zigs and Tombows.  The following colours were used.  Elephants are Zig in Blue Gray.  Balloons are Zig in Light Pink and Tombow  020.   Blushing cheeks, ears and hair bows also done with Zig in Light Pink.

I die cut the images and applied them to the scene using dimensional foam tape then attached the panel to the card base with a piece of white craft foam behind it to lift it up.


The final embellishing touches were to add Nuvo Crystal Drops.  The colours I've used are Simply White,  Buttermilk and Bubblegum Blush.

I was so happy with how this card turned out and I love the height of it which helped me play with having the elephants floating through the sky.

I'm fighting the urge to make this card all over again in a baby boy theme - it may very well happen!

Happy crafting everybody!

Nicky x


Friday, January 4, 2019

Tea With Friends & Picnic With Friends - Mama Elephant

Hi!  I have a pretty card to share with you today where I've combined both Tea With Friends and Picnic With Friends by Mama Elephant.


The scale of these two stamp sets is perfect for combining as you can see and in order to fit everything into the one card, I opted for one of my slimline cards.  Finished dimensions are 8 1/2 x 3 1/2 inches with a panel cut at 8.2 x 3.2 inches - it can be made from one new panel of cardstock with just a skinny strip left over (useful for sentiments).  My panel was ink blended using Clarity Stencil Brushes.  Colours used are Distress Inks in Tumbled Glass, Stormy Sky and Shabby Shutters.


I stamped all of the images using Bristol Smooth cardstock and Ranger Archival Ink in Coffee.  I watercolour painted the images using Kuretake Zigs in Oatmeal 064, Brown 060, Pale Rose 230, Beige 072, Blue Gray 092, Mid Grey 096, Light Pink 026 and Carmine Red 022.

Everything was die cut and I decided on an arrangement, took a photo on my phone so that I didn't forget it and then I set about adhering everything into the scene, sometime glueing it directly and sometimes popped up on dimensional foam tape.

I dotted in some crumbs and flecked in some tufts of grass directly with my Zigs and the final touch was delicately glittering a few areas as if glistening in the sunshine (it is super subtle).  I backed the panel with white craft foam and adhered it to the card base.  I had some left over little birds which I adhered inside the card where I also stamped a Happy Birthday sentiment.


I do thank you for stopping by the blog to read about this card today.  See you next time!

Nicky x

Sunday, December 30, 2018

Page Huggers - Mama Elephant

Hello!  I'm continuing to have some fun creating some cards just for pleasure whilst I have some spare time from my Design Team work!  Today I've been playing with Page Huggers by Mama Elephant.  I made this card for one of my sisters who has a very special teacher in her daughter's life to thank.


First things first, I very softly ink blended my panel using Clarity Stencil Brushes.  Distress Inks used are Tumbled Glass and Shabby Shutters.  I then die cut the panel to give it the decorative edge using the Cloud Nine Creative Cuts.   I then popped this panel into my Misti and stamped the sentiment which is from Sweetest Greetings.  I used Ranger Archival Ink in Potting Soil and stamped it twice so that it was perfect.  Inside the card I stamped the smaller 'You're The Best' sentiment from the same set.  I then attached the panel to my card base of 110lb Neenah white cardstock.


On Bristol Smooth (I favour Strathmore) I stamped and die cut my images from Page Huggers using the Ranger Archival Ink in Potting Soil again.  Using my waterbrush pens I watercolour painted each of the cuties.  For the bear I used Zigs in Oatmeal and Mid Gray.  For the kitty I used a Tombow in shade 912.   The mouse was done with Zig in Mid-Gray and the bunny with Zig in BlueGray.  All cheeks were blushed with Zig in Light Pink.  

Their spectacles are painted with Zig in Haze Blue and any red on the card was painted using Zig in Carmine Red.  Any green is Zig Light Green.  The yellow shade is Tombow 991.

I decided on a layout for my characters and adhered them with varying amounts of dimensional foam tape, I highlighted some points with a Uni-Ball Signo White gel pen.


My finishing touch was the simple addition of these miniature wood butterflies that I adore!

Thank you so much for stopping by to read, please leave me any comments or questions you may have!  Happy crafting!


Nicky x


Monday, December 17, 2018

Animal Parade - Mama Elephant

Hi!  As 2018 draws to a close and with all my Design Team work completed for the year I decided to make a few cards just for me and for the pure love of card making (not that I don't love everything I do when I do have my DT hat on you understand)!!!!


For this card I reached for Animal Parade by Mama Elephant which I have adored since I was first sent it by the lovely ladies at Mama Elephant.   I recently treated myself to the new Woodgrain Cover - Creative Cuts Die which makes exciting backgrounds a breeze to make!  I die cut an A2 panel of white cardstock and then ink blended it using Distress Ink in Antique Linen and then to deepen the very edges a little more I blended with a touch if Distress Ink in Brushed Corduroy.  I set this panel to one side.


I took some Bristol Smooth cardstock and stamped my images using Ranger Archival Ink in Potting Soil.  I watercolour painted them using my Kuretake Zig Clean Color Real Brush Pens then die cut each one.   I played around with my layout and once I had settled on one I adhered them into position using varying amounts of dimensional foam tape.


I highlighted some points with a Uni-ball Signo White Gel Pen and I decided the only embellishment needed to finish out this card was to use Nuvo Drops in toning colours for the penguins juggling balls (I stamped the image lightly first with Antique Linen so that I could apply the drops accurately).

I hope you like the card, I was going for a slightly retro and muted palette and yet keep it cheerful and current at the same time (talk about a juggling act)!!!!

Thanks for stopping by to read my blog today, happy crafting!

Nicky x

Saturday, November 17, 2018

Yappy Woofmus & O'Tiny Tree - Mama Elephant

Hey everybody, I'm happy you've come to my blog to read about my latest card featuring products from Mama Elephant.  Using Mama Elephant guarantees you crowd-pleasing, adorable cards and projects, every, single, time!!!!


If it isn't abundantly clear this is a somewhat oversized card ..... and yet not really!  IF  you're a scene builder like I am then you probably often crave more space than a standard A2 card affords you.  Now, you can play around with all number of card sizes and combinations like I have, but you're probably going to find the envelope situation to be challenging unless you are of a mind to make all of your own .... not undoable of course!  I have done this but have since chosen to take the path of least resistance and work to envelope sizes that pre-exist.  To this end, this card fits a stand 'Slimline' envelope at 8 7/8 x 3 7/8 as found HERE and all number of other places online.


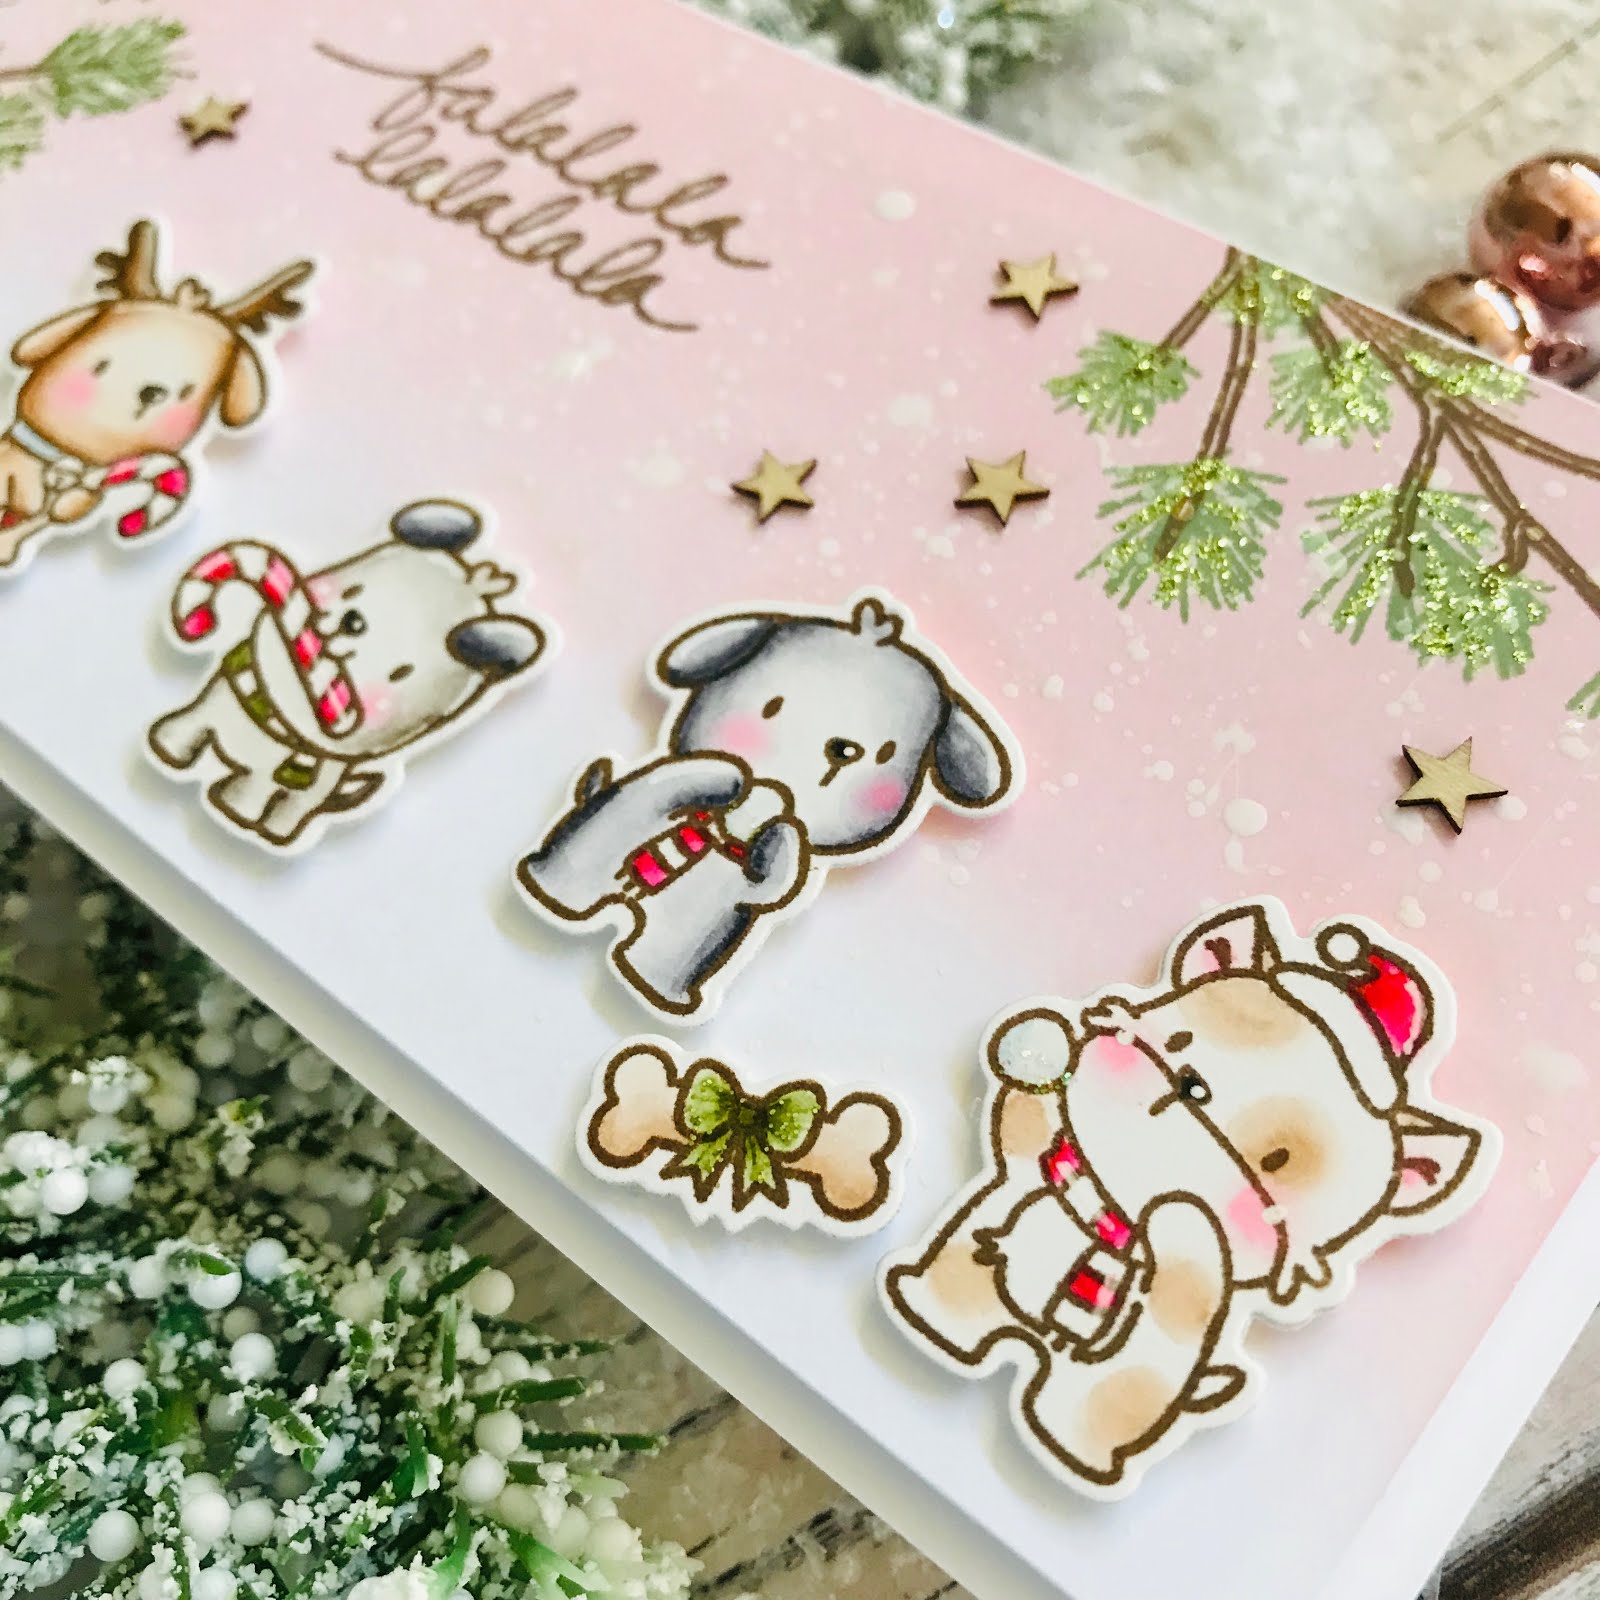
The finished size of my card base is 8 1/2 x 3 1/2 which meant that I took a piece of 110lb white cardstock and trimmed the length down to 7 inches which I then scored at 3 1/2 for the fold - really so easy!  With this made and from the remaining piece of cardstock from an A4 sheet I created a panel and you can make your own to whatever size you wish.  I ink blended my panel using Distress Oxide Ink in Spun Sugar, fading away to nothing at the bottom to give the suggestion of snow!  This background was splattered with a white acrylic paint and water solution and left to dry before stamping the Fa la la la la, la la la la sentiment!


Next, I stamped the bare tree from O' Christmas Tree using Ranger Archival Ink in Coffee.  I then used the coordinating greenery stamp and stamped it using Memento Ink.  Finally I glittered up the fronds using Stickles glitter and set it aside to dry.

On Bristol Smooth cardstock I stamped my images from Yappy Woofmus, I watercolour painted them using my Kuretake Zigs then die cut and applied them to the scene using dimensional foam tape.   The ribbons on the parcel were again given a treatment of Stickles for some glitter.


Figuring I needed more greenery in my scene to balance it out I used the O'Tiny Tree stamp again but at an angle like an overhanging branch.  I glittered it up just as I did before.

I adhered several wooden stars to the scene to embellish it and then applied white craft foam to the back of the panel and adhered this to the base and stamped 'Merry Christmas' inside.

Let's hear it for cards that aren't A2 .... switch it up and create scenes!

Until the next time,

Nicky x


Monday, October 29, 2018

Little Snowman Agenda - Mama Elephant

Hello!  I treated myself to so many wonderful Mama Elephant goodies recently that I've yet to get to them all due to other card making commitments.  However, this isn't the first time I've played with Little Snowman Agenda as you will know if you follow me.


To make this card I die cut a white cardstock panel and a green cardstock panel using the Grid Window Creative Cuts Die by Mama Elephant.  I kept the negative cuts of the white die cut and set the frame aside for a future card and I kept the positive cut of the green die cut.   I softly ink blended the white parts with Distress Oxide Ink in Spun Sugar and Stamped the lovely sentiment from Merry Greetings because it could not have fit more perfectly into that larger section.   I applied foam tape to the reverse of the green die cut and adhered it to my card base and then applied glue to each negative cut and recessed them carefully in each window opening.


On Copic friendly Neenah cardstock I stamped my images with Memento Ink in black.  I used Copics to colour the snowmen and highlighted a few points with a Uniball Signo White gel pen.  I used Stickles Glitter in 'Crystal' to add a festive touch.   I die cut and applied the snowmen to the windows with more foam tape.  The final touch was the addition of tiny silver micro star 'sequins'.


Another Christmas card completed!!!  I'm getting there!!!  Thank you so much for coming by to read today, see you next time!

Nicky x

Sunday, September 30, 2018

Meowy Woofmus - Mama Elephant

Hello Friends!

I'm back with a sweet card using an older but much loved stamp set from Mama Elephant called Meowy Woofmus, maybe some of you have this stamp set, although quite frankly, you could insert any of the Mama Elephant cuties into such a scene!


I started by taking an A2 panel of Bristol Smooth cardstock.  I ink blended it very softly with Distress Inks in Tattered Rose and Squeezed Lemonade.   I then hand applied the 'snow' affect using a Uniball Signo White gel pen.  Next, I die cut the panel using Framed Tags - Union Square and then die cut it one more time using Basic Rectangles - Creative Cuts.     At the top of the main panel I stamped the sentiment from Jingle Greetings using Versamark Ink and then heat embossed in gold.


I die cut the snowy 'hills', trimmed to size and applied them layered into the back of the opening in the panel.  I then lined up the negative cut with the background colour on it behind the opening, found the correct position for it on the card base and adhered it down.   Since the two 'hills' unlevelled things, I added strips of cardstock to match the depth of the hills around the upper part of the opening.  With that done I was then able to apply my Scotch dimensional foam tape and apply the panel to the base making sure to align it perfectly with the negative cut.

On more Bristol Smooth, I stamped my little characters with Ranger Archival Ink in Potting Soil.  I watercolour painted them with Kuretake Zigs and then die cut and applied them into the scene with their cheeks highlighted with a Uniball Signo White gel pen.


The final touch was the application of 3 mini wooden star embellishments.

Hope you enjoyed the card .... many more to come, be sure to sign up to my blog so you don't miss anything!

Nicky x

Sunday, September 23, 2018

Cool Penguins - Mama Elephant

Hello!  I couldn't WAIT to use my new stamps and dies from the new  Mama Elephant release and I imagine many of you are in the same boat as me.  My first card using my purchases (which were numerous ..... I'll admit it) is with Cool Penguins.


To start out I ink blended a panel of Bristol Smooth cardstock using a combination of Distress Inks in Spun Sugar and Tattered Rose and using a Uniball Signo White gel pen, I hand drew in the snow.   I then die cut another panel of white cardstock using the Tri Window Cover - Creative Cuts and set that aside.   Using the word HUGS from the Creative Cuts die I die cut the word first out of my ink blended panel and then 3 or 4 more times from scrap white cardstock and I glued them in stacks to build depth then glued the stacks into position in the background.


I applied the ink blended panel to my prepared card base and using dimensional foam tape I adhered the white Tri Window Cover Creative Cut to the card also.  Separately on Bristol Smooth cardstock I stamped out all the images from the Cool Penguins stamp set using Ranger Archival Ink in Jet Black.


I watercolour painted everything using Kuretake Zigs (colours used are:  Pale Pink, Light Violet, English Lavender, Light Pink, Dark Gray, Oatmeal and for their feet and beaks Bright Yellow) and I  highlighted cheeks and other points with the Uniball Signo White gel pen.  I decided on a layout and then used more foam tape to adhere them into place.

Not done yet though!!!!  I took some 80lb white paper which is a lovely quality weight and created a writing insert inside the card and on that I created a little scene using stamped and painted images not used on the front of the card, I also stamped the sentiment.


The final touch was to take a bottle of Stickles in 'Crystal' and add subtle (and not so subtle) twinkle to various points on the card.   In the image just above the penguin is surrounded by tiny dots of glitter ...... you know how glitter gets everywhere during the Christmas holidays!!!?  I also created a gloopy icicle affect on the word HUGS which is thick and dimensional.

Hmmm now .... which Mama Elephant set should I play with next?  Decisions ... decisions ...........

Happy crafting everybody!

Nicky x


Monday, September 17, 2018

Mama Elephant 6th Anniversary Stampede!!!


Hello and welcome to Mama Elephant's #celebrating6years Anniversary Release Stampede with our wonderful crafty friends and designers! The wait is finally over! The release is now live and available for purchase in the shop!


To celebrate with you, we have this amazing sale and promotion and giveaway! Keep reading to the end!


From 9/15 - 9/17
10% off entire store! No code required!

From 9/15 - 9/30
Spend $100* - receive 1 free 'Color Me Letters' 4x6 stamp set.
Spend $150* - receive 1 free 'Color Me Letters' 4x6 stamp set and 'Hilly THANKS' dies.
Spend $200* - receive 1 free 'Color Me Letters' 4x6 stamp set, 'Hilly THANKS' dies, and 'Hilly HELLO' dies.

Please read all the fine print carefully! :)

*Subtotal amount must be met before any shipping fees/tax/customs.
Free item(s) valid only a single order/transaction.
Limit one of each free offer per order.
Orders cannot be combined. New orders only.
Limit one free offer per customer/order.
We reserve the right to cancel/modify orders.
Free offer valid 9/15-9/30 or while supplies last!

Hello everybody, thank you so much for hopping along with us today as the Stampede rolls on in celebration of Mama Elephant's 6th Anniversary and this incredible new release!  I'm delighted to be participating and I have 3 cards to share with you today, so keep on scrolling down and hopefully you'll be left feeling very inspired.


First up, I have a card using the brand new 'Santa's Sleigh' stamp set.


This card features an ink blended and distressed background that fades away to a snowy white at the bottom.   All of the adorable characters were hand stamped onto Bristol Smooth watercolour cardstock using Archival Ink in 'Potting Soil', they were watercolour painted using Kuretake Zigs and the antlers on the puppies were glittered as was the top edge of Santa's Sleigh and the sign.


Everything was adhered into position with varying amounts of foam tape to build dimension.  The sentiment was stamped with Versamark Ink and heat embossed in silver and added.  The final touch was the addition of white Nuvo drops for some dimensional snow.


My next TWO cards use the new and ultra adorable Little Elf Agenda stamp set.  For the first one I made a shaker card using the Grid Window Creative Cuts die and the sentiment is from the Santa's Sleigh stamp set as used above.


My little elves were stamped with archival ink, watercolour painted with Kuretake Zigs and die cut using the coordinating dies.


Since I'd stamped up all 16 of the little elves from the stamp set I had plenty left over to create a second card.  For this one I used the Hillside Cover Die as my backdrop.


I masked it off and ink blended the hilltops with Distress Ink in Tumbled Glass then used tiny dots of Stickles glitter to make them glisten.  I took the sentiment from the Santa's Sleigh stamp set and shaped it on my acrylic block to follow the line of one of my 'hills' and then stamped it with black ink.  All that was left then was to apply my remaining elves and their toys with foam tape.


Thank you so much for stopping by and I hope I've left you inspired.  I'd love to hear from you so please use the comments section!

A final HAPPY 6th ANNIVERSARY to Kryssi and Angela at Mama Elephant, thank you for all the beautiful stamps and dies you've created for us over the years.  Here's to the next 6 years and beyond!

Nicky x

To celebrate this mega anniversary release, we are giving away of ten $25 ME gift certificates throughout the 3 day stampede! Winners will be chosen at random from the collective blogs in the Stampede. Winners will be announced on the last day of Stamp Highlights. You have up to 4 chances to qualify to win!

» 1. Leave a comment on this blog post «
» 2. Like/share us on Facebook: facebook.com/mamaelephant «
» 3. Follow/tweet us on Twitter: twitter.com/heymamaelephant «
» 4. Follow/comment on Instagram: instagram.com/mamaelephant «

Each action qualifies for one entry, max 4 entries per stampeder please!

Joining us on this wild ride of a stampede are our favorite crafty designer friends! Please visit them to see what they did with the new goodies!


And that's a wrap to the 3 day mega stampede! Make sure you checked out Day 1 and DAY 2! Thanks all for joining us! The celebration continues all month long!