Showing posts with label Christmas Card. Show all posts

Saturday, August 14, 2021

My Favorite Things - August Vault Release Countdown Day 3

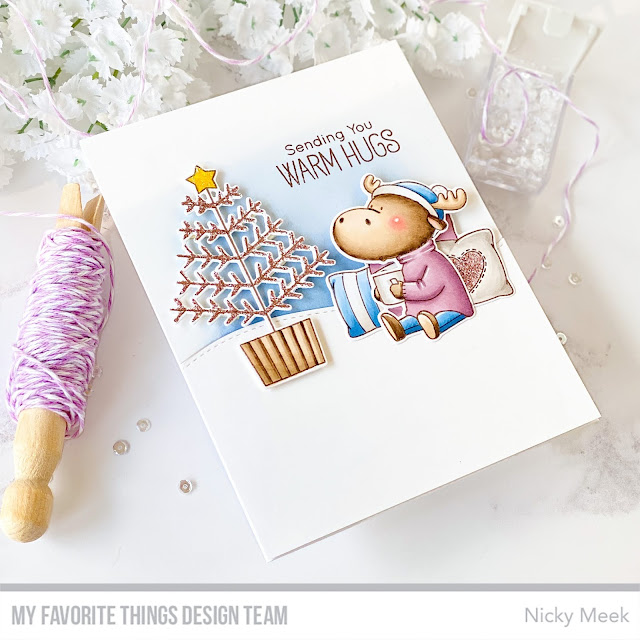
On August 17th My Favorite Things is releasing many more of the beloved Birdie Brown stamp sets from the Vault.  My card today features Merry Christmoose ... I adore this stamp set.   Read on for the details.


The card was started by ink blending an A2 panel using Stormy Sky Distress Oxide Ink to create a soft focal point.  I stamped the sentiment from the set then used Stitched Snow Drifts Die-namics to die cut a second panel which I layered over the first and glued down.


The images were stamped and I used Copic markers to colour them.  Here is my colour palette:-

Moose and Pot - E44, E43, E42, E41
Sweater - V95, V93, RV95
Blues - B97, B95, B93, B91
Greys - W3, W2, W1

I die cut all of the elements.


Time to get the sparkle out!   For the Christmas Tree and the glittered heart on the pillow I used Stickles in Pink Taffeta.   Once dry I backed the elements with foam tape and applied.   A few points were highlighted with a white gel pen and I glued the panel to a card base and then my card was complete!

I'll be back tomorrow with another vault release card so I hope you return for that.  Happy crafting!

Thursday, August 22, 2019

Avery Elle - Fall 2019 Release Blog Hop


Hello everybody!  Thank you for hopping along to my blog for the Avery Elle Stamps big new release blog hop!  Be sure you read/scroll all the way through my post today to read the GIVEAWAY information and to find the list of designers to hop along with next.

I have TWO cards to share with you today, this first one features Snow Fun one of the new stamp sets from the release and my first official Christmas card of the season!


To make this card I die cut an A2 panel from red and white gingham patterned cardstock.  I adhered this to a 110lb white cardstock base - nice and sturdy!   I then die cut a smaller panel of white cardstock.  I masked off the edges then used Tumbled Glass and Salty Ocean distress inks to ink blend the background.  I also stamped some of the snowflakes from the stamp set using Salty Ocean but I stamped it off once or twice first for lighter 2nd and 3rd generation stamps.


The sentiment was stamped.  This smaller panel was backed with white craft foam and applied to the gingham panel.

On Copic friendly paper the images were stamped with black Memento ink.   They were coloured with Copic markers then die cut, backed with dimensional foam tape and applied to the scene.  Points were highlighted with a white gel pen.


The finishing touch was to apply the pale blue and white snowflakes with a little Ranger Multi Medium Matte glue.  I also used a little Stickles in 'Crystal' to add some sparkle to the snowmen and a tiny dot of it into the centre of each stamped snowflake.

Below you'll see that I had extra images and so I decide to adorn the inside of the card for a surprise but still leave plenty of room for a personal message.


- - - - - - - - - - - - - - - - - - - - - - - - - - - - - - - - - - - - - - - - - - - - - - - - - - - - - - - - - 

My second card for this release is something really different for me since I didn't have to stamp or die cut a single thing!  This card was constructed entirely of paper from the new The Holiday Collection 6x6 inch Paper Pack together with the Holiday Ephemera Pack which is basically a fun collection of die cuts that are already coloured and stamped up for your immediate use.  With this you can create endless projects including cards and gift tags!


To construct this card I merely chose the elements I needed to build a scene from the Ephemera Pack and I laid them out on my craft table to find the right arrangement.  I then chose a background from the Holiday Collection and trimmed it to size leaving plenty of that design for a future project.


From this point it was merely a matter of building the scene behind and within the red stitched and scalloped frame using a combination of glue and single and double layers of foam tape so that the card became highly dimensional.

Once done I applied the scene to a red card base and embellished with a few sparkling clear sequins for that essential Christmas twinkle.


Buy these two items and you'll be whizzing through your Christmas card making list like a pro!

Thank you for coming by to see what I made for this exciting new release.  Please scroll down to hop to the next designer on the list.

Nicky x


Avery Elle  
Caryn Davies
Heather Campbell
Yainea
Melania Deasy
Katie Gehring 
Amy Kolling 
Ashley Marcu
Elena Roussakis
Nicky Meek (you are here)!

To celebrate our Fall 2019 Release Blog Hop, Avery Elle is giving away a stamp set of their choice to 3 winners.  To enter to win just comment on this post.  There is no purchase necessary and you must be 18 years of age or older to enter.  This giveaway is void where prohibited.  You can also do options 2, 3 and 4 of the following to increase your chances of winning. You have until midnight Sunday, August 25th to enter.  The winner will be announced on the Avery Elle Blog on Monday, August 26th .  All products are available for purchase in the Avery Elle store right now.  You can check them all out here
To enter to win you can do 1, 2, 3, or all 4 of the following to increase your chances:


  1. Comment here on the Avery Elle Blog
  2. Follow / Tweet us on Twitter (we are @averyellestamps )
  3. Follow / Share us on Facebook (we are www.facebook.com/AveryElle ) .
  4. Follow / Comment on Instagram (we are https://www.instagram.com/averyellestamps/).


Thursday, October 18, 2018

Reindeer Friends - Pretty Pink Posh

Hello and thank you for visiting my blog.  I have card for Pretty Pink Posh today featuring 'Reindeer Friends' from a year ago but always worth revisiting for reasons of obvious cuteness!


I decided on an arrangement for my scene using some previously stamped images and it was abundantly clear that this card would need some different dimensions to the usual A2 standard for us card makers.  This card does not conform to any standard size so I will need to hand make an envelope for it and there are many tutorials out there for how to do this.  So, I made my sturdy card base of 110lb white cardstock by Neenah and then scored and folded it and also cut a panel that was slightly smaller dimensions than the base. 


I ink blended this panel with Distress Oxide Ink in Cracked Pistachio, fading it away to nothing to give the appearance of a snowy ground.  I very slightly diluted a little white acrylic paint and splattered it randomly all over the panel to indicate snowfall.  Once dry I backed the panel with white craft foam and applied it to the card base.

I watercolour painted my reindeer and their piles of gifts with Kuretake Zigs and adhered them to the card with dimensional foam tape by Scotch.


The Merry Christmas die cut sentiment is by Pretty Pink Posh also and was die cut twice and the two die cuts glued together and then they were glued to the card slightly curving the words over the scene to subtly frame it.

The final touch was the application of pearly white sequins throughout the scene which also fits with the snowy scene.

Happy crafting friends!

Nicky x

Monday, September 17, 2018

Mama Elephant 6th Anniversary Stampede!!!


Hello and welcome to Mama Elephant's #celebrating6years Anniversary Release Stampede with our wonderful crafty friends and designers! The wait is finally over! The release is now live and available for purchase in the shop!


To celebrate with you, we have this amazing sale and promotion and giveaway! Keep reading to the end!


From 9/15 - 9/17
10% off entire store! No code required!

From 9/15 - 9/30
Spend $100* - receive 1 free 'Color Me Letters' 4x6 stamp set.
Spend $150* - receive 1 free 'Color Me Letters' 4x6 stamp set and 'Hilly THANKS' dies.
Spend $200* - receive 1 free 'Color Me Letters' 4x6 stamp set, 'Hilly THANKS' dies, and 'Hilly HELLO' dies.

Please read all the fine print carefully! :)

*Subtotal amount must be met before any shipping fees/tax/customs.
Free item(s) valid only a single order/transaction.
Limit one of each free offer per order.
Orders cannot be combined. New orders only.
Limit one free offer per customer/order.
We reserve the right to cancel/modify orders.
Free offer valid 9/15-9/30 or while supplies last!

Hello everybody, thank you so much for hopping along with us today as the Stampede rolls on in celebration of Mama Elephant's 6th Anniversary and this incredible new release!  I'm delighted to be participating and I have 3 cards to share with you today, so keep on scrolling down and hopefully you'll be left feeling very inspired.


First up, I have a card using the brand new 'Santa's Sleigh' stamp set.


This card features an ink blended and distressed background that fades away to a snowy white at the bottom.   All of the adorable characters were hand stamped onto Bristol Smooth watercolour cardstock using Archival Ink in 'Potting Soil', they were watercolour painted using Kuretake Zigs and the antlers on the puppies were glittered as was the top edge of Santa's Sleigh and the sign.


Everything was adhered into position with varying amounts of foam tape to build dimension.  The sentiment was stamped with Versamark Ink and heat embossed in silver and added.  The final touch was the addition of white Nuvo drops for some dimensional snow.


My next TWO cards use the new and ultra adorable Little Elf Agenda stamp set.  For the first one I made a shaker card using the Grid Window Creative Cuts die and the sentiment is from the Santa's Sleigh stamp set as used above.


My little elves were stamped with archival ink, watercolour painted with Kuretake Zigs and die cut using the coordinating dies.


Since I'd stamped up all 16 of the little elves from the stamp set I had plenty left over to create a second card.  For this one I used the Hillside Cover Die as my backdrop.


I masked it off and ink blended the hilltops with Distress Ink in Tumbled Glass then used tiny dots of Stickles glitter to make them glisten.  I took the sentiment from the Santa's Sleigh stamp set and shaped it on my acrylic block to follow the line of one of my 'hills' and then stamped it with black ink.  All that was left then was to apply my remaining elves and their toys with foam tape.


Thank you so much for stopping by and I hope I've left you inspired.  I'd love to hear from you so please use the comments section!

A final HAPPY 6th ANNIVERSARY to Kryssi and Angela at Mama Elephant, thank you for all the beautiful stamps and dies you've created for us over the years.  Here's to the next 6 years and beyond!

Nicky x

To celebrate this mega anniversary release, we are giving away of ten $25 ME gift certificates throughout the 3 day stampede! Winners will be chosen at random from the collective blogs in the Stampede. Winners will be announced on the last day of Stamp Highlights. You have up to 4 chances to qualify to win!

» 1. Leave a comment on this blog post «
» 2. Like/share us on Facebook: facebook.com/mamaelephant «
» 3. Follow/tweet us on Twitter: twitter.com/heymamaelephant «
» 4. Follow/comment on Instagram: instagram.com/mamaelephant «

Each action qualifies for one entry, max 4 entries per stampeder please!

Joining us on this wild ride of a stampede are our favorite crafty designer friends! Please visit them to see what they did with the new goodies!


And that's a wrap to the 3 day mega stampede! Make sure you checked out Day 1 and DAY 2! Thanks all for joining us! The celebration continues all month long!