Saturday, October 31, 2020

The Sweetest Little Town Collection by Stacey Yacula for Purple Onion Designs

There's a brand new winter/Christmas collection by Stacey Yacula for Purple Onion Designs called The Sweetest Little Town and my horizontal slimline card today features several stamp images from this collection.  Read on for all the details.


To create this card I first stamped the background.   I started by stamping the 'Covered Bridge' image on the right hand side using Memento Ink in London Fog.  I masked off portions of the bridge so that I could then using the same ink to stamp the 'Church' scene and I used that stamp again to add the trees to the right of the bridge to fill out the horizon.


I used super pastel shades of Copic markers to add a hint of colour to the snowy background scene I'd created including V0000 and V000 for the sky.  On another piece of cardstock I stamped the other images which from the left are 'Woodstock', 'Mailbox' and 'Timothy'.  I also stamped the little wreath image from the Twas the Night Before Christmas collection.

All images were coloured with Copic, fussy cut and attached with foam tape to the scene to add dimension.  Points were highlighted with a white gel pen.   I die cut a couple of little snow berms and stamped the sentiment to one of them and adhered those inside the double die cut frame which is the Gallery Frame #5 die by Hello Bluebird.   The whole panel was then adhered to the card base.


Glitter time!   In this sweet little town the snow falls in silver glitter form, which I dotted in using Stickles giving it a lovely vintage look that also worked with the outer frame and I used Nuvo drops to add toning baubles to the wreath that hangs from the covered bridge.

Happy crafting, I'll be back soon with a new project!


My Snowman - Hello Bluebird

Hello Friends!

So excited to be here blogging this new card today for Hello Bluebird who have an adorable new release Nov 2nd at 7pm MST.   My card today features 'My Snowman' one of the brand new stamp sets.


To create this scene I first took the Snowy Sky Scene die from a previous release and die cut white cardstock.  I used Distress Oxide Ink in Speckled Egg to softly ink blend each of the 3 sections the die cut.  I backed the top portion with white glitter cardstock adhered it to a white cardstock base and then the section beneath it was backed with a single layer of regular dimensional tape and applied and the bottom layer with a thicker dimension tape and then added.   This was then set aside.


I grabbed some Copic friendly cardstock and stamped the adorable images from My Snowman using Memento Ink in Rich Cocoa.  I Copic coloured the images using a somewhat limited and repeated colour palette.  Points were highlighted with a white gel pen and I then fussy cut the images.

I stamped the sweet sentiment on to a sentiment tag using Cherry Red ink by Gina K Designs.


I played around with all the die cut pieces to find the perfect arrangement and then adhered them to the scene using dimensional tape again.

I believe you need this stamp set in your life and I hope you treat yourself.  Don't miss the beginning of the release as soon as it goes live, things can sell out fast!!!  You have been warned!

Happy crafting.


Friday, October 30, 2020

The Sweetest Little Town Collection by Stacey Yacula for Purple Onion Designs

This is the brand new 'The Sweetest Little Town' collection by Stacey Yacula for Purple Onion Designs. For this card I've used the 'Cozy Home' stamp image and those three carol singing cuties are called 'Snow Crooners'.   Read on for how this came together.


To create this card I stamped the Cozy Home image to some super smooth/Copic friendly cardstock using Memento Ink in Rich Cocoa.  I used Copic markers to colour the image and added a hint of tint for the sky using BG0000 because I wanted to give the feeling that it was icy cold.

I also stamped the crooners and coloured them and fussy cut.   I used a white gel pen  to add some interest and highlights and glittered every third stripe on the bunny's scarf using Stickles.


The background panel was die cut to give it the simple faux stitched edge and applied to the card base, the crooners were backed with foam tape and applied and the sentiment was stamped beneath them (so now we know what they are singing)!!!

I added a few more subtle touches of Stickles to the trees and house where frost would settle and lastly I use Copics to add a little smoke billowing out of the chimney.


Could these images be more adorable?   Seriously doubt it!  Enjoy some happy crafting time and I hope you'll come back to visit the blog soon.


Friday, October 16, 2020

Pinkfresh Studio - October 2020 Slimline Stamp, Die and Stencil New Release Blog Hop


Hello and welcome to my blog where today I'm joining in as a guest designer with the Pinkfresh Studio design team to help share with you some of the exciting products available in today's new release of slimline stamps, dies and stencils.   Before I reveal my cards, please note that by commenting on my blog post today you stand to win a $25 GIVEAWAY.  Winners will be chosen on October 23rd and you will find out if you are one of the lucky ones by visiting the GIVEAWAY PAGE on that day.  Here are the shipping promotion deals you may be interested in.


My first card today stays 'seasonal' with a Christmas theme.   It uses the new Argyle Layering Stencil Set for the background.


To make this card I used Distress Ink in Picket Fence to ink blend the first stencil on to pink cardstock.   I then took the second stencil, layered it over the top and I used a silvery/gold Gelly Roll by Sakura to apply the streaks of sparkle which look like metallic thread has been woven through it and catches the light beautifully as seen in the photo below but especially when the card is handled.


I trimmed down this panel and layered it over other panels to get a very sturdy and stacked frame appearance and applied it to a 110lb white cardstock base.


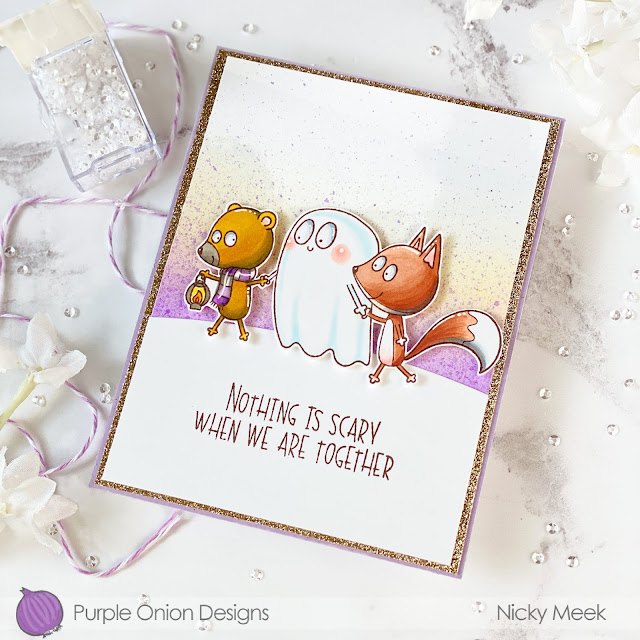
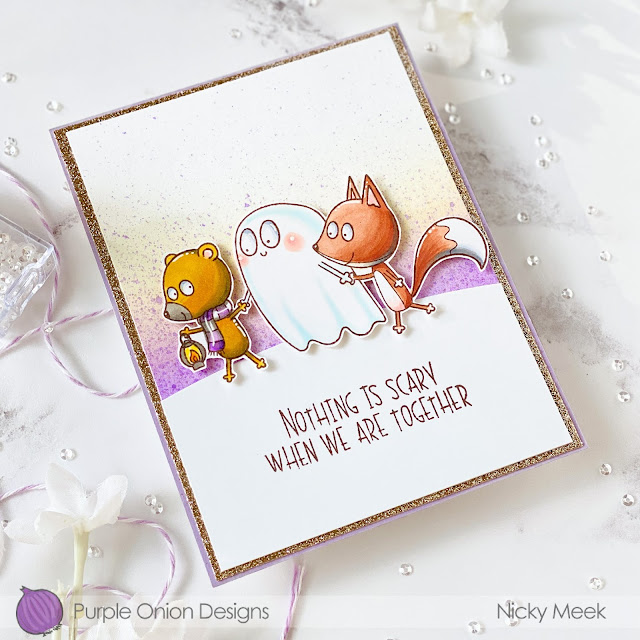
On Copic friendly cardstock I stamped my images from Tree Trimming Friends (from a previous release) using Memento Ink in Rich Cocoa.   I Copic coloured these sweet little images and die cut using the coordinating dies.  I also die cut 4 or 5 more times just from plain white cardstock and adhered each die cut to the next to make a nice dimensional stack.   These characters were attached to the main panel and I stamped a sentiment from the Tree Trimming set and applied that with dimensional foam tape.

                                            *************************************  

My second card jumps all the way into a fresh Spring look and features the brand new and ever so beautiful Be Courageous stamp set that has a coordinating die that cuts out the inside of the frame.   In the background I have used the new slimline Argyle Layering Stencil Set and given it a different look.


To create this card I first die cut a panel of white cardstock using the Slim Diagonal Stitched Rectangles Die which was part of a form release.  This was attached to a slimline card base.   I then used the Argyle stencil to create a background.   I ink blended first with green and then with the second stencil layer with pink ink.   I trimmed down this panel so that the design on the white panel would show and I adhered it.


I have a regular sized Misti which isn't quite large enough to stamp the floral border and so I stamped the image using an extended cutting plate for my Cuttlebug as my giant stamping block.  The image was stamped using Memento Ink in Rich Cocoa and I die cut using the coordinating die which removes the centre to reveal the prettiest frame.


I used Copic markers to colour up the floral images, I backed it with foam tape and applied it over the Argyle.   I was sure to coordinate my colours from the background with my florals.

Finally, I grabbed some coordinating cardstock and a die cut the words 'best' and 'wishes' 6 times over from the 'Phrase Builder : Sending' die set.  I stacked them together glueing each one to the next so that the sentiment really pops and I set it inside the frame.   Last but not least a I chose a smaller sentiment from 'Be Courageous' and stamped and applied that in the lower right hand corner.   A few of Pinkfresh's jewel accents finish out the card.


Thank you so much for visiting my blog.  Don't forget to add your comment for a chance to win the giveaway before visiting the next designer on the hop from the list below.

Take care and happy crafting!

Wednesday, October 14, 2020

Harvest Friends - Winslow and Rusty - Julian Charlton for Purple Onion Designs

This is my third card featuring these sweet buddies Winslow and Rusty illustrated by Julian Charlton for Purple Onion Designs.  This stamp image is called Harvest Friends.


To create this card I first used a cloud stencil in my stash to create the soft background sky.    I used a cloud edge die and grass edge die to create clouds and grass.   Clouds were directly attached and the grass was softly ink blended and splattered and the sentiment stamped at an angle before that too was attached.  For dimension the top layer of grass has foam tape behind it.  The panel was attached to a card base.


On Copic friendly paper I stamped my image of Winslow and Rusty pulling their wagon of gourds using Memento Ink in Rich Cocoa.   I used a variety of Copic markers to colour the image but as I have with my previous two Winslow and Rusty cards for this release I used the following colours for the critters.  The fox character was E11, E33 and E35 and I used W3 and W5 to add shadow.   The bear character uses Y26, YR24 and YR27 and again W3 and W5 for shadow.


The image was fussy cut, backed with a double layer of foam tape and applied to the scene.  I then considered finishing touches and decided to add a few blowing leaves from a 4th image in this release from Julian Charlton which you'll find in the link given above and I highlighted a few points with a white gel pen.

Happy crafting!


Monday, October 12, 2020

Halloween Friends - Winslow and Rusty - Julian Charlton for Purple Onion Designs

 Today's card is another for the release of illustrator Julian Charlton's Winslow and Rusty designs for Purple Onion Designs.  This stamp is called Halloween Friends.


This is a simple Halloween/friendship card that started with an ink blended A2 panel of cardstock that I also splattered pretty well with an old toothbrush but I did it with the gradient of the colouring so that where the colouring was the deepest I did more splatter,  decreasing to very little at the top.   This panel was trimmed and was layered over a panel of cardstock which in turn was adhered to a purple panel that I attached to the card base.   I die cut the snowy ground (winter came early!) and stamped the sentiment and attached it to the top panel.


Winslow and Rusty are a lot of fun to colour and for this release I've always used the same colour palette using Copic markers for consistency.  The fox character was E11, E33 and E35 and I used W3 and W5 to add shadow.   The bear character uses Y26, YR24 and YR27 and again W3 and W5 for shadow.  Please see my last card featuring these cuties and I've got another Autumnal one coming in a few days.  Images were stamped with Memento Ink in Rich Cocoa.


I fussy cut the image, it was a pretty easy one to do and backed it with foam tape and applied it.   The final touch was to add white gel pen to highlight certain points and I used a metallic gel pen to dot in a little glimmer around them so that you get a little added interest when the card is handled ... I love movement!

This stamp can be reimagined so many times with so many backgrounds and I absolutely adore it.

Happy crafting! 


Saturday, October 10, 2020

Campfire Friends - Winslow and Rusty by Julian Charlton - Purple Onion Designs

Hi!  Today I'm revealing part of a new release by the illustrator Julian Charlton for Purple Onion Designs featuring the adorable Winslow and Rusty.  This is a one layer Copic coloured card and the stamp is called Campfire Friends.


It wasn't necessary to do any masking since the image with the duo huddled around their campfire nicely tucks underneath the separate tree image.   With those two images stamped on to Copic friendly cardstock I was quickly turning my attention to a couple of hours of colouring.


I started my colouring with the campfire and then the halo of blue surrounding it and rising up and up into the deeper BG shades.   I then turned my attention to producing a halo affect under the campfire using increasingly darker YG shades.   The tree trunk is E31, E55 and E27.


The fox (Rusty) was E11, E33 and E35 and I used W3 and W5 to add shadow.   The bear (Winslow) uses Y26, YR24 and YR27 and again W3 and W5 for shadow.  I finished by colouring the other tiny elements which give some nice pop of colour here and there and then I stamped the sentiment.  Finishing touch was to grab my white gel pen and draw in 4 point stars and some more dotted ones and add some highlighting to the characters and ground beneath them.

Finally I just die cut the scene to provide the simple faux stitched edge and with that the card was finished.

I will be back very soon with another card using these cuties in a different setting but the whole release is Fall and Halloween themed.

Happy crafting!
 

Thursday, October 8, 2020

Fairy Dance - Hello Bluebird Stamps

My card today places the sweet fairies from 'Fairy Dance' by Hello Bluebird Stamps into a sparkling icy winter scene for something a little bit different.


To construct this card I die cut white cardstock using the Winter Woods Overlay die.    A 'land' portion is formed in one solid piece and so I used some of the dies from Hill and Dale to break this up.   I used BG0000 to add a blue tinge to the top edges of each piece and then glued it all back together adhering it to some sparkling white cardstock.  This in turn was adhered to a white cardstock base.


On Copic friendly cardstock I stamped my Fairy Dance characters using Memento Ink in Rich Cocoa.  I coloured them with Copic markers and die cut using the coordinating dies.   I added details to their clothing with a white gel pen and Stickles glitter to their wings.   They were backed with foam tape and attached to the background.


Sentiments were stamped on strips of cardstock and I die cut the word 'Magical' three times from red cardstock using the Magical Sparkle Words die and glued those together so that it was nice and dimensional.   The three part sentiment was then arranged into the scene and adhered.

Thanks for stopping by today, happy crafting!


Monday, October 5, 2020

First Snow - Hello Bluebird Stamps

Hi, welcome to my blog and to this new winter themed card that uses First Snow, Frosty Flakes and the Gallery Frame #4 Die by Hello Bluebird Stamps.


To make these reindeer creating snow angels card. I first use the die to cut the snow angel shape 3 times out of glitter cardstock.  I then placed this glitter panel over a panel of Bristol Smooth cardstock in my Misti and I placed the stamp images within the die cut opening and stamped using Ink On 3 ink for no line watercolour painting.  I repeat this 2 more times for the other openings.


I watercolour painted the images using Kuretake Zigs, highlighted points with a white gel pen  and adhered the panel to a card base.   I went over the snow angel edge lines with a silvery/gold gel pen.  The glitter panel was backed with dimensional foam tape and layered over the top and the frame was die cut and backed with more foam tape and also applied.   Super chunky, dimensional card!


To finish the card I die cut several snowflakes from the Frosty Flakes Die and applied them with a sparkling clear sequin in the centre for some extra twinkle.  Finally, the sentiment was stamped and applied with yet more foam tape (I won't lie .... I get through this stuff)!!!!

Happy crafting!

Nicky x