Showing posts with label Easter. Show all posts

Friday, April 18, 2025

Alex Syberia Designs - Spring Meadow Release Blog Hop & Giveaway


Hello everyone!  Welcome to my blog, where I hope you are hopping along with the Alex Syberia Designs brand new 'Spring Meadow' Release which is available NOW!  This link will take you to the company's blog hop post for this release and it is where you'll find tons of information and inspiration from the Design Team.

Alex Syberia Designs is giving away a £30 (or $30 for US winners) gift certificate to one winner and three other lucky winners will win a £15 (or $15 for US entrants).  The giveaway is open internationally.  Prizes will be awarded in GBP (£) for non-US winners and USD ($) for US winners.


All four winners will be drawn from participants who enter this Blog Hop by midnight BST April 27th, 2025.


Winners will be announced on the Alex Syberia Designs blog 'Giveaway Winners' page on April, 28th, 2025.


One final bit of useful information - the US Alex Syberia Designs shop can be found HERE and the UK/International Alex Syberia Designs Shop HERE.


Now please read on to learn how I made this card.


My first card for this release features the new Julian Charlton illustrated stamp set called Hoppy Easter.  Easter may be in the name but this stamp has flexibility well beyond Easter as I'll demonstrate in a card to be shared on Sunday, so look out for that.

I started by ink blending a smaller white panel of cardstock using Fresh Pink and Matcha inks by The Stamp Market.  I spattered on some white acrylic paint, backed the panel with white craft foam and adhered it to an A2 white panel of cardstock and then to my card base.

I stamped the Hoppy Easter images in black ink and coloured with the following Copic marker combinations:-

Bunnies - E31, E42, E41, E40
Large Eggs - E0, E000, E0000, C3, C1, C0
Mint - BG32, BG11, G0000
Pink - RV02, R21, R00, RV0000
Damselflies - W3, BG11, G0000

I added one or two highlights with a white gel pen than die cut using the coordinating Hoppy Easter dies, backed each image with dimensional foam tape and adhered to the ink blended background.


To complete the card, I also stamped and die cut the sentiment (one of many included in the stamp set) and I used fine tipped felt pens to add in a little interest to the grass and with that this card was done!

Please continue to hop along with the other designers using the hand list of links I have provided below and don't forget to enter the giveaway.  Thanks and good luck!


Wednesday, January 22, 2025

Pink & Main - Easter Flag Shaker Card


Welcome to my blog and my third of three cards created for Pink & Main for their January 17th release.  Again with this card I'm back to using the Easter Flag stamp set  but this time I'm using the main image and it is so cute!

To create the card I took a white A2 panel of cardstock and I used their new Stitched Egg Dies to create and egg shaped opening.  I took the negative cut and ink blended in pastels and adhered it to another white A2 panel.  I backed the first panel with acetate and formed a shaker pocket with dimensional foam tape around the ink blended egg and I sprinkled on some of Pink & Main's new 'Easter Mix Confetti' (also seen in the dish on the left of the photos) and I then closed the shaker unit by apply the top panel to the second panel.


I stamped the Easter Flag image and the painted eggs using Eiffel Tower ink by MFT.  I used theses Copic markers to colour:-

Bunnies - N2, N1, N0, E40, R0000
Blush - R22, R21, R20, R00
Eggs - Y00, RV02, YG41, B000
Flag - R00, R000

I highlighted and then emphasised their eyes with a black glaze pen, die cut and adding it to the background with dimensional foam tape.


I wanted to keep the card as CAS as possible and so I finished with some white Nuvo drops and then this fun shaker card was finished.

Thanks for stopping by and if you'd like to know what else I made from the release please keep scrolling to the next two posts!


Monday, January 20, 2025

Pink & Main - Easter Flag


Hi there!  Welcome to my blog and the second of three cards created for Pink & Main's latest release.  Keep scrolling to see the card shared 2 days ago.  This card features their new Easter Flag stamp and dies plus the useful Stitched Egg Dies which is a stacked set of different sizes.

I started by die cutting two eggs using the Stitched Egg Dies and I used two images from Easter Flag and stamped one on each egg using Eiffel Tower Ink by MFT.


I coloured the images with these Copic combinations:-

Bunny & Basket - N2, N0, E41, E40, R000
Blush - R22, R21, R20, R00
Pink - RV02
Yellow - Y21
Blue - B00
Green - YG41
Shading - C3, C1
Grass - YG41, G20
Sky - BG0000


I stamped and die cut the sentiment.

I then used a background stamp from my stash and using Powder Blue ink by The Stamp Market I stamped a white panel of cardstock to provide the floral backdrop.  I die cut the panel to give the faux stitched edge and glued it to an A2 card base.

I glued the basket of eggs directly to the background and with the bunny image and sentiment I popped them up on dimensional foam tape.

Shop Pink & Main's new release now, so much seasonal cuteness to be enjoyed and I'll be back in 2 days with my final card for the release.


Friday, January 17, 2025

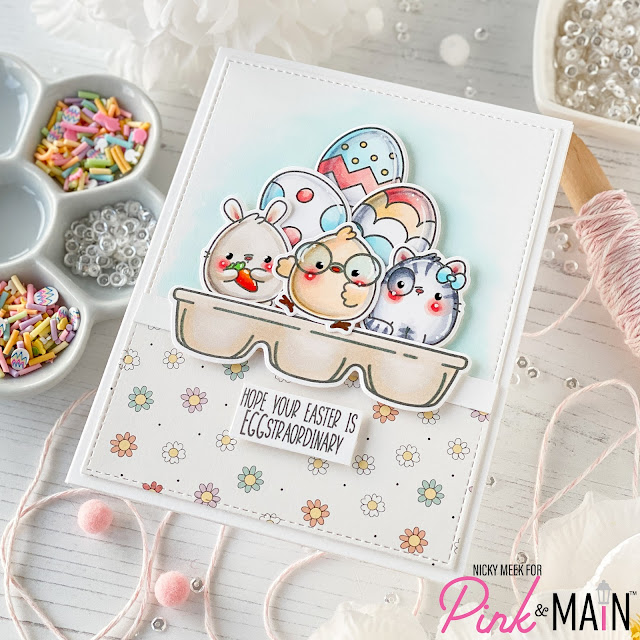
Pink & Main - EGGstraordinary


Hello!  Today I'm happily guest designing for Pink & Main's newest release and I'm sharing the details on this card made using their adorable new EGGstraordinary stamp set.

I stamped the images using Eiffel Tower ink by MFT and I coloured the images using the following Copic markers:-

Chick - YR31, YR20, E50, BG0000
Bunny - E42, E41, E40
Kitten - C5, C3, C1, C0
Blushes - R22, R21, R20, R00
Eggs - R22, R20, R00 & BG01, B00, B000 & Y21, YR20, E50 & C3, C1, C0
Egg Carton - E42, E41, E40
Shading - C3, C1, C0

I highlighted with a white gel pen and used a black glaze pen to emphasise the eyes and die cut.


I die cut a panel of cardstock and ink blended a blue background.  Over this at the bottom I layered some patterned cardstock from my stash.  I backed all of the stamped images and applied them to the background using foam tape.  

The decorative panel was glued to an A2 white card base.


I chose a sentiment from some of the choices included in this fun stamp set and stamped it on a perfectly sized piece of cardstock which I applied with more foam tape.

Thanks for stopping by my blog today, I'll be back on Monday 20th with my second of three cards created for Pink & Main's new release so I hope you return for that.

Happy crafting!


Friday, March 22, 2024

Sunny Studio Stamps - Mini Grass Border Die with Chickie Baby


You can find me over on the Sunny Studio Stamps blog today with this new Easter card featuring the Mini Grass Border Die along with other Sunny products.  Please use THIS LINK to go there directly.  Thank you and have a lovely day!


Friday, March 8, 2024

Sunny Studio Stamps - Big Bunny


Hey there!  You can find me on the Sunny Studio Stamps blog today with this fun Easter card featuring the Big Bunny stamp set.   If you would like to learn all the details please click THIS LINK to be taken directly to my blogpost.  Many thanks and have a great day.


Wednesday, February 14, 2024

Hello Bluebird Stamps - Easter Egg Hunt


Hi!  I'm on the Hello Bluebird Stamps blog today with this new Easter card.  Please join me there for all the details by clicking THIS LINK which will take you directly to the post.  Thank you.


Wednesday, January 31, 2024

Hello Bluebird Stamps - Little Painters


I'm over on the Hello Bluebird blog today with these two Easter cards.  If you'd like to join me there where I share all the details, please just used THIS LINK to go directly to the post.  Thank you!


Saturday, March 18, 2023

Hello Bluebird Stamps - Spring Challenge


Hi everyone!  Just a super quick blogpost today to share my inspiration card for the newest design challenge by Hello Bluebird Stamps.

If you're reading this, I encourage you to visit the Hello Bluebird blog today to see lots of design team inspiration and to read the challenge rules.   A randomly selected winner will receive a $50 gift certificate to the Hello Bluebird shop.

This is an Instagram only challenge and you must use the #hellobluebirdspringchallenge hashtag so that your post/entry can be found.  You can make a spring themed card, or use the colours from the mood board above to enter or as I have done, I've combined the two.

My card today was created using the:-

Nesting Circle Die
Little Painters Stamps and Dies
Grass Knoll Die


Friday, March 19, 2021

Lamb Cuddle - Rachelle Anne Miller

A new digital stamp card today for Rachelle Anne Miller Digital Stamps and this card uses the sweetest image called 'Lamb Cuddle' for a sweet Easter card.


I received the digital stamp image to my inbox and printed at 90% of size using my home printer and Copic friendly cardstock.


I used a wide array of Copic markers to colour this scene and it was so much fun!

I used a die from my stash by Studio Katia to size down to an A2 panel and giving it the subtle pierced edge.

I got the sentiments and sentiment strips/speech bubble from Hello Bluebird Stamps and stamped those and applied with foam tape for some subtle dimension.


The final touch was to add a few sparkling clear sequins for a subtle twinkle of interest.

Happy crafting!


Tuesday, March 17, 2020

Easter Egg Hunt - Hello Bluebird Stamps

Today's card for Hello Bluebird Stamps has a lovely soft look because I used a no-line Copic technique.  Featured here is the Easter Egg Hunt stamp set.


To create this card I first made the background panel by brushing on Distress Inks with Clarity Stencil Brushes, then distressing with paint splashes.

The clouds and grassy hills were created using the Grassy Knoll die set.  Once they'd been die cut I ink blended them using Cracked Pistachio for the grass and Tumbled Glass for the clouds.   I took what would be my lower portion of grass and I stamped and heat embossed it with the Easter Blessings sentiment from the Spring Banner Script stamp set.  The embossing is very raised because I used my Misti and repeated the process 3 or 4 times.


I assembled these die cuts with foam tape behind them and applied them to the background panel which in turn was adhered to a 110lb white cardstock base.

On Copic friendly cardstock I stamped my images from Easter Egg Hunt using Nuvo Hybrid Ink in 'Soft Suede'.  I inked up my stamps and stamped them off once on some scrap paper and then stamped again on my Copic paper which gives just enough of an image to colour in but you can make the lines disappear.

I coloured the images with an array of Copic markers then highlighted some points and finally I die cut, backed them with foam tape and added them to the scene.


I used a Sakura Gelly Roll Pen in a pale silvery gold to accent the butterfly wings a little and I dotted a little more into the hazy background and with that the card was complete.

Happy crafting!

Nicky x

Thursday, March 5, 2020

Springtime Easter Card - Hello Bluebird Stamps

Hello, welcome to my blog!  I have a new card today for Hello Bluebird Stamps and it is Easter themed.   I've combined images from Spring Gatherings and Springtime for this card, they work beautifully together.


The first step was to create the pastel plaid background panel which I did using a 4 part stencil kit by Honey Bee Stamps (although I only used 3 of the 4).   I brushed on Distress Inks using Clarity Stencil Brushes for a super soft look with no hard edges.  I applied this panel to a white cardstock base.


I die cut the Gallery Frame #2 Die and used just the frame which I backed with foam tape and applied to the background.  I then used the Grassy Knoll die to create the section of grass which I delicately ink blended with Distress Ink in Cracked Pistachio.  I stamped the sentiment and backed this portion with foam tape also and applied it within the frame.

On Copic friendly cardstock I stamped the images from the two stamp sets using Memento Ink in Rich Cocoa.  I used an array of Copic markers to colour everything and then I die cut and applied them to the background using either a single or double layer of foam tape to achieve some fun depth.


Cheeks were highlighted with a white gel pen and I decided that no other embellishment was needed for this card.

Appreciate you stopping by to read today.  Happy crafting!

Nicky x

Saturday, February 8, 2020

Chickie Baby - Sunny Studio Stamps

Hello!  I'm delighted to be guest designing for Sunny Studio Stamps again today and have had so much fun creating with the unapologetically adorable Chickie Baby stamp set.  I have TWO cards for you today (so keep on reading and scrolling) that feature the stamp set in completely different ways!

My first card also uses one of the dies from the Eyelet Lace Borders die set.


To make this card I die cut one of the Eyelet Lace Border dies 12 times over from 3 different coloured card stocks.  I adhered them to one another in layers then set them aside to dry.   I took a panel of cardstock and ink blended the focal point using Distress Ink in Spun Sugar.  I added in a few dots of white gel pen just to break it up a little.


I adhered the lace borders to the panel by backing them with foam tape, then popped it in my Misti and stamped the sentiment.  This background was then applied to a 110lb white cardstock base.


Now for my Chickie Baby images.  I stamped them all with Memento Ink in Rich Cocoa and coloured them with Copic markers, highlighted some points with a white gel pen and then die cut.  Each was backed with foam tape and applied.  To make it just a little more girly and playful I added some Nuvo Crystal Drops amongst the chickies.  Card complete!

---------------------------------------------------------------------------------------------------------------------

My second card using Chickie Baby is a slimline card with finished dimensions of 8 1/2in x 3 1/2in and this allowed me more space to create a big scene.


I grabbed a panel of smooth white cardstock and ink blended the sky using Distress Oxide in Tumbled Glass.  I applied the panel to the prepared cardstock base.  I took a couple of other slimline panels and used a grass edge die from my stash to create 4 undulating hills.  They were ink blended with Distress Oxide in Twisted Citron and areas darkened using Mowed Lawn (seemed appropriate!).   The sentiment was stamped.   These sections were all adhered down to the background panel which in turn was adhered to the 110lb white cardstock base.


The Chickie Baby images were again stamped with the Memento Ink in Rich Cocoa and coloured with Copic markers, highlighted with a white gel pen, die cut and adhered either directly or with foam tape to build depth.  I dotted in patches of daises with a white gel pen and with that this card was also complete.


I hope you have been enjoying your purchases from the most recent Sunny Studio release and that I've provided you with some fun inspiration.

Nicky x


Sunday, March 31, 2019

Spring Gatherings - Hello Bluebird

Hello,  I have a new card today using Spring Gatherings from Hello Bluebird Stamps.


This is such a great stamp set since it works as well on its own as I've done here, as it does paired with Easter Egg Hunt.

This card was started with an ink blended panel created with randomly blending Distress Oxides in Cracked Pistachio, Squeezed Lemonade, Spun Sugar and Tumbled Glass.  I then die cut the 2 part frame using the Gallery Frame #1 Die.  I backed the frame with foam tape and applied it to the background panel.  Through the larger window I stamped the sentiment with Ranger Archival Ink in Potting Soil.


On Bristol Smooth cardstock I stamped my images again using the Potting Soil ink.  I watercolour painted the images using the following:-

Tombow ABT 451, 243
Kuretake Zigs in Flesh Colour 071, Pale Pink 028, Light Pink 026, Cool Gray(1) 099, Pale Yellow 055, Oatmeal 064, Mid Gray 096.

The images were die cut and backed with an extra thick foam tape and applied to the scene.


A few points were highlighted with a white gel pen and I stamped Happy Easter inside the card!

Pretty quick and simple design that some of you newer card makers might like to tackle.

Happy crafting and see you next time!

Nicky x

Thursday, February 7, 2019

Avery Elle New Release Blog Hop!


Hello and thank you for joining in the fun on the Avery Elle Blog Hop as we celebrate a big new release!  My card today features the brand new Easter Chicks mini stamp set that comes with coordinating dies.


My card consists of a panel of Bristol Smooth cardstock that was repeatedly and randomly stamped using all the elements from the mini stamp set using Distress Ink in Antique Linen.  I watercolour painted all images using the following ...... Kuretake Zigs in Oatmeal 064, Pale Orange 054, Pale Pink 028, Pale Yellow 055, Green Shadow 049 and Haze Blue 302.  Butterflies were done with an Arteza Real Brush Pen in Ice Blue/A173 and cheeks were blushed with a Tombow ABT in  shade 761.  Phew!  That was quite the list today!!

I love to do background cards, especially when images are as cute as these are.  Had I just stamped the three chicks once each I'd have been left craving to colour them more and more - so doing what I did was pure self indulgence!


I have this lovely cardstock in my collection that is right on the cusp of where pale pink meets pale beige and I love the subtlety of it and I thought it worked well with the egg shells.  I framed my panel using the Reverse Pinked Die because the inner edge echoed the broken eggshell image and applied it with dimensional foam tape.  I then applied all of that to a panel with a basic stitched edge in the same pink cardstock since I knew the stitched edge would still show.

From the negative cut I had remaining after die cutting the frame I made the Wonky Bow.  Now ..... the United States Postal Service will iron this bow flat for the bargain price of a 1st class stamp!!!!  Ultimately that is not the look I'm going for, I want my bow 'pert' and to help keep its shape I use some extra thick dimensional foam tape, I cut a piece that will disappear inside the loops of the bow.  I adhered the bottom down but I leave the peel away paper on the top side, that way, when the card is compressed 'ironed' it will bounce back up (I do hope that is clearer than mud)?  The good news is that I know what I mean and that's half the battle, much like making yourself laugh!


I adhered the bow into position and then using one final piece of the pink cardstock I stamped the sentiment from the Easter Chicks stamp set with Versamark Ink and heat embossed with silver embossing powder!  This was adhered with a double layer of foam tape.  I attached the entire decorative panel to a 110lb white cardstock base which is super sturdy and hey presto, card complete!

Thanks for stopping by to read today, hope you enjoyed my card, please keep scrolling to find the next designer on the the hop to click on.

Nicky x

Avery Elle  
Caryn Davies
Heather Campbell
Yainea
Melania Deasy
Katie Gehring 
Amy Kolling 
Ashley Marcu
Elena Roussakis
Nicky Meek (you are here)
Betsy Veldman

To celebrate our Spring 2019 Release Blog Hop, Avery Elle is giving away a $25 Gift Certificate to one random winner.  To enter to win just comment on this post.  There is no purchase necessary and you must be 18 years of age or older to enter.  This giveaway is void where prohibited.  You can also do options 2, 3, 4, 5 or all 6 of the following to increase your chances of winning. You have until midnight Sunday, February 10th to enter.  The winner will be announced on the Avery Elle Blog on Monday, February 11th .  All products are available for purchase in the Avery Elle store right now.  You can check them all out here
To enter to win you can do 1, 2, 3, 4, 5 or all 6 of the following to increase your chances:


  1. Comment on any of the design team's posts and/or here on the Avery Elle Blog
  2. Follow us on Twitter and tweet the contest (we are @averyellestamps )
  3. Follow us on Facebook (we are www.facebook.com/AveryElle ) and share us with your friends - make sure they tell us you sent them.
  4. Follow us on Pinterest
  5. Become a blog follower through email (comment on the Avery Elle blog if you already follow us)
  6. Follow us on Instagram (we are https://www.instagram.com/averyellestamps/).

Thanks for stopping by to take a peek. Have a great day!