Showing posts with label Love. Show all posts

Wednesday, May 27, 2026

Simon Says Stamp - 'Always There' May Release - Floral Word Builder


Well, it's been a minute hasn't it?  Simon Says Stamp are finally out with a new release after the Create event postponed the April one. They are making up for it with an incredible selection of new products and they call it their 'Always There' release, which I encourage you to explore because the release is live NOW!

For my first card I'm working with the new Floral Word Builder stamps and dies together with the Mythic Blooms embossing folder. I framed out the card in white using the A2 Frames die set which I consider a craft room essential.


I started with the new embossing folder and I embossed an A2 panel of Simon's 'Apricot' cardstock.  I adhered this to the card base and framed it out using the A2 Frames.

I stamped the L, O, V and E from the Floral Word Builder.  The set of letters included will allow you to spell out several words.  I coloured with the following Copic markers:-

Letters - R29, R27, R24
L - YR07, YR14, Y38
O - YR21, YR31, YR30
V - R22, R20, R00
E - YR02, E95, YR82
Green - G21, YG61

I die cut and applied each letter to the embossed background.


I wanted this card to be very simple so I resisted the usual sequins and decided to glaze each red letter instead and so they are all lovely and glossy and catch the light when the card is handled. I use Spellbinders Glaze & Glue because it is the only formula I've found that is non-yellowing. Don't be put off by initial application.  It will dry with no yellow.

Happy crafting and shopping friends!


Wednesday, July 2, 2025

Alex Syberia Designs - July Release Blog Hop and Giveaway


****************************************


I'm happy to be sharing my first card for the brand new release by Alex Syberia Designs which is available now for purchase.  Summer florals and butterflies and great sentiments await you, there is much to tempt.  Here's a handy link to their release blogpost. 

Giveaway Information .....


Alex Syberia Designs is giving away a $15 (or £15) gift card to four lucky winners. 


Open internationally. All 4 winners will be drawn from the entrants that have played along with this Blog hop by midnight BST July 10th, 2025. Winners will be announced on the Alex Syberia Designs blog 'Giveaway Winners' page on July 11th, 2025.


Read all the way to the bottom of my blogpost to find the blog hop order links.  Thank you!


My card today has used the following products:-

Peony Blossoms BetterPress Plates (NEW!)
Essential Sentiments Press Plate (NEW!)


I used a die from the Good Day die set to create a smaller than A2 white panel with a decorative edge.  I glued this panel to a white A2 card base.

I hot foiled using the Peony Blossoms press plate instead of using the BetterPress (remember, press plates do both)!  I used gold foil and then used Copic markers in RV04, RV02, RV00, RV000, Y00 and Y000 to colour the blooms, inspired by some peonies in our own garden.  Leaves were coloured with YG67, YG13 and YG11.


I fussy cut the image and backed it with foam tape and applied to the white background.

I hot foiled the Essential Sentiments all in one go so that I had this sentiment and all of the others for future projects.  I used a holographic gold for a little dazzle to do this and the set comes with a coordinating die ... who doesn't like die cutting their sentiments beautifully?  I applied the sentiment with more foam tape and a few flat cup gold sequins were adhered to complete the floral design.

I'll be back on Friday July 4th with a second card using products from the release.  The Design Team will be holding an Instagram Hop that day with lots of inspiration.

Blog Hop Order


Friday, February 28, 2025

Alex Syberia Designs - New Release Instagram Hop


Thank you for stepping away from the Alex Syberia Designs Instagram Hop and joining me here for the details on my card featuring products from their February release.  For this card I have used the following products:-


I used black ink to repeat stamp a background design using floral images from From Our Hearts.  I trimmed this panel smaller than A2, backed it with white craft foam and applied it to my white card base.


I then stamped the three blooms and some greenery on some more white cardstock and I coloured with the following Copic marker combinations:-

Blue Flower - B63, BV13, BV20
Pink Flower - RV63, RV52, RV10
Yellow Flower - Y26, YR31, E51, YR30
Greenery - YG95, YG93, YG01

Images were die cut using the coordinating dies and then the blooms were added with dimensional foam tape.  I tucked the greenery behind the flowers and when I was happy I applied a little foam tape to the leaves to pop them up.


I completed the card by stamping the sentiment words with black ink and die cutting and applying with little bits of foam tape and the final touch was the addition of some water droplet style embellishment which were added with glue.

I hope you enjoyed my card inspiration today, always a useful style to create and keep on hand.  Thank you for stopping by!


Wednesday, February 26, 2025

Alex Syberia Designs February Release Blog Hop & Giveaway


I thank you for joining me today on my blog where I'm sharing my first card for Alex Syberia Design's February release.  Love cards shouldn't only be reserved for Valentine's Day and there's some wonderful love and friendship themed products to choose from in the new selection being offered.  Did you hear that there is a UK online site for Alex Syberia products now and you can find it HERE?  This shop serves the UK and EU but also ships across the world as does the US online site which is found HERE.  Last but not least THIS LINK will take you to the Alex Syberia Designs blog hop post which I encourage you to visit.  Be sure to read all the way to the end of my post for GIVEAWAY information and to find a link the next designer on the blog hop.  Thank you.

My first card for the release uses the following products:-


I ink blended a white panel using Blush ink by The Stamp Market.  I faded the ink so it was darkest at one end and lightest at the other.  Over this I glued a white die cut created using the Heart Collage Die.  I then framed this out with a pale peach frame created using the Good Day Quilted Rectangles Die Set and some cardstock from my stash.  The frame was applied popped up on foam tape.


I then took the new Love & XOXO Die Set and die cut 4 times.  Twice in white cardstock, once in pale blue and finally in red.  I glued the letters in stacks with the white slightly offset and you also get a glimpse of the pale blue when viewed from an angle and this will eventually tie in to some of the colouring on the penguins.

I determined a straight line and adhered the big XOXO to the card background.

The images from Penguin Love were stamped with black ink and coloured with the following Copic markers:-

Penguins - T6, T5, T4, T3, G00, G0000, C3, C1, C00, Y19, YR07
Blush - R22, R21, R20, R00
Red - R29, R24, R05
Pot - G00, G0000, C3, C1

All images were die cut using the coordinating dies.


I backed the images with foam tape and applied them to the scene and set them standing on the Roses Are Red sentiment from the same stamp set.

To complete the card I took out my white gel pen and I highlighted the coloured images and the XOXO and then I did some highlights in the actual background collage to create further interest.

Last but not least a few sparkling clear sequins created a subtle sparkle.

Thanks for stopping by!

Giveaway info:


Alex Syberia Designs is giving away a $50 gift certificate to 1 winner and a $15 gift card to 3 lucky winners. 


Open internationally. All 4 winners will be drawn from the entrants that have played along with this Blog hop by midnight GMT March 8th, 2025. Winners will be announced on the Alex Syberia Designs blog 'Giveaway Winners' page on March 9th, 2025.


Blog Hop Order:


Alex Syberia Designs

Emelie
Erin
Colleen

Sylvie

Carly

Amanda

Bobbi

Brenda

Nicky (you are here)

Nicoletta

Sandi


Monday, January 6, 2025

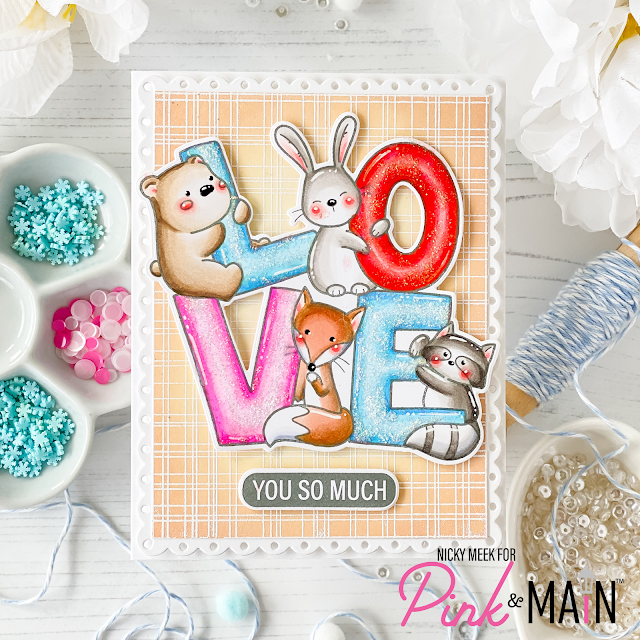
Pink & Main - Love Letters


Hello friends!  I hope 2025 has got off to a good start for you all personally.  Today I'm sharing a card made as a guest designer for Pink & Main and which frankly has you covered year round but of course with Valentine's Day right around the corner there is special focus.

This card features their new 'Love Letters' stamp set, together with the coordinating die.  The scalloped panel in the back was made using Fancy Scalloped Rectangle Stackables Die by Lawn Fawn and the patterned background created using the now discontinued 'Woven' background stamp from Hello Bluebird.

Ok, lets get started!  As with just about every card I create I started with the background and I kept it neutral so that the colourful letters popped.  I took a panel of cardstock and ink blended using Tea Dye Distress Oxide Ink, inking a little more around the edges and fading towards the centre focal point.  I hit this with my heat gun to dry it then stamped the panel using Versamark Ink and the Woven background stamp then I heat embossed in white.


I die cut a white panel of cardstock using the scalloped die and then glued the blended panel to that.  I backed the panels with white craft foam and applied it to a white card base.

I used Eiffel Tower ink by MFT to stamp the image and I coloured with the following Copic markers:-

Bear - E44, E43, E42, E41, E40
Bunny - W3, W2, W1, W0, W00
Fox - E35, E34, E33, E11, C3, C1, C0
Raccoon - W6, W5, W4, W2, W0, C3, C1, C0
Blushes - R22, R21, R20, R00

I used a black glaze pen to emphasise their noses and eyes and a white gel pen to highlight a few spots.


I used the coordinating die to die the image and also the stamp sentiment.  I backed it all with dimensional foam tape and applied to the background.

The final act was to grab my Stickles Glitter in 'Diamond' and glitter up those letters in all their glory and with that done this card was complete.

Shop this delightful stamp set by clicking the Pink & Main link at the top of this blogpost.  Thanks for stopping by!


Saturday, September 21, 2024

Simon Says Stamp & Alex Syberia Design STAMPTEMBER - Close At Heart


Today is the turn of Alex Syberia Designs and the Simon Says Stamp #stamptember event which has been ongoing all month long.  Alex Syberia Designs submitted this 'Close At Heart' floral stamp set with some lovely sentiments and here's how I made the card.

I took a panel of white cardstock and stamped the floral image using Memento Ink in Tuxedo Black.  Each time I stamped off the edge of the panel and I kept in mind where I'd want the sentiment to go and which I also stamped.


I coloured the floral images using Copic markers in the following combinations:-

Blooms - BV13, B63, BV31
Foliage - YG67, YG45, YG25

I then used Matcha ink by The Stamp Market and came around the edges and finishing with a soft focal point.  Following this I spattered on some white acrylic paint that I loosened with a drop or two of water and then I die cut the image using the largest die from Good Day Wilted Rectangles Die Set which gives the panel that attractive edge.

I backed the panel with white craft foam and then adhered it to a white A6 panel and then to the card base.


To finish this simple card I added 3 Nuvo Crystal Drops in Gloss - Berry Blue.

Many thanks for coming to learn about this Stamptember card, have a lovely day!


Friday, March 1, 2024

Sunny Studio Stamps - Tree Branch Dies


Hello!  You can find me over on the Sunny Studio Stamps blog today with everything you need to know about this new card.  Please use THIS LINK to be taken directly to the blog.  Thanks and have a great day!


Sunday, January 14, 2024

Streamside Studios - Chocolate Covered Strawberry Cows


Hello friends and welcome to my blog where today I'm guest designing for Streamside Studios using their sweet stamp set 'Chocolate Covered Strawberry Cows' .... which is one delicious mouthful!

To start the card I first prepared an A2 panel of patterned cardstock from Lawn Fawn.  Over this I layered a smaller white panel that I die cut to give it a faux stitched edge and I ink blended the panel using 'Blush' Ink by The Stamp Market.  I popped the panel in my Misti and stamped the sentiment three times over for a  super bold image.  This panel was glued to the patterned panel and it was all attached to my card base and set to one side.


Next up I created the 'Strawberry Basket Die' as a shaker.  This die is by Hello Bluebird stamps and I filled it with a fun mix of shaker filler provided to me by Streamside Studios.  I adhered the shaker to the blended background and then created a grassy edge for the bottom of the card which I also blended with a little 'Blush' ink as mentioned above.  This was attached with an extra thick dimensional foam tape.

I used Memento Ink in Rich Cocoa to stamp the images from 'Chocolate Covered Strawberry Cows'.  I coloured with the following Copic marker combinations:-

Cows - E79, E77, E74, E71, C3, C1, C0, R20, R00, E31
Strawberries - R08, R22, R21, E79, E77, E71, G07, YG06
Hearts - R08, R22


Images were fussy cut and applied to the scene with foam tape.  Points were highlighted with a white gel pen and I emphasised their eyes with a black archival pen so the expressions were more pronounced.

I had great fun guesting for Streamside Studios and hope you like what I created.


Wednesday, January 10, 2024

My Favorite Things - January Release Spotlight Day


Greetings Earthlings!  Today we are spotlighting the January release from MFT Stamps which is already available for purchase so go and grab your favourites before they go out of stock.  Here's what I've used to make this card:-

Wonky Stitched Rectangles Stax Die-namics

I ink blended a white panel using Peacock Feathers Distress Oxide Ink and dotted in some interest with a white gel pen and Copic.  The panel was die cut using the Stax Die-namics and I popped it in my Misti and stamped the sentiment.  The panel was backed with craft foam and applied to another white A2 panel then to the card base.


I stamped the images from Monster Love using Memento Ink in Rich Cocoa.  I coloured with the following Copic marker combinations:-

Landscape - G19, YG45, YG13, YG01
Spaceship - C5, C3, C1, C00, BG000
Monster (left) - BG13, BG32, BG11, W3, W1, YR09, YR04, RV02, RV63
Monster (middle) - RV02, RV10, RV000, YR09, YR04, Y38, BG32, BG11
Monster (right) - RV63, RV02, RV000, BG32, BG11, R29


Images were highlighted with a white gel pen and die cut then the landscape was glued directly to the background and all other elements applied with foam tape.  Card complete!

Thank you for stopping by my blog today and don't forget to visit and subscribe to the MFT You Tube Channel for endless how-to videos, inspiration and product reveals.


Tuesday, January 9, 2024

My Favorite Things - January Release Day!


The January release from MFT Stamps is now LIVE and available for purchase.  So many cute products to choose from and perhaps my card today will inspire you.   I've used the following MFT products to make this card:-

A2 Rectangles Frames Die-namics
Joyful Plaid 6 x 6 Paper Pad

I started by creating a patterned panel of cardstock which I adhered to an A2 panel then to my card base.  Over this I layered two frames created from sturdy white cardstock using the frames die-namics listed above.  I backed the outer/larger frame with foam tape and applied to the card base and then did the same with the smaller one whilst retaining the inner cut that was produced in cutting it.


I ink blended the inner panel to create toning grass and sky to work with the surrounding frame area and glued it in place.

I stamped the elements from Unbearably Sweet with Memento Ink in Rich Cocoa and coloured with the following Copic markers:-

Bears - E43, E31, E41, E40, R21, R00
Hive - W4, W2, W0
Branch - E77, YG97, YG95
Honey and Bee's Nest - Y28, Y26, Y21, E000

Points were highlighted with a white gel pen and then the images were die cut and applied either directly with glue or popped up on foam tape.


The sentiment was stamped on a sentiment strip and glued to the bottom of the frame and that was all that was needed to complete this sweet scene.  Aren't those honey bears adorable, love their expressions.

Thank you for stopping by my blog today and don't forget to visit and subscribe to the MFT You Tube Channel for endless how-to videos, inspiration and product reveals.


Monday, January 8, 2024

My Favorite Things - January Release - 1 More Day To Go!


I'm very happy you have stopped by my blog today where I'm sharing this easel card that was created using the latest stamp set illustrated by Stacey Yacula.  Here's what I've used:-

Blueprints 27

The photo at the top of this blogpost shows the card opened into an easel in one of two positions.  Below is the card in it's second easel position.   A recipient can choose which position to sit the card open depending on the height it will be at but also the sender can choose to write above the inside sentiment or around it or just write on the back of the whole card.


Here's a link to an easel card tutorial by Jennifer McGuire.  Start out with a basic design and as you grow in confidence you can do endless more complicated, charming designs.  They're really not tricky!

So for this design I used Blueprints 27 to cut the same scallop edged panel twice.  I ink blended both panels after masking off the edges and stamped the larger sentiment.  I was then able to attach the easel to the back of the panels with glue.


I stamped the images from Micest Thing using Memento Ink in Rich Cocoa and I coloured with the following Copic markers:-

Mice - E31, E41, E40, C3, C1, C0, W3, W1
Blushes - R22, R21, R00
Ears - R21, R00
Hearts - R08, R22, R20

I then die cut with the coordinating die-namics.


Images were backed with foam tape and I also stamped the smaller sentiment and backed it with foam tape too.   I applied the sentiment for one position to sit the easel and then with the second position I made sure to align the top of the mouse with the top of the thought bubble so that the easily would sit straight if placed in that position.  I then stuck the elements to the main front of the card.

Points were highlighted with a white gel pen.


Thank you for stopping by my blog today and don't forget to visit and subscribe to the MFT You Tube Channel for endless how-to videos, inspiration and product reveals.