Showing posts with label Purple Onion Designs. Show all posts

Friday, June 12, 2026

Purple Onion Designs - Sunshine & Daydreams New Release!


Hello! I have a new card today for Purple Onion Designs celebrating their new Sunshine & Daydreams release illustrated by Chilliezgraphy by Pei.

This darling image is called 'Flappy's Rainbow' and also uses a sentiment from the sentiment set called 'Sunshine & Daydreams Sentiment Set'.

I panel of kraft cardstock was adhered to a card base.  I took a smaller panel of white cardstock and ink blending with Speckled Egg Distress Oxide Ink to a soft focal point and I stamped the sentiment.  The panel was backed with white craft foam and applied to the kraft panel.


The Flappy's Rainbow image was stamped with black ink and coloured with the following Copic marker combinations:-

Flappy - E37, E35, E33, E11
Apron - E43, E42, E40
Beret - T9, T7, T5
Stool - E44, E43, E40, C3, C1, C00

Rainbow (top to bottom)

RV13, R20
Y38, YR21
Y15, Y11
YG13, YG03
G00, G000
B32, B91
V12, V00

I added a few splotches of some of these colours to Flappy's apron then I fussy cut and backed the images with foam tape and applied to the blended background.


I glazed Flappy's nose and parts of his beret using a black glaze pen and highlighted here and there with a white gel pen.

The finishing touch was the addition of the sparkling clear sequins.

Thanks for stopping by today!


Wednesday, June 10, 2026

Purple Onion Designs - NEW RELEASE - Sunshine & Daydreams


Happy to announce a new release of summery stamps from Purple Onion Designs which are available for purchase now.  Today I'm sharing a card made with the Chilliezgraphy illustrated image called 'Happy Cone Mobile' and I've added a sentiment from a new sentiment stamp set called 'Sunshine & Daydreams Sentiment Stamp Set'.
 
I stamped the adorable new image with Memento Ink in Rich Cocoa and I coloured with Copic Markers:-

Ice Cream Mobile - V01, RV52, RV00, RV000, W2, W0
Mint  - BG11
Cream - E51, E50, W3, W1
Chrome - C3, C1, C0
Tires - T6, T5, T4
Glass - BG11
Cone - W44, E43, E42, E41
Bear - E77, E74, E71, E70
Dog (right) - E93, E01
Dog (left) - C3, C1, C0
Mouse - C3, C1
Kitten - C5, C1, C00
Blushes - R22, R21, R20, R00

The image was fussy cut.


I created a panel of white cardstock measuring 4" x 5 1/4" and I ink blended sky and sand using Distress Oxide Inks in Antique Linen, Vintage Photo, Salvaged Patin & Peacock Feathers.

I decided where I wanted to place the coloured image and sentiment and ink blended in such as a way to create movement as the truck is definitely in motion if you observe the animal's ears and especially that sweet mouse hanging on for dear life!  To that end I created some 'whoosh' by leaving the area around the ice cream mobile very lightly coloured.

I splashed the ink blending with white acrylic paint watered down with a drop of water then backed the panel with white craft foam and adhered it to an A2 white panel and this was glued to the card base.


I glued the sentiment in place and added a few sequins for a final flourish, I highlighted areas with a white gel pen and added a little W3 and W1 shadows to the sand.

Check out this wonderful new summer release, there's so much to love and I'll be back in a couple of days with a new card to share.

Happy cardmaking!


Sunday, June 29, 2025

Purple Onion Designs - Spring Is In The Air Stamp Collection


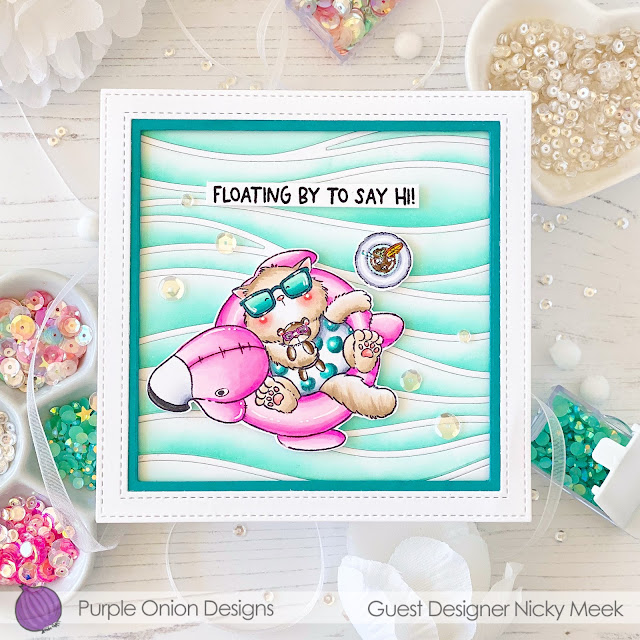
Hey, thanks for coming to read about my latest card for Purple Onion Designs which celebrates their brand new Spring/Summer release filled with ridiculous cuteness!  I have used Tofu's Flamingo Floatie, which is a stamp that forms part of the Spring Is In The Air Stamp Collection illustrated by Chilliezgraphy by Pei.  Everything is available for purchase now!


I started by creating a background using discontinued dies by Hello Bluebird Designs.  I then stamped the new stamp image in black and coloured with Copic markers.  Flamingo Floatie - RV04, RV02, RV00.  Tofu, E43, E42, E41.  Turquoise combination - BG78, BG57, BG15, BG32, G000.

The image was fussy cut together with the drink floatie image and backed with foam tape and applied.


To complete the card I stamped and applied the sentiment.  The sentiment is part of the new Summer Day Sentiment Set which I love. 

I highlighted with a white gel pen and applied a few sparkling clear sequins to the water.

Shop the new release TODAY!!!  Enjoy!


Thursday, June 26, 2025

Purple Onion Designs - NEW RELEASE!


Welcome to my blog and a quick look at my first card of several that showcases the brand new release from Purple Onion Designs which is available now!  I shall be working with the stamps from Chilliezgraphy by Pei in her 'Tofu & Friends Spring Is In The Air Stamp Collection'.  The sweet image I'm working with today is called 'Picnic Buddies'.


I ink blended a little grass and sky on a panel of cardstock that I had die cut.  I added a frame around it and backed both pieces with white craft foam and applied to a cream panel then this was applied to an A2 white card base.

I stamped the Picnic Buddies stamp set and coloured with Copic markers.  Pig - YR02, E95, E01, E00, W3, W1.  White Goose - E50, E41, E40, YR07, YR04, Y38.  Blue - B24, B32.  I added a design to the tea set and shadowed white areas with C5, C3, C1, C00.


I backed the image with foam tape and applied to the background and I stamped a sentiment strip with a sentiment from Friendly Warm Wishes Sentiment Set.  This too was added with foam tape.

I completed the card with some highlighting on the image with a white gel pen and the addition of some tiny sparkling clearly sequins

Thank you so much for stopping by.  Check out the new release, there is MUCH to love from different illustrators.  I'll be back very soon with something new for this release.


Tuesday, February 4, 2025

Purple Onion Designs - Flowers From Tofu


I'm back with a new card for Purple Onion Designs today that features their Flowers From Tofu stamp illustrated by Chilliezgraphy by Pei.  Here's a list of links to the products used:-


I took a panel of white cardstock measuring 4 x 5 1/4 inches.   I used the Vintage Postcard Stamps to stamp all the fun little features to build a postcard and I found some Purple Onion sentiments from my stash to type the Hello and Happy Birthday words.


I then used Spun Sugar and Cracked Pistachio Distress Oxide Inks to softly ink blend the panel and dotted in some interest.

I stamped the main image using Memento Ink in Tuxedo Black and coloured with the following Copic marker combinations:-

Overalls - B34, B32, B91
Tofu - C3, C1, C0, C00
Boots - RV34, RV11, R81, W3, W1
Flowers Y19, RV34, RV11, R81, YG06, YG13, E41, E40
Blush - R22, R21, R20, R00

Points were highlighted with a white gel pen and then I fussy cut the image, backed it with foam tape and applied it to the background.


For the finishing touches I added some tufts of grass and flowers to the the grass and added some shadow beneath Tofu and then I added some clouds with foam tape.  These clouds are from Hello Bluebird's 'Beach Umbrella Die' and I added some subtle colour to each to emphasise them and to pick up on the blue from Tofu's overalls.

The panel was then glued to an A2 white card base and then it was done!  Thanks for reading my blog today!


Tuesday, January 28, 2025

Purple Onion Designs - Flappy's Lucky Day


Hi!  I'm happy to be sharing this CAS card today for Purple Onion Designs which features their 'Flappy's Lucky Day' stamp image.  Read on for the details.

I took a white A2 panel of cardstock and I masked a line above which I ink blended with Mowed Lawn Distress Oxide ink.  I then came in with a cloud stencil from my stash and softly ink blended the sky using Tumbled Glass Distress Oxide Ink.


I stamped the images and coloured with the following Copic markers:-

Flappy - E44, E43, E55, W3, W1, W0, R000, R0000
Blushes - R22, R20, R00
Clover - YG67, G07, YG13
Sparrows - E31, E41, Y19

I highlighted a few points with a white gel pen and then fussy cut the images.


I backed the images with dimensional foam tape and applied them to the background and to finish the card I stamped the sentiment which is from the 'Lucky Sentiment Set'.

Between this stamp image and the sentiment stamp set linked in this blogpost you have many occasions covered including St. Patrick's Day.

Happy cardmaking friends!


Wednesday, December 18, 2024

Purple Onion Designs - Flappy's Christmas Delivery


Hello friends, a warm welcome to my blog where today I'm sharing how I made this Christmas card for Purple Onion Designs featuring the lovely 'Flappy's Christmas Delivery' stamp image illustrated by Chilliezgraphy by Pei.

I started by die cutting two deckle edged panels using the Hello Bluebird Stamps 'Nesting Deckle Mini Slimline Die'.   I then stamped the image on the smaller panel along with the sentiment from Holiday Time Sentiment Stamp Set.  I stamped using Memento Ink in Rich Cocoa.


I stamped the image once more on masking paper.  I fussy cut this image and layered it over the image I'd stamped on the panel.  I used Cornflower Ink by The Stamp Market to ink blend softly around the masked image and I spattered on some snow using white acrylic paint loosened a with a drop or two of water.  I removed the mask and began to colour the image using the following Copic marker combinations:-

Flappy - C5, C3, C1, C0, C00
Scarf - G19, YG67, YG45, YG41, E77
Pink - RV63, RV52, RV10
Brown - E43, E41, E40
Blush - R22, R21, R20, R00
Shadow/Footprint - W3, W1, W0

I glazed Flappy's nose with a black glaze gel pen and then highlighted a few points.


To complete the card I used the white gel pen to dot in snow over the image.  I backed the decorative panel with white craft foam and applied it to the larger deckle panel and then to a slightly smaller card base so that you can really see the deckle edge.

Another Christmas card complete!


Monday, December 16, 2024

Purple Onion Designs - Christmas Igloo


A warm welcome to my blog and this new card I've created for Purple Onion Designs featuring a stamp image illustrated by Chiliezgraphy by Pei called 'Christmas Igloo'.  This card also features the Stitched Hillside Border Die and Snow Flurries Backdrop Die both by Lawn Fawn.

I started by ink blending my night sky filled with Aurora Borealis.   To do this I took a white panel of cardstock and I first applied streaks or blobs of Twisted Citron and Picked Raspberry Distress Oxide Inks.  I then came in with Chipped Sapphire in all areas and then I came in with Black Soot.   In reality these colours aren't quite as pungent as they have photographed, it's more realistic in person.


I created the hillside border using the Lawn Fawn die mentioned above and I glued it to the background.  Over this I glued the Snow Flurries die cut created from sturdy white cardstock.  I set this to one side.

I stamped the Christmas Igloo image and coloured with the following Copic markers:-

Polar Bear - E41, E40, C3, C1, C00
Igloo - BG70, C1
Penguins - T6, T5, Y19, YR09
Blushes - R22, R21, R20, R00
Hat and Scarf - V17, V04, V12

I added highlights and a polka dot design on the hat using a white gel pen and I emphasised eyes and the polar bear's nose with a black glaze pen and then fussy cut the image which I backed with foam tape and adding to the background.


To complete the card I added silver jewel type embellishments to the centres of the snowflakes of the frame and I added gold Stickles glitter to the garland of stars they are adorning the igloo with.  Last but not least I stamped the sentiment which is from Hello Bluebird and applied this under the image with more foam tape.

Thanks for stopping by!


Wednesday, December 11, 2024

Purple Onion Designs - Tofu & The Snowman


I'm back today with a brand new card for Purple Onion Designs that features the Tofu & The Snowman stamp.  Here's a list of links to what I've used to create this card:-


The card started as an A2 white panel which I turned into a postcard by using the Vintage Postcard Add-On Set and added other postal features by combining stamps from the Vintage Postcard Set and Vintage Holiday Postmark Set.  I also chose a sentiment from Holiday Time Sentiments and stamped that on the right hand side.

I lay a stencil across the panel and ink blended above the stencil using Cracked Pistachio Distress Oxide Ink.  This panel was then adhered to a slightly larger red panel of cardstock and then that was glued to a patterned panel and then to my card base.


I stamped the Tofu & The Snowman image with  Eiffel Tower ink by MFT.  I coloured the image with the following Copic marker combinations:-

Snowman - C3, C1, C0, BG70, YR09, YR04, Y38
Tofu - E43, E41, E40
Green - G29, G28, YG67, YG45
Red - R89, R39, R29
Blushes - R22, R21, R20, R00
White - C3, C1, C0

Points were highlighted with a white gel pen and then I fussy cut the image, backed it with foam tape and applied it to the background.


To complete the card, I used Stickles glitter to glitter the ornaments swinging from the snowman's arms and I dotted in the snow using a stylus and using Dr. Ph Martin's Bleed Proof White which gives you dimensional snow!  I also used Copic C3, C1 and C0 to add shadow under the characters.

Thank you for stopping by!


Monday, December 9, 2024

Purple Onion Designs - Beary Christmas


Welcome to my blog and a CAS card for Purple Onion Designs that features the Beary Christmas stamp image illustrated by Chilliezgraphy by Pei.  The sentiment is from the Holiday Time Sentiment stamp set and the main panel was die cut using Stitched Pinking Edge Rectangle Stax Die-namics by MFT.

I used the Stax Die-namics to die cut a white A2 panel.  I used a stencil and ink blended above it using Spun Sugar Distress Oxide Ink and leaving the area below white for a steep snowy hillside.  I stamped the sentiment in the lower right corner then backed the panel with white craft foam and glued it to a kraft panel then to a white A2 card base.


I stamped the Beary Christmas image and coloured it with the following Copic marker combinations:-

Bear - E77, E74, E44, E43, E42, E41, E40
Blush - R22, R21, R20, R00
Christmas Tree Hat - YG67, YG45, YG06
Star - Y21, Y00, C3, C1, C0
Mouse - T6, T5, T3, T1

I highlighted with a white gel pen and used a black glaze pen to emphasise the nose and eyes and then I fussy cut the image.


I backed the image with dimensional foam tape and applied it to the background.  I added some skid mark on the snowy hillside using C3, C1 and C0 Copic markers and finished the card by glueing 3 small sparkling clear sequins in place.


Wednesday, December 4, 2024

Purple Onion Designs - Baking Fun


A warm and cosy welcome to my blog today where I have a new card for Purple Onion Designs.  This postcard themed Christmas card features their 'Baking Fun' stamp image illustrated by the amazing Chilliezgraphy by Pei.  I have also used the 'Vintage Postcard Set Add-On' stamps which will help you take care of all of your postcard style cards without the need for purchasing expensive dies.  Also used in this card are the 'Vintage Postcard Set' (for the stamp) and 'Vintage Holiday Postmark Set' (for the postmark).

To kick things off I took a white A2 panel of cardstock and die cut it with the faux stitched edge.  I lay a stencil on the panel and ink blended above the line using Powder Blue ink by The Stamp Market.  I then used the Vintage Postcard Set Add-On images to create the post card image and I delved into my Purple Onion sentiments and found two perfect sentiments to stamp in the appropriate place.


I used Greenery ink by The Stamp Market to stamp the postage stamp image, I fussy cut it and applied with glue.  I was then able to stamp the  postmark and void images.  The panel was backed with a slightly larger striped cardstock which gives it a little bit of an 'air mail' feel and this was backed with white craft foam and applied to a larger white card base.

I stamped the 'Baking Fun' image and coloured it with the following Copic marker combinations:-

Mouse - W4, W3, W1, W0, W00, E41, R000
Cheeks & Ears - R22, R21, R20, R00
Apron & Chef's Hat - B41, C1, C0
Oven Mitt - G29, YG67, G07
Cupcake - E49, E77, E74, E41, E40
Cupcake Wrapper - C1, C0, BG70
Holly & Berries Garnish - RV69, R39, R29, R27, G29, YG67,  G07
Bow - RV69, R39, R29, R27, T7, T5

I highlighted with a white gel pen and fussy cut the image.  I backed it with dimensional foam tape and applied to card.  I added a little shading under the image using the W Copics colours used above for the body of the mouse.


To complete the card I used a little Stickles glitter on certain areas of the cupcake and garnish and then I dotted in snow using a stylus dipped in Dr. Ph.Martin's Bleed Proof White acrylic paint.

Treat yourself to some holiday stamps from Purple Onion Designs  There's a big sale on through December 8th!


Monday, December 2, 2024

Purple Onion Designs - Tofu & Tabby Cozy Christmas


Welcome to my blog today (and always)!  I've got this new Christmas card to share with you today which was made for Purple Onion Designs.  The card showcases the new 'Tofu & Tabby Cozy Christmas' stamp image illustrated by Chilliezgraphy by Pei.

To create the card I chose some plaid cardstock from my stash and die cut a panel that was slightly smaller than A2.  I also found some wood grain cardstock and used the same die to create some hardwood flooring.  I glued the floor to the wallpaper and across the dividing line where they meet I added baseboard in the form of a strip of white cardstock.   This patterned background was glued to a white A2 card base and set to one side.


I stamped the Tofu & Tabby Cozy Christmas image and coloured it with the following Copic markers:-

Armchair - BG49, BG57, BG15, T6, T5, T4, T3, T1
Tofu (sitting) - E44, E43, E42, E31, E41, E40
Tabby - C5, C3, C1, C0, C00
Hat - C3, C1, RV69, RV19, RV06
Blushes - R22, R21, R20, R00
Side Table - E44, E43, E31
Sentiment Sign - E44, E31, W3, W1, W00

Images were fussy cut and applied to the living room background with foam tape. I highlighted a few points with a white gel pen.


For a Christmasy flourish, I created some Christmas decor.  I used the Hello Bluebird Holly & Pine Die and created greenery and a bow, I glittered the greenery and used Copic markers to add dimension to the bow, then glued the pieces together then to wall.

Thanks for stopping by my blog today, I hope you're enjoying my cards for Purple Onion Designs, I will be back soon with something new.  Have a great week ahead!