Showing posts with label Stacey Yacula Studio. Show all posts

Thursday, November 14, 2024

Purple Onion Designs - Stacey Yacula Winter 2024 Release


I'm happy to be revealing a card featuring a stamp image from 'Whispering Pines' illustrated by  Stacey Yacula for Purple Onion Designs.  This images is called Trixi and Cuddles.  Faintly in the background, disappearing into the blowing snow is 'Perfect Pines' which is a very useful image to start your cards off with.

I stamped Perfect Pines on a A2 white panel of cardstock using 'Fog' ink by Simon Says Stamp.  I then ink blended  the panel using Powder Blue and Cerulean inks by The Stamp Market and I added undulations to the snow on the ground using W1, W0 and W00 Copic markers.


I stamped the Trixi and Cuddles image and coloured with the following Copic markers:-

Truck - R59, R39, R29, R27, E44, E43, E31, E41, B000, B00, C3, C1, C0, T6, T5, T4, YR06, Y38
Tree - G19, YG67, YG45, YG41
Pup - T6, T5, T4, T2, W3, W1, W0
Bunny - W5, W4, W3, W2, W0, W00
Blushes - R22, R21, R20, R00

I highlighted with a white gel pen, fussy cut the image, backed it with foam tape and applied it to the background offset to the right hand side.


I tied some red/white baker's twine around the card and as I formed a bow I pulled in a little gift tag that I'd stamped LET IT SNOW on using Lipstick ink by The Stamp Market.  Behind this I tucked some glittered white sprigs of fir which are little die cuts from a set by Hello Bluebird Stamps.  I adhered these in place.  I turned over the panel and backed it with white craft foam and adhered the whole thing to a white A6 card base.

Last, but never least with my Winter cards, I dipped a stylus into white acrylic paint and dotted in the snow exactly where I wanted it to be throughout the scene.  Card done!


Thursday, November 7, 2024

Purple Onion Designs - Whispering Pines Winter 2024 Release


Another card today featuring the Whispering Pines Winter 2024 release from Purple Onion Designs, this image is called 'Carlie & Vincent' by Stacey Yacula Studio.

I used the Hello Bluebird Stamps Nesting Deckle Mini Slimline die in their Essentials collection to die cut a white panel of cardstock and I ink blended using Victorian Velvet and Black Soot for a moody winter sky.  I splattered the whole panel with white acrylic paint loosened with a drop or two of water.  I applied this panel to a mini slimline card base.


I stamped the Carlie & Vincent image using Eiffel Tower Ink by MFT.  I coloured with the following Copic markers:-

Bear - E49, E77, E44, E43, E42
Fox - E59, E27, E25, E15, E13, C3, C1
Tree - YG99, G29, G28, YG67, YG45, YG41
Sled - W1, E31, E43
Blushes - R22, R21, R20, R00

I fussy cut the image, backed it with dimensional foam tape and adhered it to the background panel.


To finish up, I used W3 and W1 Copic markers to add shading and footprints to the snow.  I stamped the sentiment which is from Purple Onion and fussy cut the image and adhered with foam tape.  Over the image I dotted in white acrylic paint using a stylus.  I highlighted a few points with a white gel pen and a few 4 point star embellishments were added to the sky for a fun twinkle.

Thanks for coming by, I hope you're inspired to get creative!


Saturday, June 17, 2023

Purple Onion Designs - Seaside Collection


Hello and welcome to my blog and my second of two cards celebrating the launch of Purple Onion Design's brand new release from Stacey Yacula Studio called the Seaside Collection.   Keep scrolling past this post to see the first card I shared two days ago.

I created the background by stamping the ocean waves (a stamp from the collection) using Peacock Feathers Distress Oxide Ink.  I then ink blended using Tumbled Glass Distress Oxide.  Below it I used Squeezed Lemonade and Fossilized Amber and Tea Dye inks to blend the sand.

I splashed with water and then with white acrylic paint mixed with water to distress the background.


I stamped the sentiment using Memento Ink in Rich Cocoa and then stamped the images from the collection that I was using with the same ink - it's my favourite!

Here are the Copic marker combinations used:-

Squirrel - W6, W5, W4, W3, W2, W1, W0, W00
Raccoon - T6, T5, T4, T3, T2, T1, T0, C00
Red Combo - R05, R08
Turquoise Combo - BG32, W2, W0
Sand and Sandcastle - Y26, YR31, Y32, E00, E50

Points were highlighted with a white gel pen then I fussy cut the images and used a combination of glue and dimensional foam tape to attach them.  I die cut a frame using a simple frame from MFT stamps and framed out the scene by attaching it with dimensional tape.

Last but never least, a few sparkling clear sequins add a glistening accent.

Enjoy shopping the Seaside Collection.  Have fun!


Thursday, June 15, 2023

Purple Onion Designs - Brand New SEASIDE COLLECTION!


A new collection illustrated by Stacey Yacula has launched today over at Purple Onion Designs and of course it is gorgeous!   It is called the Seaside Collection.   You can browse the collection by clicking that link and you will find the stamps used in this, my first of two projects.  Second card will be on the 17th!

The frame is by Hello Bluebird Stamps and is part of their Rainbow Sky Die if anyone is interested in sourcing that.

The background of my card was made using Distress Oxide Ink in Spun Sugar and the sand is Squeezed Lemonade, love those two colours together!

I stamped the images and coloured with the following Copic marker combinations:-

Palm Trees - E87, E44, E43, E42, E41, YG01, YG03, YG13, YG09
Mice - W2, W1, W0, W00, R22, R21, R20, R00
Pink Combo - FRV1, RV04, RV06
White Combo - C3, C1, C0, C00
Beach Sign - W4, W2, W0, W00
Sandcastle - Y06, Y02, W1, W0


All images were fussy cut and backed with either a single or double layer of foam tape to build some nice dimension and I highlighted some points with a white gel pen.

To wrap things up I stamped a sentiment from the new collection and applied it with more foam tape and a few sparkling clear sequins tucked here and there completed the scene.


Thanks for stopping by and as I said before I'll be back in a couple of days with a new project using the Seaside Collection.


Friday, December 11, 2020

Sweet Snow Friends - Purple Onion Designs

I have a new card for Purple Onion Designs today featuring the image 'Sweet Snow Friends' from 'The Sweetest Little Town' collection illustrated by Stacey Yacula.


To create this vintage feeling card I grabbed a panel of kraft cardstock.  I stamped the image using Memento Ink and for the sky I used a couple of toning green Copic markers and I used a combination of Prismacolor pencils and Copics to colour the images and snowy ground.


I used a white gel pen to highlight a few points on the main image.

I took my embossing buddy and thoroughly brushed the panel of cardstock and began using a snowfall image from the 'A Charming Winter' collection and using Versamark Ink I stamped and turned and stamped and turned this way and that way until I had gone over the entire panel. I then used superfine white embossing powder and heat set the pretty snowfall.

When I was stamping the snowfall I made sure to avoid the characters and chose to add snow using a white gel pen over them so that I had full control of where it 'fell'.   Make sure to nick the lines of the image you are covering with snow for a more realistic look.


I stamped and embossed the sentiment to a strip of kraft cardstock and added this with foam tape to this otherwise one layer card with no other embellishment.

I trimmed the panel slightly and layered it over a white panel which in turn was applied to a card base.  Card complete!

Happy crafting!


Thursday, March 19, 2020

Garden Blooms - Purple Onion Designs

Hello there!   I have a new card for Purple Onion Designs today featuring images illustrated by Stacey Yacula from the Garden Blooms stamp collection.


I ink blended the background grass and then used a stencil in my stash to create the soft cloudy sky.  I die cut the panel to give it the faux stitched edge and applied this to a card base.


I die cut a frame from white cardstock, backed it with foam tape and applied it to the scene.


On Copic friendly cardstock I stamped my images and coloured them with Copic markers then fussy cut each image and backed it with foam tape and applied within the frame.


The sentiment is from Carnival/Fair Blurbs.


A few sparkling clear sequins finish out this simple scene perfect for the enthusiastic gardener in your life!


Thanks for stopping by and happy crafting!


Nicky x


Wednesday, June 19, 2019

Sunny Meadow Fair - Purple Onion Designs

I'm still continuing to play with all the combinations that Sunny Meadow Fair by Purple Onion Designs offers.   These illustrations by Stacey Yacula are beyond irresistible.  Today I've navigated away from the fair scene and towards the little farm that lies on the edge of the meadow.


A background panel was ink blended with Distress Inks in Tumbled Glass and Twisted Citron.  It was then die cut with a Lawn Fawn background die to give the stitched cloud affect.  I used a white Prismacolor pencil to further define the clouds.


All images were hand stamped onto Bristol Smooth cardstock using Ranger Archival Ink in Potting Soil.  They were watercolour painted using the following colour palette from Kuretake Zigs - Fl Green, Light Green, Beige, Bright Yellow, Light Pink Mid Gray, Mustard, Oatmeal and Cornflower Blue.  I also used two Tombow ABT's in shades 020 and 991.


All images were fussy cut and I inverted them on a firm rubber mat and using a stylus and gentle pressure in a circular movement I made the cardstock 'dome' (avoiding the edges) - this makes the images look more dimensional and hides the foam tape quite well when viewed from an angle.  I then backed with either one or two layers of foam tape and applied them to the scene.


I chose to keep this card sentiment free so that it could be used for all number of occasions and so the finishing touches included just a little white gel pen highlighting, sparkling clear sequin accents and using a Distress Ink pen I dotted in some texture in the ground.

I hope you're feeling inspired and I look forward to sharing a new card with you next time.

Nicky x

Wednesday, April 10, 2019

Bubbly (Bear With Sparkler) - Purple Onion Designs

Do you love to create night skies and galaxy backgrounds as much as I do?  If you haven't tackled one I promise they are really easy and you can't go wrong with them, very forgiving.  Read along to find out how I made this fun firework display scene for Purple Onion Designs and featuring their Bubbly character by Stacey Yacula Studio together with Fireworks.


This is a slimline card with a finished size of 8 1/2 x 3 1/2 inches.  I also prepared a panel of the same size from Bristol Smooth and masked it off to create the white border.  I ink blended using Distress Oxides in Peacock Feathers, Festive Berries, Squeezed Lemonade, Chipped Sapphire and Black Soot.  I decided were the Bubbly Bear would stand and daubed yellow ink there and then randomly daubed the other colours elsewhere.  I then came in with Chipped Sapphire and ink blended everywhere including a certain amount directly over the colourful patches I'd created to bring the colour down.   Finally I came in with Black Soot and did the same.I wanted the colour splotches to look a little smokey since the sky is always filled with smoke and sparkles with real fireworks.  On more Bristol Smooth I ink blended two grass edged die cut panels adding Peacock Feathers and Festive Berries to the tips of the grass as if illuminated by the fireworks and again blending over the top with Chipped Sapphire and Black Soot.   These two panels were directly adhered to the panel.  The mask was removed.


Next step was the glitter heat embossing.  I stamped each firework and heat embossed using Wow! Embossing Glitters in Calypso, Pink Fizz and Salsa.  I dotted in some 'stars' with a white gel pen and set the panel to one side.


On more Bristol Smooth cardstock I stamped my bear and rocket images using Ranger Archival Ink in Potting Soil.  I watercolour painted these images using Kuretake Zigs in Beige, Mid Gray, Dark Gray, Cobalt Blue, Light Pink, Pink and Yellow.  Points were highlighted with a white gel pen.  I used gold Stickles to glitter up the bear's sparkler and before adhering him to the scene I also used the Stickles to do a burst of sparkles around his actual sparkler too.  All elements were applied with dimensional foam tape after being fussy cut.


I felt that the YIPPEE! sentiment was perfect and that the card could be a Congratulations, 4th July or Birthday card and an additional stamped sentiment could go inside to tailor it for the occasion.   YIPPEE! was stamped with Versamark Ink onto black cardstock and heat embossed in white and then backed with foam tape and applied at a playful angle above the bear's head.

Many thanks for stopping by my blog today to read about this project.  I will be back very soon with a new card.  You can sign up with your email to receive all blogposts in your inbox and never miss one if that is something you'd like.

Nicky x


Friday, March 29, 2019

Bursting With Pride (Bears With Flag) Purple Onion Designs

I'm back today with a new card for Purple Onion Designs featuring the incredibly sweet image of the Bears With Flag by Stacey Yacula Studio.


To start, I ink blended an A2 panel of cardstock with Distress Inks in Blueprint Sketch and Victorian Velvet.  I then squished a little of the blue ink onto my craft mat, added a drop of water to mix and then using a small paintbrush and a tapping motion, I splattered the image.  I set this aside to dry.  Meanwhile I die cut the white frame using a die from MFT Stamps.  I backed it with dimensional foam tape and attached it to the background panel.


I stamped a tuft of grass image 3 times to create a little ground and I also stamped the clouds which I then fussy cut and applied with double and single layers of foam tape to build depth.

On Bristol Smooth cardstock I stamped the bear images using Ranger Archival Ink in Potting Soil.   I also stamped the sentiment from Essential Thoughts, I fussy cut the images and then watercolour painted them using the following colours:-

Kuretake Zigs in Beige 072, Mid Grey 096, Light Pink 026 and Yellow 050.

The bears were applied on a double layer of foam tape.


The final touch was the application of 2 different sizes of sparkling clear sequins by Pretty Pink Posh adhered with Ranger Multi Medium Matte glue which dries clear and holds really well!

What's not to love about those sweet little bears and their sincere expressions?

See you next time!  Happy crafting!

Nicky x


Friday, March 15, 2019

Spread Kindness - Purple Onion Designs

Hello there!  I'm so happy you swung by the blog today to read about my latest card for Purple Onion Designs.  This card uses two images from the Spread Kindness category by Stacey Yacula Studio.  Namely, Floral Corners and Tiny Dwelling.


I stamped the Tiny House image onto an A2 panel of Bristol Smooth cardstock.  I then stamped and fussy cut a mask of this image and lay it over the original image.  I ink blended with Distress Oxide in Spun Sugar (above the grass line)  and with Mowed Lawn below the grass line.  I splashed some Picked Raspberry Distress Ink, mixed with a drop of water into the pink sky and then removed the mask and die cut it to finish the edges with the faux stitched edge and then adhering the panel to a 110lb white cardstock base.


On Bristol Smooth cardstock I stamped the Floral Corners so that I had one for each corner.  I used Ranger Archival Ink in Potting Soil for this.  I also stamped the snail and the bee from Garden Blooms.  I then set about watercolour painting all images using the following:-

Tombow ABTs in 243, 772.

Kuretake Zigs in Mid Gray 096, Oatmeal 064, May Green 047, Haze Blue 302, Pale Rose 230, Yellow 050, Pink 025, Deep Red 260, Gray Brown 094 and Light Pink 026.

The Floral Corners and Snail and Bee were fussy cut, backed with dimensional foam tape and applied to the panel.


Finishing touches time!  I randomly applied some sparkling clear sequins by Pretty Pink Posh and I stamped the sentiment from Snowflake Grove and adhered it on more foam tape.

I thank you for coming by my blog today, hope you'll join me next time.

Nicky x


Wednesday, March 6, 2019

Waving Hello Card for Purple Onion Designs

Hi!  My card today for Purple Onion Designs uses stamps from Stacey Yacula Studio and it looks like it is a sizzling hot day at the beach!


To make this card I grabbed a panel of white cardstock.  I stamped the sand dunes image with Ranger Archival Ink in Potting Soil and then stamped it a second time on masking paper which I applied over the original stamping.  I used regular masking tape and masked a line that would form the horizon.  I ink blended the ocean using Distress Ink in Peacock Feathers.  I then moved the masking strip to protect the ocean area and I then stencil blended the cloud design using Distress Ink in Tumbled Glass.  Both masks were removed and I watercolour painted the sand dunes using a Tombow ABT 020.  This panel was then die cut to provide the playful wavy stitched decorative edge which is Cloud 9 by Mama Elephant.

Other watercolours used in this project are Tombow ABT 620, Arteza Sea Foam A158 and Kuretake Zigs in Light Pink 026, Oatmeal 064 and Mid Gray 096.


Using the same Archival Ink the remaining images were stamped on Bristol Smooth cardstock.  Here is the bunting and all the remaining images are from the Happy Trails series.  They were all watercolour painted, fussy cut and backed with foam tape and applied to the scene whereupon certain points were highlighted with a Uni-ball Signo White gel pen.


A couple of quick finishing touches complete this card.  Firstly I stamped the Waving Hello sentiment to a strip of cardstock adhered it with foam tape and then to add a little sparkle to the sand I used Multi Medium Matte to glue Ivory Jewels by Pretty Pink Posh.

Anyone craving a day at the beach now?

Thank you for coming by to read and happy crafting!

Nicky x

Friday, February 22, 2019

Up And Away - Purple Onion Designs

Hi!

Today I have another of my slimline cards for you!  I especially like to make a scene using the card in portrait mode and playing with the height!  Perfect for a hot air balloon card!


My slimline cards are 8 1/2 x 3 1/2 inches and you can buy envelopes for these cards by searching for Slimline Envelopes, Invitation Envelopes, #9 or Size 9 envelopes!  Any problems finding pretty ones let me know and I'll link you up.


A panel of Bristol Smooth cardstock was masked off and then ink blended using Clarity Stencil Brushes in the following Distress Ink colours - Peacock Feathers, Squeezed Lemonade and Picked Raspberry.  Afterwards I squished a little of each of the inks onto my craft mat and mixing with a little splash of water I used a toothbrush to spritz each of the colours all over the project.  I carefully removed my masking tape.

I stamped the sentiment and applied the panel to the 110lb white cardstock base - you need sturdy stuff for the oversized cards - regardless, I always use 110lb weight.


On Bristol Smooth card stock and using Ranger Archival Ink in Potting Soil, I stamped my image of the balloon and also the clouds from Stacey Yacula Studio for Purple Onion Designs.  I watercolour painted the balloon image using Kuretake Zigs in the following colours - Light Blue 036, Light Pink 026, Oatmeal 064, Green Gray 093 and Light Grey 091.  Also used were two Tombow ABT's in 020 and 761.

I fussy cut all images including using a craft knife to cut around the balloon's rope tethers.  I stuck some clouds directly to the card panel, I applied the balloon image with foam tape and also some of the clouds so that it really looked like the balloon was passing between the little puffy clouds.


I finished my scene with some sparkling clear flat cup sequins by Pretty Pink Posh which I adhered with Ranger Multi Medium Matte.

Another card finished ...... onto the next!  See you soon!

Nicky x


Saturday, February 9, 2019

A Birdie Birthday Card for Purple Onion Designs

Hi!  As promised I'm back with another design using Stacey Yacula Studio for Purple Onion Designs.  This time I have a birdie themed birthday card full of yummy girly goodness!


I used Ranger Archival Ink in Potting Soil to stamp a panel of white cardstock using the Wood Grain Background Stamp.  I then die cut the panel with a simple faux stitched edge to make it look finished and used some circular dies I have to die cut the three openings.  I like that these circular dies also leave a faux stitched edge so that it matches the border!


I ink blended a panel of cardstock using Distress Oxide Ink in Spun Sugar and using dimensional foam tape, I backed my decorative panel and applied it to the ink blended panel which in turn was adhered to the card base.

On Bristol Smooth cardstock I stamped all of the images by Stacey Yacula Studio from her Sweet Occasions, Garden Blooms and A Sweet Summer ranges with the floral sprig from A Beautiful Day and I watercolour painted them using a limited colour palette of Kuretake Zigs in the following colours - Yellow Green 053, Oatmeal 064, Mid Gray 096, Pale Orange 054 and S. Almond Pink 200.

I then set about fussy cutting all that I had stamped and painted (yes the branches were fiddly but I survived the ordeal) and applied them with foam tape into the scene.


Time to finish out this 'tweet' card.  I stamped the sentiment with Versamark Ink and heat embossed in white, backed the strip with foam tape and applied.  I then delved into my embellishment trays and added a little pink twinkle with these jewels by Pretty Pink Posh.

This card screams Spring no? I think a lot of us right now are craving a dose of Spring!

I thank you for coming by to read and I hope you make something pretty today.

Nicky x

Friday, February 1, 2019

Valentine's Card for Purple Onion Designs

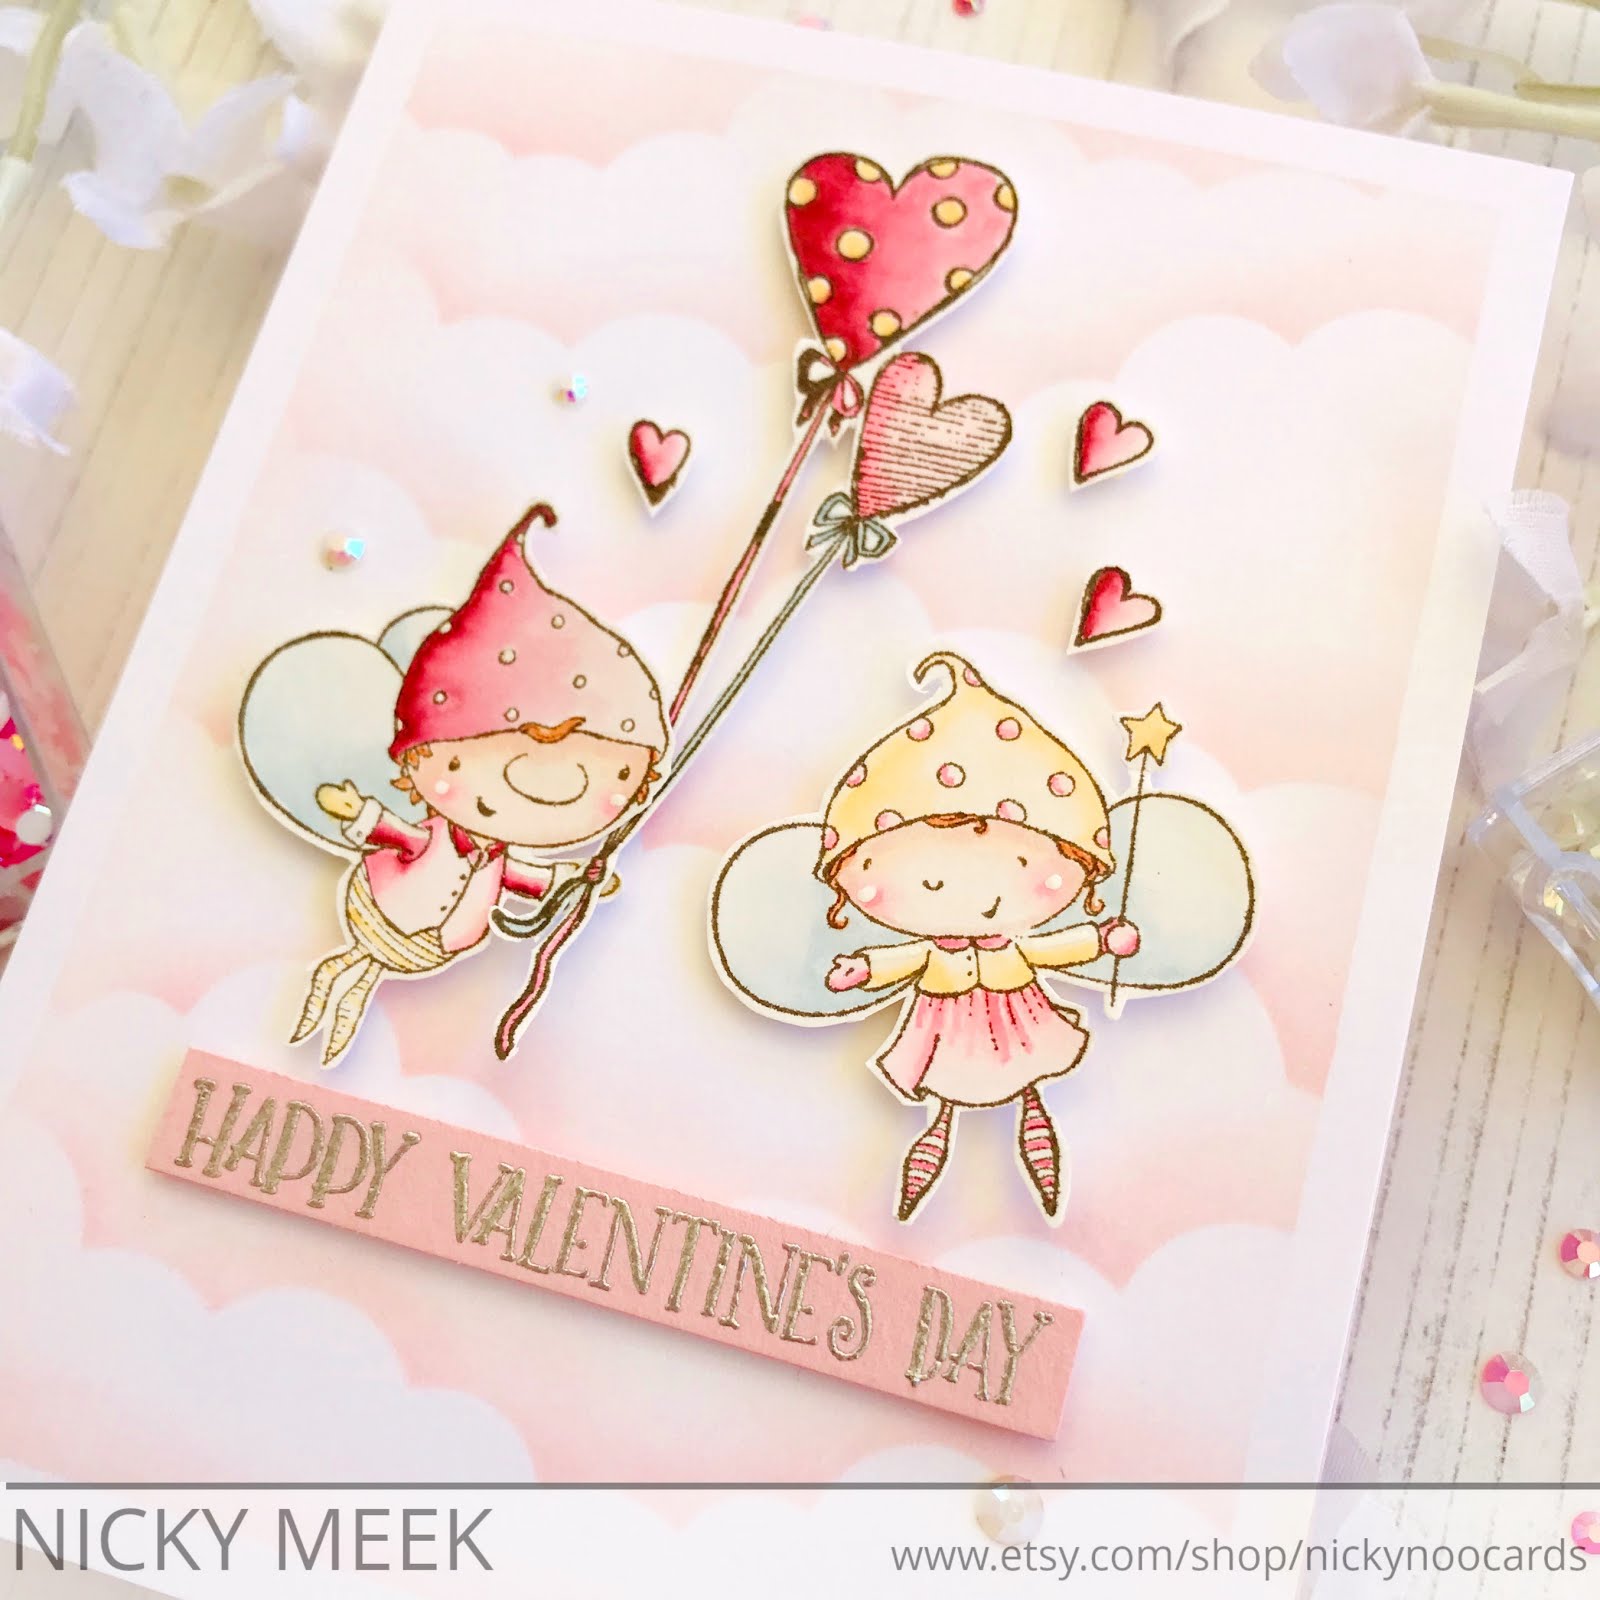
Hello!  I have a relatively quick Valentine's card for you today using stamps from Stacey Yacula Studio for Purple Onion Designs.  Characters are from the Spread Kindness category and the balloons are from the Sweet Occasions category.


I masked off the edges of an A2 panel of white cardstock.  I used a cloud stencil and Distress Oxide Ink in Spun Sugar to create a romantic, cloudy background.  The mask was then removed.


On Bristol Smooth cardstock I stamped all of the images using Ranger Archival Ink in Potting Soil, I stamped my sweet characters.  I watercolour painted them using Kuretake Zigs in the following colours - Deep Red 260 (also for hearts), Light Pink 026, Haze Blue 302, Pale Pink 028 and Flesh Colour 071.  I also used Tombow ABT's in shades 912 and 020.

I fussy cut the images and applied them to the scene using dimensional foam tape.  The decorative panel was applied to a pink cardstock base and a writing insert was adhered inside.

Using a piece of scrap cardstock of the same type used for the card base I stamped and heat embossed the sentiment in silver, I trimmed up the strip and added that with foam tape also.


The final touch was the addition of a few jewel type embellishments which reflect some of the colours used in the project.

Thanks for coming by to read about this Valentine's card, I'll be back with another card for Purple Onion very soon!

Happy crafting!

Nicky x

Wednesday, January 23, 2019

Winston - Purple Onion Designs

Hi, I have a new card for you today using the adorable little Winston from Purple Onion Designs as illustrated by Stacey Yacula Studio.


The card also features Garden Bushes which I stamped twice onto Bristol Smooth cardstock.  I also stamped Winston, May (the flying bird) and  Finch the little bird in the shirt.  I used my favourite ink for watercolour painting - Ranger Archival Ink in Potting Soil.  I painted all of my images and here is a list of the colours used.  Kuretake Zigs in Mid Gray 096, Beige 072, Warm Gray(2) 900, May Green 047, Light Green 041 and Mid Green 046.  Cheeks were blushed using a Tombow ABT in shade 761.  A few points were highlighted with a Uni-Ball Signo white gel pen.


I masked off the bushes at their base and ink blended the grass using Distress Ink in Cracked Pistachio. The mask was removed and I fussy cut the bush line.  I took another A2 panel of cardstock and ink blended it for the sky using Distress Ink in Peacock Feathers.  I applied the grass and bushes over the sky panel with dimensional foam tape.  I also fussy cut the bunny and birds and also attached them with foam tape.   I die cut a slim frame using kraft cardstock.  I backed the frame with foam tape and applied it.


The final touches were to stamp the sentiment.  I then hand dotted and flecked in tufts of grass using a Kuretake Zig in Green Shadow 049  which nicely tones with the Cracked Pistachio.  I blended it out a little with a waterbrush pen and dotted in some white daisies.

I found the wooden floral daises in my sequin stash and adhered them using Ranger Multi Medium Matte which is beautifully strong.

Hope you enjoyed my card, thanks for stopping by.

Nicky x