Showing posts with label Rainbow Square Die. Show all posts

Saturday, December 2, 2023


You can find me over on the Hello Bluebird Blog today with this new winter themed card featuring a bunch of HB's products.  Use THIS LINK to go directly to the blogpost.  Thank you!


Saturday, July 2, 2022

Hello Bluebird Stamps - July Summer Challenge

I would love it if you would take a moment to visit the Hello Bluebird blog today where there is a brand new challenge starting that I hope you will enter for a chance to win a $50 gift certificate.   The lucky winner is randomly selected and is not based on your skill level, so you literally have nothing to lose.   All details for entering can be found within the Hello Bluebird blog post and you will also see several other inspiration cards from the Design Team along with mine.   What is different this time is that you can enter the challenge as a color challenge entry or enter as a summer beach theme entry or as in the case with my card, you can use both theme and colors!   Keep scrolling to see and read about my card .....


My card was made using:-


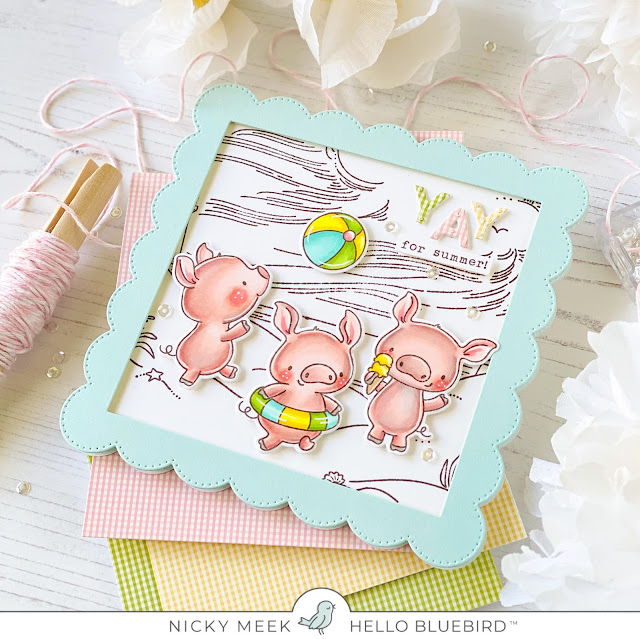
I started by stamping the background stamp image.   Once in a while I like to leave these background stamps completely  uncoloured like an uncoloured page in a colouring book but I layer on some colourful  focal points.   This is a great look if you are intimidated by those big backgrounds too!

So, I applied the background image to my card base and then I die cut the Rainbow Square Die using some pretty pale blue cardstock and applied this popped up on foam tape.


I adhered some mini gingham cardstock to some small pieces of sticky foam sheets and die cut the letters YAY, I peeled off the backing and adhered them in the top right hand corner and underneath I used part of a sentiment included in the Beach Babes stamp set, stamping it to a strip of cardstock and adhering with more foam tape.

I then stamped out the piggies I'd be using from Beach Babes and coloured them with the following Copic markers:-

Pigs - R21, R20, R00, R000, W3, W2, W1
Blush - R22, R21, R20, R00
Greens - YG25, YG13, YG03
Blues - BG32, BG11, BG0000
Yellows -  Y15, Y06

Points were highlighted with a white gel pen and then the images were die cut using the coordinating dies, backed with foam tape and applied.

To finish I just added a few sparkling clear sequins.   Don't forget to visit the Hello Bluebird blog!


Friday, May 20, 2022

Hello Bluebird Stamps - May Release - Sweet Dreams

It's the second day of previews for the new Hello Bluebird release which you can buy tomorrow May 15th at 7pm MST.   Everything being revealed today by myself and the rest of the Design Team and guests is baby themed and so of course there are lots of heart melting images and projects to share.   My card here uses Sweet Dreams which is a gorgeous new stamp set.  I have also used the new Oh Baby Words Die, Starry Sky Die and Rainbow Square Die (minus the rainbow portion for my project).


I die cut the Rainbow Square Die three times and discarded the inner cuts that can be used as a rainbow.

I created a square panel of cardstock and ink blended it with Spun Sugar Distress Oxide Ink forming a brighter focal point in the centre.  I die cut the panel using the Starry Sky Die and adhered it to a panel of white glitter cardstock.  I adhered one frame cut directly and a second one was adhered that I backed with foam tape and adhered it to the first frame and set it to one side.


I stamped the images from the Sweet Dreams stamp set and coloured them with Copic markers:-


Moon - Y23, Y21, E51, E50, E0000, W2, W0
Bear - E42, E41, E40, E0000
Fox - E13, E34, E53, W2, W1, W0
Blushes - R21, R20, R00
Cloud - RV000, RV0000, W2, W1, W00

Images were die cut using the coordinating dies and adhered to the background.

I die cut the Oh Baby Words Die 4 times and adhered each to the next in layers for a nice chunky sentiment.  I used the W2 Copic marker to colour the top later and the two words were adhered in place.

I applied the decorative panel to a prepared card base and then created another identical frame to stick to the back of the card base so that the card stood upright and level so there actually 3 frame cuts to this card, it feels beautifully substantial and a lovely quality and I think that is important, so many people keep baby cards of course.

Be sure to visit the Hello Bluebird Blog today and see the other products being revealed and Design Team and guest inspiration cards.   Be sure to leave a comment there before you leave to be in the running to win a $50 gift certificate to spend on the new release.   One winner from each preview day will receive a gift certificate and the winners will be announced approximately 2 hours before the release goes live.