Showing posts with label Magic Iris Beehive Add-On. Show all posts

Monday, February 24, 2025

Lawn Fawn - Ruff You!


Welcome to my blog and a card made for fun using Lawn Fawn products.  Here's a list of links to the products I've used:-

Magic Iris Beehive Add-On (for the flowers)

To create the card I took a panel of pale blue cardstock.  Over this I glued a white panel that I had die cut using the Itsy Bitsy Die and which I had ink blended with a little Speckled Egg Distress Oxide Ink.

Next, I die cut a sturdy white panel of cardstock using the Meadow Backdrop Die and I ink blended using Twisted Citron and Mowed Lawn Distress Oxide Inks.  I also spattered with water and blotted that up and then splattered some Mowed Lawn loosened with a couple of drops of water.  I backed this panel with dimensional foam tape and applied it to the other panels.
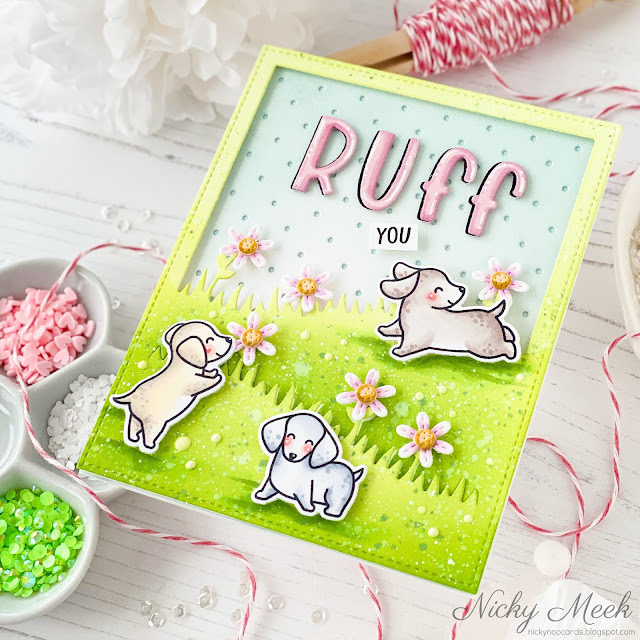


I die cut 6 flowers using the Magic Iris Beehive die and coloured them with Copic markers and then adhered them with glue to the meadow background.  I also added a little piece of foam tape behind each bloom to support it and make sure it stays nice dimensional.

I stamped 3 puppies from Furry and Bright and coloured with the following Copic markers (clockwise from the top):-

Puppy 1 - E70, E71, W2, W1, W0
Puppy 2 - C3, C1, C0, C00
Puppy 3 - E51, E40, E0000

I blushed and highlighted their cheeks and then die cut and applied with more foam tape.


For the punny sentiment I die cut RUFF using the Henry's ABCs die.  I offset the black behind the pink for a shadow when glueing them together and I used Copic markers to shade the pink for the look of more dimension.  I then came in with a white gel pen and highlighted the letters and glued to the sky and lastly I stamped the word YOU on a strip and added it underneath.

I used Copic markers under each pup to add a shadow and a few Nuvo drops completed the scene.

Appreciate you visiting my blog today,  I'll be back soon with something new to share.


Saturday, June 22, 2024

Lawn Fawn - Magic Iris Beehive


I continue to create using my Lawn Fawn products just for the pure love of creating cards with their lovely products and today my card uses their Magic Iris Beehive Add-On Die along with their Stitched Scalloped Rectangle Frames Die and More Magic Messages stamp set.

To create this card I first used the Scalloped Rectangle Die mentioned above and die cut once from white cardstock and again from some of Lawn Fawn's patterned cardstock.  I used the largest die in the set of four to do this.   I used the patterned section from the centre and recessed it within the white frame which I adhered to a slightly smaller than A2 card base.


I used green, pink, yellow, black and kraft cardstock scraps and die cut the branch, leaves, blooms and bees from the Beehive Die.  I used a little ink on a mini sponge dauber to add a little colour to the leaves and then I adhered all the parts together and assembled the blooms and greenery on the branch.

I die cut the beehive, stamped the sentiment of my choice in the centre and then ink blended with Scattered Straw, Fossilized Amber and Vintage Photo Distress Oxide Inks.

I backed all of these die cuts with dimensional foam tape and then started by sticking down the beehive then the branch overhanging at the top and finally the bees with their little vellum wings.


To finish the card I used a white gel pen to highlight some points and then used white Nuvo drops for finishing accents.

This card needs to go out to someone amazing!!

Thanks for joining me on my blog, I'll be back tomorrow with something new.  Happy crafting!


Thursday, June 1, 2023

Lawn Fawn - Magic Iris Beehive Add-On


Hello crafters, welcome to my blog and a new card that I created using purchases from the most recent and very gorgeous release by Lawn Fawn.   Here's what I have used in the making of this card:-


I used Salvaged Patina Distress Oxide Ink to softly ink blend an A2 panel of white cardstock.  I applied a little more ink at the top and gently faded it out towards the bottom.   I then used the Cloud Background Stencils (just one of the pair of two) and some white pigment ink and ink blended the clouds, these show more as a little a surprise when the card is handled.  I used a white gel pen to add a little bit of outlining to each card to make them more prominent.

I die cut the largest frame from Stitched Rectangle Frames and backed it with skinny strips of dimensional foam tape and applied it to the background and then the panel was adhered to my card base.


I die cut white cardstock using the Beehive die and all it's little accessory images like the blossoms and bees.  I used my Copic markers to colour the images, here's what I used:-

Hive - YR23, Y17, Y15, Y13, Y31, E30, Y00, Y000, W2
Bees, - YR31, Y21, E30, G00
Blushes - R22, R20, R00
Branches - E44, E43, E42
Leaves - YG45, YG41, G40
Blossoms - RV10, R000, R0000, Y17, Y08, Y000

I added Stickles glitter to the bee's wings and when dry I assembled all the little pieces using glue then backed them with foam tape and applied them for a lovely dimensional look.

Last but not least, I stamped and heat embossed the opening/inside of the hive using my chosen sentiment from 'More Magic Messages' and I backed this piece with glue and recessed it through the opening.  A few points were highlighted with a white gel pen.

Absolutely LOVED making this card!  Hope you come back and see what I make next.  Have a happy and crafty day!