Showing posts with label Copic Coloring. Show all posts

Wednesday, June 3, 2026

Simon Says Stamp - Always There Release - Farm Sweet Farm


Welcome to my blog where I'm sharing this new card for Simon Says Stamp that features a stamp set called Farm Sweet Farm from their Always There release.

I took an A2 panel of white cardstock and ink blended softly using Distress Oxide Inks in Scorched Timber and Salvaged Patina.  To create the soil line I tore a scrap of cardstock by hand, giving it a soft uneven edge and ink blended up against it.

I splattered a few drops of water and blotted the background to soak it up and added a few dots here and there in toning colours with a fine tipped pen.


I stamped the images I was going to work with from Farm Sweet Farm using Memento Ink in Rich Cocoa.  I then coloured with the following Copic marker combinations:-

Skin - E04, E34, E11, E01
Hair - E44, E43, E42, E40
Overalls - E44, E35, E55, E31
Shirt - G28, YG67, YG17, YG25
Shovel - E44, E31, E40, T5, T4, T3, T2
Crate - E31, W5, W3, W0
Leaves - G28, YG67, YG17, YG25
Onions - RV69, V06, V04
Radish - RV17, RV04, RV02
Squash - E42, YR20, E50
Tomatoes - R08, RV14
Carrots - YR09, YR07, YR04, Y38

Points were highlighted with a white gel pen and the images were die cut and applied to the background with dimensional foam tape.


Just one job left and that was the sentiment, which was also stamped in the Rich Cocoa ink and you've got a coordinating die for it in the set (don't you just love that?) so I die cut and also applied this with foam tape.

Card done!

I will be back on Friday with my final card for the Always There release and so I hope you will join me then.  Meanwhile, happy crafting!


Monday, April 20, 2026

Pink and Main April Release - Cozy Shelf


A warm welcome to my blog where I'm sharing a new card for Pink & Main today as we continue to promote their new release which went live on the 17th and which you should definitely check out because it is just so lovely with it's books/reading and bows theme.

My card today uses their new Cozy Shelf stamp set and the coordinating die.


Initially I was going to stamp the bookshelf image but I changed my mind and I simply die cut white cardstock with the bookshelf die.  I backed the outer frame and shelves with foam tape and I used a little Lost Shadow Distress Oxide Ink on the three pieces that form the back of the unit.  

I chose some Lawn Fawn patterned paper for wallpaper and trimmed it to A2 and glued it to my card base, I framed the background using an old MFT frame die from my stash and applied that with foam tape and then I adhered the bookshelf and glued the three ink blended pieces directly through each opening.


I stamped all of the images from Cozy Shelf with black Memento Ink and coloured with combinations of the following Copic markers:-

Girl's Skin - E04, E11, E00
Blush - R22, R21, R20, R00
Hair - E44, E50, E40
Teal - BG49, BG15, G00, BG000
Pink - R22, R21, R20, R00
Beige - E31, E40
White - C3, C1, C0
Leaves - YG41, G20
Cat - C5, C3, C1, C0

Each image was die cut and glued directly on the shelves and the girl and cat images applied with foam tape.

Last but not least a sentiment was chosen from Cozy Shelf, stamped on a sentiment strip and applied also popped up on foam tape.  No embellishments required on this project and so with that it was done!

Thanks for spending some time with me today, it is appreciated!


Sunday, May 30, 2021

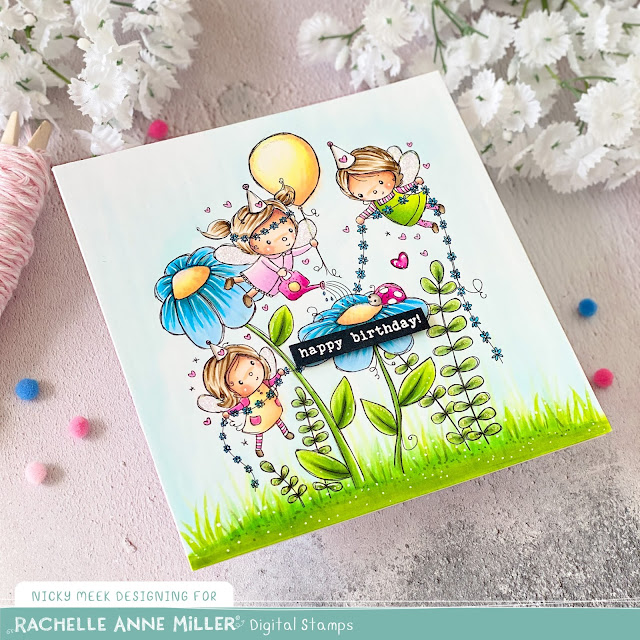
Fairy Party - Rachelle Anne Miller Digital Stamps

Hello, welcome to my blog and this new card I have today for Rachelle Anne Miller Digital Stamps.   This card features the Fairy Party digital stamp image.


Have you ever ventured into the world of digital stamps?  I know I'm pretty new to them.   Rachelle's designs are so beautiful and have the added benefit of being delivered to your email address moments after you buy the digital image.   Another plus is that you change the size of the image before sending it to print on your home printer and you can choose what type of cardstock you want to print on depending on what medium you are going to use to colour your image.

For my card today I increased the image size by 10% so it fit what was going to be a 5 x 5 inch card.  You can always do a test print first on regular printer paper before committing ... that's what I do!    I was colouring with Copics and so I inserted a panel of white Copic friendly cardstock and printed the image.    I have been asked many times if Copics make the printer ink 'run' and for me the answer is a definite no.


I coloured my image with just about every Copic colour known to mankind so I do apologise for not saving and listing them for this project.

Points were highlighted with a white gel pen and I decided for a little whimsy I'd make the ladybug's spots white instead of black.

Fairy wings were glittered up a treat using Stickles glitter and just the odd spot of glitter was added elsewhere so that this was all sparkly for a little girl's birthday.


To complete the card I trimmed the panel down to 5 x 5 inches as previously mentioned and I attached it to a card base.

I stamped the sentiment using Versamark Ink on to a little black sentiment strip and heat embossed using superfine white embossing powder.   This was applied to the card using a little foam tape, I like how the black works with the cheerful colours.

Thank you for stopping by today and I do hope you give digital stamps a try if you haven't already.

Happy crafting!