Thursday, April 28, 2022

My Favorite Things - CC188

Whose up for a new colour challenge for MFT Stamps?   Super pretty colour combination for this challenge and which I used for this CAS inspiration card.   Read on for all the details.


                                                                                                                                                                    Here's what I used for my card:-


I created an A2 panel of the pink cardstock and adhered it to my card base.   I then used the A2 Stitched Rectangles die to create a panel of white cardstock which I stamped with the door image and added the mailbox and wall sconce light.   I chose the perfect sentiment from Essential Sentiments and stamped this too then this panel was backed with white craft foam and applied to the pink card base.


I stamped the images from Sittin' Pretty and coloured them with the following Copic markers:-

Skin - E04, E11, E21, E00
Hair - E43, E42, E40, E50
Greens - YG17, YG13, YG03, YG01
Deep Pink - RV04, FRV1
Medium Pink - RV02, RV2
Light Pink - RV10
Greys - T1, T0


Images were die cut using the coordinating dies, backed with foam tape and applied to the simple background for a fresh, minimal but pretty clean and simple feel.  I reached for my white gel pen to highlight a few points and then the inspiration card was complete.


Best of luck with your challenge entry.

Thank you for stopping by my blog today and don't forget to visit and subscribe to the MFT You Tube Channel for endless how-to videos, inspiration and product reveals.


Wednesday, April 27, 2022

My Favorite Things - Wednesday Sketch Challenge - WSC591

Well a warm welcome to this new Wednesday Sketch Challenge (WSC591) for MFT Stamps.   I have a created and am sharing an inspiration card working off the sketch which you will find immediately below followed by some details about how this card was made.


First of all I used the Scene Builder stamp set illustrated by Stacey Yacula, stamping the hills and then straightening out the grass image on my stamping block and repeat stamp from edge to edge twice to form the lines at the bottom.

I ink blended the sky with Salvaged Patina Distress Oxide Ink  and then used Copic colours to colour the rest of the background.  Here are those colours:-

Greens - YG45, YG13, YG03, YG01, YG000
Flowers - R22, R21

I die cut the panel using A2 Stitched Rectangles Stax (Set 1) and backed it with white craft foam and adhered it to an A2 panel of white card stock that I then attached to my card base.


I stamped the hugging foxes image from the Hugs Make Everything Better stamp set and coloured this with the following colours:-

E99, E97, E13, E11, T3, T2, T1, T0, R21, R20, R00

I highlighted a few areas with a white gel pen then die cut with the coordinating dies and applying the image to the scene with dimensional foam tape.


I used the Skinny Strips Die-namics to create a sentiment strip and stamped the sentiment and this too was applied with foam tape.

I chose not to embellish these scene other than to use white and pink gel pens to dot in some small flowers throughout the grass.

I wish you lots of luck with your challenge entries.

Thank you for stopping by my blog today and don't forget to visit and subscribe to the MFT You Tube Channel for endless how-to videos, inspiration and product reveals.


Tuesday, April 26, 2022

My Favorite Things - Rainbow Bridge Card Kit Release Day


The beautiful and thoughtful Rainbow Bridge card kit is now available for purchase.   I have a new card today using more products from the release.


To create this CAS Slimline card I first created a Slimline panel and then using the Slimline Double Stitched Stax Die-namics I created two smaller panels (the largest two from the set).   I adhered the larger of the two directly to the full sized panel.

I used Tattered Rose Distress Ink and the Slimline Cloud Stencil to create a super soft blended background and I was sure to fade it away to almost nothing the more to the right of the panel I got.

I die cut the large paw print using the Paw Prints Die-namics from the kit and I backed this panel with dimensional foam tape but before apply it to the layer beneath I added some Cement Gray cardstock where it would show under the paw.


I stamped the sentiment from Rainbow Bridge Goodbyes using Versamark Ink and then I heat embossed in silver.  I was then able to adhere the panel down.

In order to keep the card elegant, minimalist and little heavenly I adhered 3 sparkling clear sequin accents.


I hope you feel inspired to treat yourself to this beautiful card kit, it certainly is a useful one to have on hand.

Thank you for stopping by my blog today and don't forget to visit and subscribe to the MFT You Tube Channel for endless how-to videos, inspiration and product reveals.


Monday, April 25, 2022

My Favorite Things - Rainbow Bridge April Card Kit


The April card kit from MFT Stamps is called Rainbow Bridge and will be available for purchase tomorrow April 26th at 10am EST and the theme is for bereavements be they of the human or pet kind.


I created this CAS card using die-cuts only.   I firstly created a white panel, slightly smaller than A2 and applied it backed with craft foam to an A2 panel of Cement Gray Prestige Card Stock.

I then used up some scraps of several other pastel colours of MFT's card stock and die cut using the Rainbow Bridge Die-namics.   I adhered dimensional foam tape to the back of each piece and line them up at the base and adhered them into a rainbow bridge.


I used the Pet Silhouettes Die-namics and more of the Cement Gray cardstock to  create the dog (there are several silhouettes in the kit to choose from including a cat).  The dog was adhered with foam tape.

I stamped the sentiment from Rainbow Bridge Goodbyes with Versamark Ink and heat embossed in silver and applied the strip between the rainbow bridge and dog.

To embellish this simple card I used the Cutest Clouds Ever Die-namics and some sparkling clear sequins to finish off the area around the dog.


We never want to face a bereavement but they are sadly inevitable and this kit has got you covered beautifully.

Thank you for stopping by my blog today and don't forget to visit and subscribe to the MFT You Tube Channel for endless how-to videos, inspiration and product reveals.


Saturday, April 23, 2022

Hello Bluebird Stamps - Word Buddies Woodland

I have a new card today for Hello Bluebird Stamps that features their darling Word Buddies Woodland stamp set and the High Rise Tree Scene Die.


To start the card I first created an A2 panel of cardstock and ink blended the sky using a cloud stencil from my crafty stash.   I stamped the sentiment which is from the Spring Gatherings stamp set and then applied the panel to my card base.

I die cut the High Rise Tree Scene Die and ink blended it with Distress Oxide Inks and applied it to the scene with dimensional foam tape.  I then used the Grassy Knoll die to create two strips of grass which I ink blended and applied behind and in front of the base of the tree.


I stamped the images from Word Buddies Woodland and coloured them with Copic markers.   Here are the colours I've used:-

Squirrels - T7, T6, T5, T3, T1
Bunnies - E41, E0000
Raccoon - W7, W5, W4, W2, W0
Bear - E87, E44, E43, E42, E41

I also stamped and coloured the Mole from the Bloom and Grow stamp set.

T4, T3, T2, T1

Images were die cut using the coordinating dies and then adhered to the scene.   Many Hello Bluebird stamp sets have little flower images and so I coloured some up and applied blossoms to the tree and tucked them behind the ears of a couple of the cute critters.   Card complete!


I really appreciate you coming by my blog today and I'll be back soon with a new project to share with you.


Friday, April 22, 2022

My Favorite Things - April Outside The Box Challenge

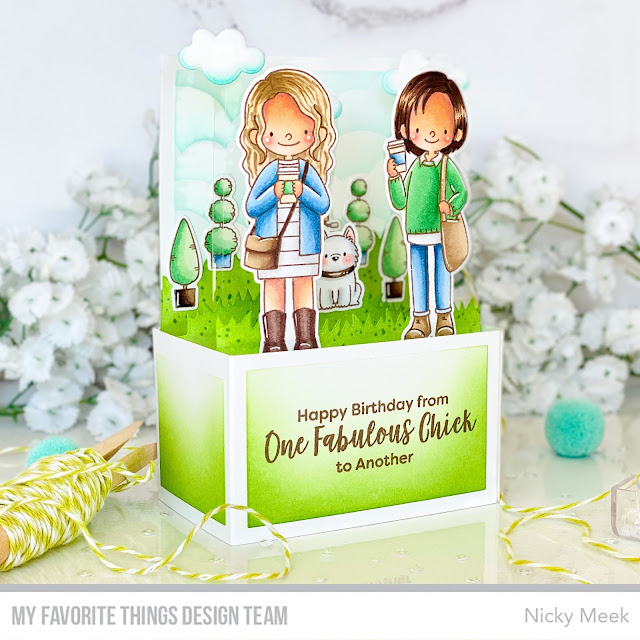
Hello and welcome to a brand new Outside The Box Challenge for the month of April.  I hope you will play along with the challenge and our theme this month is 'people'.   We encourage you to build an Outside the Box card using some of the human stamp images that MFT produces.


Products used in my projects include:-

Cloud Stencil
Cutest Clouds Ever Die-namics

To kick things off I first created my basic box card from sturdy white cardstock.   I used one of MFT's cloud stencils to create the sky backdrop and I used the Grassy Hills die to create the grass.   I stamped the sentiment to the ink blended from panel piece before applying it.


I stamped and coloured the images from Friends At First Sip.   Here are my Copic colours used:-

Greens - YG45, G12, G40
Blues - B97, B95, B93, B91
Whites - T2, T1, T0
Brown Hair - E49, E79, E77, E42
Blonde Hair - E41, E51, E43
Skin - E04, E11, E21, E00, R21, R20, R00

Images were die cut using the coordinating dies and I adhered the coffee cart and topiary trees to the background panel.   The puppy was adhered to the next layer forwards and the two ladies were adhered to the front most layer to build some nice depth.

Finally, I die cut 3 clouds using the Cutest Clouds Ever Die-namics and ink blended them softly then these were floated behind and above the two ladies using thing strips of acetate.


Best of luck with your entry to the challenge, have fun!

Thank you for stopping by my blog today and don't forget to visit and subscribe to the MFT You Tube Channel for endless how-to videos, inspiration and new product reveals.


Thursday, April 21, 2022

My Favorite Things - April Slimline Challenge

Hello and welcome to a brand new Slimline Challenge for MFT Stamps.   The challenge is for you to create a slimline card for a newborn baby or a newly minted 1 year old and I opted for the 1st birthday card option with my inspiration card.  I hope you play along with this sweet theme!


Here are the products used in my project:-


To kick things off I prepared a full size slimline panel using the Princess Pink card stock and adhered it to a card base.   Next, I used the Slimline Starter Die-namics to create a white panel and I masked the edges and softly ink blended with Distress Oxide Ink, fading away to almost nothing by the time I reached the right hand side.  I removed the mask carefully and this panel was backed with white craft foam and applied to the pink base.


I stamped and coloured the Mice Day To Celebrate images.   Here are the Copic colours that I used:-

Mouse - E31, E41, E0000, R21, R20, R00, W1, W0
Cupcake - E44, E43, E42, Y21, YR20, E000, W1, W0
Cake Stand/Party Hat - R20, YR20, W2, W1, W0

Please note above that I use the low W Copic markers to shade and to mute tones for a softer and more vintage appearance.

Images were die cut using the coordinating dies, backed with dimensional foam tape and applied to the scene.  

I then used the Essential Alphabet Die-namics to create the large sentiment.   I die cut once from stick foam sheets and again from white cardstock and adhered the cardstock letters to the foam letters after peeling away the protective top layer revealing the glue.  I masked lines along which to align the letters and adhered them down one word at a time, carefully removing the masking tape after each word was complete.


To finish I used some pretty Nuvo Dream Drops to dot in some interest and with that the card was finished.

Thank you for stopping by my blog today and don't forget to visit and subscribe to the MFT You Tube Channel for endless how-to videos, inspiration and new product reveals.


Wednesday, April 20, 2022

My Favorite Things - Wednesday Sketch Challenge - WSC590

A warm welcome to you for this new Wednesday Sketch Challenge by MFT Stamps!  Please find below my inspiration card and below that you'll see the sketch you will be working with and read on for the details of what I used and how this came together.


I used A2 Stitched Rectangles Stax Die-namics (Set 1) to create both panels of patterned cardstock which were selected from Pretty in Plaid 6 x 6 Paper Pad and from Happy Patterns 6 x 6 Paper Pad which you can find on this page HERE.   I mounted the plaid panel to an A2 white panel and the cloudy panel was adhered with some white craft foam sandwiched behind it to start building dimension.


I stamped my images from Sky High Friends with Memento Ink in Rich Cocoa and I coloured the images with Copic markers.  Here's what I used:-

Balloon Basket - E44, E43, E42, E41
Bunnies - E30, E000, E0000
Bear - T3, T2, T1, T0, C00
Blues - B01, B00, B000, BG0000
Yellows - Y23, E51, E50
Pinks - R20, R00, R000

Images were die cut using the coordinating die-namics and applied to the scene with dimensional foam tape.

To finish the card off I stamped the sentiment from Itty Bitty Baby to an Itty Bitty Strip and applied that along with a few sparkling clear sequin accents.


Wishing you lots of luck with your challenge entries!

Thank you for stopping by my blog today and don't forget to visit and subscribe to the MFT You Tube Channel for endless how-to videos, inspiration and product reveals.


Monday, April 18, 2022

My Favorite Things - Dog Squad

A new day and a new card for MFT Stamps that I created using the new Dog Squad stamp set together with the Tree Builder Die-namics.


The Dog Squad stamp set is a match made in heaven for me since we have 3 beloved Pugs and so I pulled those stamp images from the set and stamped them up first.    I coloured them with the following Copic markers:-

Bodies - E43, E42, E41, E40
Muzzles and Ears - W6, W5, W4, W3, W2, W1, W0, W00

I die cut the images with the coordinating die-namics and set them to one side while I created the background.


Did you spot the fun new Rolling Hills Stencil?  This is what I've used to create my background of 3 different grassy colours.  I dotted in some further interest and then I used the new Tree Builder Die-namics to create my trees - these are fun to make with endless possibilities.   I adhered mine directly to the background and then framed it out using the A2 Rectangle Frames Die-namics - which I couldn't live without!  The frame was applied with dimensional foam tape

I then added my Pugs and stamped the sentiment from Best Dog Friends to a sentiment strip from Essential Stitched Sentiment Die-namics, everything was applied with foam tape.

I kept the embellishments to a minimum and just used some white Nuvo drops for a little 'something and nothing' interest.   Card done!


Thank you for stopping by my blog today and don't forget to visit and subscribe to the MFT You Tube Channel for endless how-to videos, inspiration and product reveals.


Sunday, April 17, 2022

Hello Bluebird Stamps - Pig Day

Hello!  I just wanted to let you know here that you can find me over on the Hello Bluebird blog with all the details on this cute card.


See you over there hopefully!


Saturday, April 16, 2022

My Favorite Things - Number Fun 1

Well hello there and thanks for coming by my blog today where I'm sharing a slimline card for MFT Stamps that features the new stamp set called Number Fun 1 illustrated by Rachelle Anne Miller.


This sweet little stamp set has my heart and the best part is that there will be 9 more released taking us to 10 in total.   I love the sweet simplicity of the image and decided to keep my card simple and ethereal as well.

I stamped the images onto a panel of card stock and coloured with the following Copic colours:-

Bunny - T1, T0, C00
Blanket and Blushes - R21, R20, R00, R000
Number One & Moon/Stars - E51, E50, YR0000, W2, W1
Sky - BG70 plus some of the above colours

I used Slimline Double Stitched Die-namics to die cut the panel.


I stamped the lovely,  sentiment with Versamark Ink and heat embossed in gold then I adhered some clouds made using Cloudy With A Chance Of Rain Die-namics and added a little Stickles glitter to the stars and elsewhere for some subtle interest.

The panel was backed with white craft foam and mounted on a full size slimline panel of coloured card stock which in turn was adhered to my card base and with that the card was complete.


Thank you for stopping by my blog today and don't forget to visit and subscribe to the MFT You Tube Channel for endless how-to videos, inspiration and product reveals.


Friday, April 15, 2022

My Favorite Things - Sunshine Friends

Don't you just love Stacey Yacula illustrations?    My card for MFT Stamps today uses the brand new Sunshine Friends stamp set and coordinating dies.   Read on for all the details.


I ink blended using Speckled Egg and  Crushed Olive Distress Oxide Inks on a panel that was created using A2 Stitched Rectangles Stax Die-namics (Set 1).   I spritzed the panel with water and blotted it up to distress the ink blend a little.

I stamped the sentiment and then backed the panel with white craft foam adhering it to a full size A2 panel and in turn glued it to the card base and set this to one side.


I stamped the images from Sunshine Friends and coloured them with the following Copic markers.

Cherry Blossom Tree - RV02, RV10, RV0000, C0, C00, YG03, E44, E43, E42
Bees - Y28, Y17, Y13, Y02, BG13, BG000
Bear - E43, E42, E41, R21, R00
Duckling - Y19, Y15, Y04, W2, W1
Blue Flower - YG45, YG13, YG03, BG13, BG32, BG0000
Picket Fence - W0

Images were die cut and applied with a single or double layer of dimensional foam tape.   I then stamped the tufts of grass around them using Crushed Olive again but a second generation stamp for softness.

The finishing touch was the addition of the white Nuvo drops accents.


Thank you for stopping by my blog today and don't forget to visit and subscribe to the MFT You Tube Channel for endless how-to videos, inspiration and product reveals.


Thursday, April 14, 2022

My Favorite Things - Color Challenge 187

Welcome to a new colour challenge at MFT Stamps and I hope you are in the mood and can carve out the time to join in the fun.   Below you will find my challenge inspiration card and then the colours you are working with below that.


Products Used In This Card:-


To create my card I first used the Stitched Rectangles to create a panel which I softly ink blended with Speckled Egg Distress Oxide Ink.   I then backed this panel with white craft foam, adhered it to an A2 panel and then to my card base.

I stamped the bouquet image and coloured it with the following Copic markers:-

Poppies - R27, R08, R05, R22
Dark Leaves - YG97, YG95, YG93
Shasta Daisies - Y19, Y15, Y04, W1, W0
Light Leaves - YG06, YG01

I die cut the image and then die cut twice more from white cardstock.  I glued these die cuts in a stack and then glued the stack to my ink blended background.

I chose a sentiment from the stamp set and stamped it and finished the scene with a few sparkling clear sequin accents, keeping it fresh and Springy!


Wishing you all the best with you challenge entries!

Thank you for stopping by my blog today and don't forget to visit and subscribe to the MFT You Tube Channel for endless how-to videos, inspiration and product reveals.


Wednesday, April 13, 2022

My Favorite Things - Wednesday Sketch Challenge 589

Hello and welcome to a brand new Wednesday Sketch Challenge at MFT Stamps.   I'm sharing an inspiration card with you in the hopes that you will enter your own for the challenge and who knows, you may end up the lucky winner!


I created a white slimline panel and where my openings would be I glued some pretty plaid paper from the Pretty In Plaid 6 x 6 Paper Pad.   Over this and adhered with foam tape I layered a panel of Chantilly Cream cardstock that was die cut using the Slimline Starter Die-namics and the Inside & Out Stitched Circle Die-namics.


I stamped images from I Knead You and coloured them with Copic markers - here are the colours I used:-

Top Cat - C5, C3, C1, C0, C00
Middle Cat - E44, E43, E42, E41
Bottom Cat - E13, E11, E21, E30
Rosy Cheeks - R21, R20, R00

Images were die cut using the coordinating die-namics and applied with foam tape.


To finish the card I stamped the sentiment on an Essential Stitched Sentiment strip and applied it under the sleeping cat with foam tape.

A few crystal accents finished off the design.

Best of luck to you with your entries!

Thank you for stopping by my blog today and don't forget to visit and subscribe to the MFT You Tube Channel for endless how-to videos, inspiration and product reveals.


Tuesday, April 12, 2022

My Favorite Things - April Release Day

The MFT Stamps brand new April release is now available for purchase!   The Design Team are joined by guest friends in making a card using items from the new release and for my card I selected to play with Fairy Special.


I created a full size slimline panel using Princess Pink card stock and adhered it to my card base.   I then used the Slimline Double Stitched Rectangles Die-namics to create a feature panel which I ink blended with Speckled Egg Distress Oxide Ink and  and splattered with Peacock Feathers D.O. Ink that was loosened with a bit of water.   I masked across the bottom and stamped the grass image from the Fairy Special stamp set multiple times in two different greens and so that it was soft I was always using a second generation stamping meaning I stamped it off on the side first before stamping on my panel.

I popped the panel in my Misti and stamped the lovely sentiment.   This panel was then backed with craft foam and mounted on the pink panel and set to one side.


Images from Fairy Special were stamped with Memento Ink in Rich Cocoa and coloured with Copic markers.   Here are some of the key colours used:-

Tree - E44, E43, E42, YG45, YG13, YG01
Toadstools - R22, R21, R20 R00, W2, W1, C00
Skin - E11, E21, E0000
Pink Petal Tutu - FRV1, RV02, RV63
Yellow Petal Tutu - FY1, Y17, Y13
Orange Petal Tutu - FYR1, YR04
Fairy Wings - BG15, BG32, BG0000
Bunny - W1, C00
Blushes - R20, R00

The images were die cut using the coordinating die-namics, arranged and applied to the background using foam tape.   For the finishing touch I applied tiny dots of Stickles glitter to the areas surrounding the fairies because ..... magic!


Thank you for stopping by my blog today and don't forget to visit and subscribe to the MFT You Tube Channel for endless how-to videos, inspiration and product reveals.