Wednesday, November 30, 2022

Hello Bluebird Stamps - December Challenge


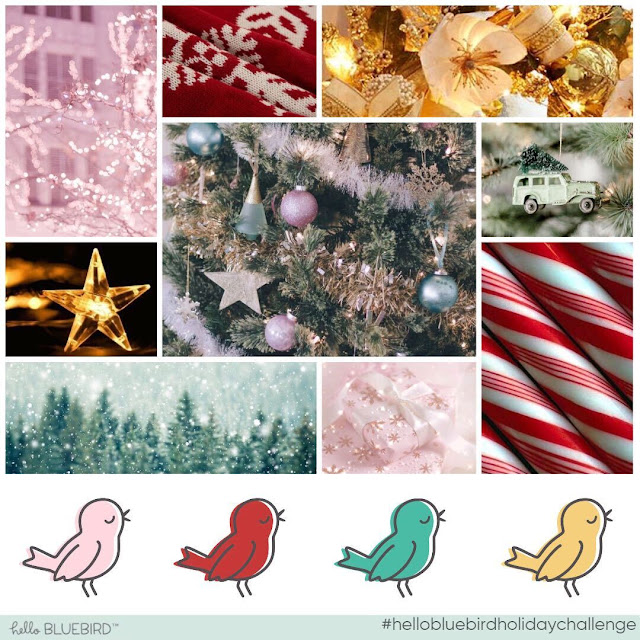
Here's my inspiration card for the new Challenge from Hello Bluebird Stamps.   You can enter the challenge by making a Holiday themed card or by being inspired by the colours from the graphic or as in the case of my card, I combined the two!   Please visit the Hello Bluebird blog to read the rules and dates involved in this challenge.   A randomly selected winner will be selected and will receive a $50 gift certificate to the shop.   Good luck!

Products Used:-

Snowman Hugs Stamps
Snowman Hugs Die
Nesting Deckle A2 Die
Holly & Pine Die
Pine Boughs Die
Hill & Dale

I created a kraft cardstock card base using the largest of the Nesting Deckle dies and scored a line on the back panel to enable to the card to open and stand and then sealed the left edge with Scor-Pal tape.  I made a smaller white card insert to go inside to write on.

I used the next size down in the set to die cut two white panels.   One I ink blended in pink, backed with foam tape and applied to the kraft base, the second one I also die cut using the Hill & Dale Die on then stamped and heat embossed the sentiment in antique gold embossing powder, I backed this piece with foam tape and aligned the deckle edges with the white background panel and adhered.


I stamped the image from Snowman Hugs with Memento Ink in Rich Cocoa and coloured the image with the following Copic marker combinations:-

Squirrel - T6, T5, T4, T3, T2, T1
Snowman - C3, C1, C0, BG10, BG70, T5, T4, T3, T2, T1, YR07, YR04, Y38
Bunny - E42, E41, T3, T2, T1
Blushes - R21, R20, R00
Red - R89, R39, R29, T5, T3
Brown Scarf - E89, E44, E43
White - C3, C1, C0

Points were highlighted and designs made on scarves using a white gel pen and then I die cut and applied with foam tape.

Finishing touches included, creating the pine garnish at the top created using the Holly and Pine Die and the gold glitter bow from the Pine Boughs Die.  I glued the pieces in position and then used acrylic paint and a stylus to dot in a little delicate snowfall.


Tuesday, November 29, 2022

My Favorite Things - Christmas Cash Card Kit - Release Day


MFT's Christmas Cash Card Kit is now available for purchase!  Perhaps you'll pick up what is needed to make tooth fairy cards - so cute!   Here's what I used for this card:-


I created several panels of cardstock to layer up using both using my paper trimmer and the Stitched Rectangles Die-namics.   Before I glued them all together I stamped and heat embossed the sentiment in white and I used a die from the Tooth Fairy Die-namics to make the 'sparkle rays' for behind where her wand would be.


I die cut all the necessary components to build my tooth fairy and adhered the parts together, backed them with foam tape and applied to the scene.

That's all there was to it with this project but when the tooth fairy is going to visit that night, you need a quick card idea in a hurry!

Happy shopping everyone!


Thank you for stopping by my blog today and don't forget to visit and subscribe to the MFT You Tube Channel for endless how-to videos, inspiration and product reveals.


Monday, November 28, 2022

My Favorite Things - Christmas Cash Card Kit - Countdown Day 1


Tomorrow, the Christmas Cash Card Kit will be available at 10am Eastern.   Today my money card focuses on some of the numerous add on stamps and dies that will be available covering a host of different occasions.  Here are the items that I've used:-


I first used the large die from Money Card Die-namics to make two white panels, I masked a line on one panel and stamped with the background stamp above the masked line.   I then stamped the sentiment at the bottom of the same panel and then die cut the opening for the pouch, the frame for the opening and header at the top of the card.  I inserted the pouch and stuck it in place and rolled up a bank note and sealed it in by adhering the second panel to the reverse.


I used Coffee Break Companions Die-namics and MFT's Prestige Cardstock to create the cup and saucer and the coffee beans.    I backed all the pieces with foam tape and applied to the background and I used a white gel pen to highlight a few points and with that the card was complete!


Thank you for stopping by my blog today and don't forget to visit and subscribe to the MFT You Tube Channel for endless how-to videos, inspiration and product reveals.


Sunday, November 27, 2022

My Favorite Things - Christmas Cash Card Kit - Countdown Day 2


Excited to start the countdown to the Christmas Cash Card Kit from MFT Stamps that you can buy at 10am Eastern on November 29th.  Gifting some money for a whole variety of reasons and events is always a good option and this kit has you covered.

Here are the products that I used in the making of my gift card:-


I used the main die from Money Card Die-namics to form the patterned front panel and a white rear panel and I used other dies within the comprehensive set to die cut the head and foot pieces and to die cut the opening for the Lip Balm Pouch which I also framed with an additional die in the set.  I inserted the pouch and adhered on the reverse and rolled up a bank note and inserted it and sealed it all in with the plain back panel.


I stamped the sentiment using the Christmas Cash stamp set and then used the stocking dies from Christmas Compliments to die cut 3 white trimmed red stockings which I backed with foam tape and adhered as if hanging from the mantlepiece.

I'll be back tomorrow with a very different themed money card at 10am Eastern!


Thank you for stopping by my blog today and don't forget to visit and subscribe to the MFT You Tube Channel for endless how-to videos, inspiration and product reveals.


Wednesday, November 23, 2022

My Favorite Things - Wednesday Sketch Challenge - WSC621


Ready for the new Wednesday Sketch Challenge from My Favorite Things?   This is WSC621 and I hope you can carve out a little time for a chance to join in.  Here's what I've used to make my inspiration card:-


I used the stencil and Dried Marigold Distress Oxide Ink to create the background panel over which I layered a white panel that was die cut using the Rolling Clouds Die-namics, this cloud panel was popped up on some white craft foam to start building dimension.


I stamped some of the images from Parachute Pals and coloured them with the following Copic markers:-

Bunnies - E43, E31, E41, E40
Red - R29, R27
White - C3, C1, C0, C00
Blue - B12, BG70
Orange - YR09, YR04, Y38
Cheeks - RV21, RV10

I highlighted a few points and die cut the images and applied them with foam tape.

To finish, I simply stamped the sentiment to a sentiment strip and applied with foam tape and a few sparkling clear sequins finished the simple but very sweet scene.


Thank you for stopping by my blog today and don't forget to visit and subscribe to the MFT You Tube Channel for endless how-to videos, inspiration and product reveals.


Saturday, November 19, 2022


You can find me over on the Hello Bluebird Stamps Blog today with all the details for this new Christmas card using their ever popular Frosty Littles stamp set.  Hope to see you over there!


Thursday, November 17, 2022

My Favorite Things - November Slimline Challenge


Time for a new Slimline Challenge for MFT Stamps.   Mini slimline cards provide a great alternative to the length of a full slimline card while still offering different proportions from a traditional A2 card. Here's the fun part — this month, there's no theme or technique requirement. Push yourself to play with the 3" by 6" size using any products, themes, or techniques in your arsenal.

My inspiration card uses the following products:-


I love creating snowstorm backgrounds and for this one I ink blended a mini slimline panel using Chipped Sapphire and Black Soot Distress Oxide inks.  I then splashed the ink generously with water and then mixed some white acrylic paint with a drop or two of water and tapped it off the end of a little paintbrush onto my project until I had the desired affect.


I stamped the images from Holiday Hello with Memento Ink in Rich Cocoa and coloured them with Copic markers:-

Santa - R89, R39, R29, C3, C1, C0, C00, T5, T4, T3, E04, E11, E21, E00
Reindeer - E44, E31, E41, C3, C1, C00, R89, B99
Picket Fence - B91, BG70, W1
Parcels - E31, W3, W2
Mailbox - T5, T4, T3, T2, R89, E44, E43, E42
Fir Trees - B99, BG70

All images were die cut then added with a single or double layer of dimensional foam tape.

I stamped the sentiment on a Skinny Strip and applied with foam tape and finally I added more splashes of the white acrylic paint over all of the die cut images avoiding some key facial features by covering them with a tiny piece of post it tap whilst I splashed.


Thank you for stopping by my blog today and don't forget to visit and subscribe to the MFT You Tube Channel for endless how-to videos, inspiration and product reveals.


Wednesday, November 16, 2022

My Favorite Things - Wednesday Sketch Challenge - WSC620


Hello and welcome to a new Wednesday Sketch Challenge for MFT Stamps and above you'll see the sketch you're working with this week and I'll tell you all the details for my inspiration card.  Here are the products used:


Such a simple and easy sketch to work with this week.  I ink blended an A2 panel using Stormy Sky and Black Soot Distress Inks, fading it to nothing where there would be snow.   I liberally splashed the ink with water and then splattered with white acrylic paint loosened with a droplet of water.   I trimmed this panel down to a size to suit the sketch, backed it with white craft foam and applied it to a white A2 card panel which in turn was glued to the card base.


I popped the card in my Misti and stamped the sentiment underneath the feature panel per the sketch.

I stamped the images from Jingle All The Way and coloured them with the following Copic marker combinations:-

Trees - YG99, BG96, G85, YG63, G21
Red - R89, R39, R29
White - C3, C1, C0
Reindeer - E44, E43, E42, E41
Skin - E04, E11, E21, E00
Hair - E89, E44, E43, E42
Blush - R85, R83, R81

I die cut and applied the images with dimensional foam tape and highlighted with a white gel pen.

To finish I glittered the stars on top of the trees and added 3 wooden stars.


Thank you for stopping by my blog today and don't forget to visit and subscribe to the MFT You Tube Channel for endless how-to videos, inspiration and product reveals.


Tuesday, November 15, 2022

My Favorite Things - Playful Penguins


Thanks for waddling all the way over to my blog today where I have a new card for MFT Stamps featuring the adorable Yuzu illustrated Playful Penguins stamp set.   Here are the products used in this project:-


To kick things off I first ink blended a mini-slimline panel of white cardstock using a layered blend of Speckled Egg and Cracked Pistachio Distress Oxide Inks.   I then liberally sprinkled water over the ink and then watered down some white acrylic paint and splattered that too.  Once dry I used the Torn Paper Edges Die to give the fun raw edge and I scaled down a mini slimline card base so that it wouldn't show behind the torn edges and glued the background down.


I stamped the Playful Penguins with black ink and used the following Copic markers to colour them:-

Penguin Bodies - T5, T4, T3, C3, C1, C0 , C00, YR04, Y38, Y19
Blushes - RV34, R83, R81, RV000
Brown Cardigan and Scarf - E87, E44, E43, E42, E41
Pink Sweater R81, W4, W3, W2, W1
Igloo - BG11, BG70

Points were highlighted and decorated with a white gel pen and then I die cut the images and applied them to the scene with foam tape.

To finish up, I stamped the sentiment and applied this with foam tape and I stamped Merry Christmas inside my card and I took the smaller of the two star dies from the coordinating die set and die cut some white stars/flakes and popped each one up on a tiny piece of dimensional foam tape.  Card complete!


Thank you for stopping by my blog today and don't forget to visit and subscribe to the MFT You Tube Channel for endless how-to videos, inspiration and product reveals.


Sunday, November 13, 2022

My Favorite Things - Coolest Friends


Thanks for jingling all the way over to my blog today to read the details for this new slimline Christmas card that I've made for My Favorite Things.   Here are the products used in this project:-


I created a background panel by ink blending with Distress Oxide Inks in Spun Sugar, Victorian Velvet and Black Soot and creating a soft focal point.  I then did a lot of splashing with water and then mixed white acrylic paint with a drop or two of water to loosen it up and liberally splattered that mixture by tapping it off the end of a small paint brush.

I created 3 edges using the Torn Paper Die-namics and white cardstock and I quickly ink blended with Victorian Velvet and Black Soot so that a little would show before the next layer and so on, on up and these were glued in a stack to the card base.


I stamped the Coolest Friends images with black ink and coloured the images with the following Copic marker combinations:-

Pink - R83, RV11, T5, T3, T1
Penguins - T5, T4, T3, C3, C1, C0, C00, RV000
Snowmen - R83, RV11, RV000, C3, C1, C0, C00
Brown - E43, E42, E40
Bells - Y21, E0000, T2, T0

I used a white gel pen to highlight certain points and create patterns on their scarves etc then die cut the images and applied them with dimensional foam tape.

I die cut the JINGLE letters from Frosted Alphabet and glued the frosting die cuts to the main letter and then basically to finish the rest of the card it was a whole lot of Stickles glitter 'work'.  I made the letter icing ombré by combining white glitter, merging with silver glitter and then a muted pink glitter to fit the theme.  I also dotted the white glitter around amongst the snow and glittered points on the characters and elsewhere and then I dried it with a mini desk fan for an express finish!


Thank you for stopping by my blog today and don't forget to visit and subscribe to the MFT You Tube Channel for endless how-to videos, inspiration and product reveals.